LuxTrust

Introduction

The LuxTrust smartcard container facilitates communication with card readers with inserted LuxTrust smartcards and LuxTrust Signing Sticks. The T1C-JS client library provides function to communicate with the smart card and facilitates integration into a web or native application. This document describes the functionality provided by the LuxTrust smartcard - which is a PKI container

Interface Summary

The Abstract LuxTrust smartcard interface is summarized in the following snippet:

export interface AbstractLuxTrust {
  allCerts(parseCerts?: boolean, filters?: string[] | Options, callback?: (error: T1CLibException, data: TokenAllCertsResponse) => void): Promise<TokenAllCertsResponse>;
  rootCertificate(parseCerts?: boolean, callback?: (error: T1CLibException, data: TokenCertificateResponse) => void): Promise<TokenCertificateResponse>;
  authenticationCertificate(parseCerts?: boolean, callback?: (error: T1CLibException, data: TokenCertificateResponse) => void): Promise<TokenCertificateResponse>;
  nonRepudiationCertificate(parseCerts?: boolean, callback?: (error: T1CLibException, data: TokenCertificateResponse) => void): Promise<TokenCertificateResponse>;

  allCertsExtended(parseCerts?: boolean, filters?: string[] | Options, callback?: (error: T1CLibException, data: TokenAllCertsExtendedResponse) => void): Promise<TokenAllCertsExtendedResponse>;
  rootCertificateExtended(parseCerts?: boolean, callback?: (error: T1CLibException, data: TokenCertificateExtendedResponse) => void): Promise<TokenCertificateExtendedResponse>;
  authenticationCertificateExtended(parseCerts?: boolean, callback?: (error: T1CLibException, data: TokenCertificateExtendedResponse) => void): Promise<TokenCertificateExtendedResponse>;
  nonRepudiationCertificateExtended(parseCerts?: boolean, callback?: (error: T1CLibException, data: TokenCertificateExtendedResponse) => void): Promise<TokenCertificateExtendedResponse>;

  verifyPin(body: TokenVerifyPinData, callback?: (error: T1CLibException, data: TokenVerifyPinResponse) => void): Promise<TokenVerifyPinResponse>;
  authenticate(body: TokenAuthenticateOrSignData, callback?: (error: T1CLibException, data: TokenAuthenticateResponse) => void): Promise<TokenAuthenticateResponse>;
  sign(body: TokenAuthenticateOrSignData, bulk?: boolean, callback?: (error: T1CLibException, data: TokenSignResponse) => void): Promise<TokenSignResponse>;
  signRaw(body: TokenAuthenticateOrSignData, bulk?: boolean, callback?: (error: T1CLibException, data: TokenSignResponse) => void): Promise<TokenSignResponse>;
  allAlgoRefs(callback?: (error: T1CLibException, data: TokenAlgorithmReferencesResponse) => void): Promise<TokenAlgorithmReferencesResponse>
  resetBulkPin(callback?: (error: T1CLibException, data: BoolDataResponse) => void): Promise<BoolDataResponse>;
}

Additional Remarks

The LuxTrust Signing Stick can be seen as an smartcard integrated in an USB smartcard reader. The use cases described in this wiki are valid for both LuxTrust smartcards as LuxTrust Signing Stick, as there a no technical implementation differences.

Retrieve a connected card reader

In order to start with any use case, we need to select a card reader. The targeted reader will be passed as a parameter to the subsequent methods provided. This is part of the core Trust1Connector functionality. More information about core service functionality can be found on the following page: Core Services.

For demonstration purpose we'll add a simple console output callback, which we'll use throughout the documentation.

function callback(err,data) {
    if(err){console.log("Error:",JSON.stringify(err, null, '  '));}
    else {console.log(JSON.stringify(data, null, '  '));}

Just as an example, we instantiate a new gcl (local client) and ask for all connected smart card readers:

T1CSdk.T1CClient.initialize(config).then(res => {
    client = res;
    client.core().readers(callback);
}, err => {
    console.error(error)
});

This will returns us all connected readers:

{
  "data": [
    {
      "card": {
        "atr": "3B7D94000080318065B0831100C883009000",
        "description": [
          "personal identity card (ID card)",
          "LuxTrust card"
        ]
      },
      "id": "c8d31f8fed44d952",
      "name": "Identiv uTrust 4701 F Dual Interface Reader(1)",
      "pinpad": false
    },
    {
      "id": "ec3109c84ee9eeb5",
      "name": "Identiv uTrust 4701 F Dual Interface Reader(2)",
      "pinpad": false
    }
  ],
  "success": true
}

In the example you'll notice that we are using a dual interface uTrust reader and a card has been inserted.

The reader id 'c8d31f8fed44d952' can be used as parameter in the next steps in order to select a smartcard reader for the functionality we want to execute. The pinpad property can be used to decided whether to pass the pin property to the reader (e.g. when verifying the pin).

Certificates

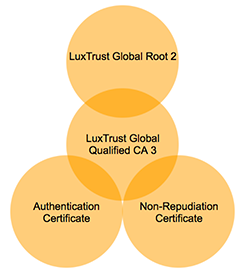
Exposes all the certificates publicly available on the smart card. The following certificates can be found on the card:

  • Root certificate

  • Intermediate certificate

  • Authentication certificate

  • Non-repudiation certificate

T1C-JS will return the raw base64 certificate, optionally it can also return an object representing the certificate as parsed by PKI.js. To enable parsing, parseCerts must be set to true.

The root and intermediate certificates are both stored as root certificates.

Certificate Chain

Extended certificates

You can also fetch the extended versions of the certificates via the functions

allCertsExtended(parseCerts?: boolean, filters?: string[] | Options, callback?: (error: T1CLibException, data: TokenAllCertsExtendedResponse) => void): Promise<TokenAllCertsExtendedResponse>;
authenticationCertificateExtended(parseCerts?: boolean, callback?: (error: T1CLibException, data: TokenCertificateExtendedResponse) => void): Promise<TokenCertificateExtendedResponse>;
nonRepudiationCertificateExtended(parseCerts?: boolean, callback?: (error: T1CLibException, data: TokenCertificateExtendedResponse) => void): Promise<TokenCertificateExtendedResponse>;
rootCertificateExtended(parseCerts?: boolean, callback?: (error: T1CLibException, data: TokenCertificateExtendedResponse) => void): Promise<TokenCertificateExtendedResponse>;

this has the capabilities to return multiple certificates if the token has multiple of this type.

for a single certificate the response looks like:

{
    "success" : true
    "data" : {
        "certificates": [{
            "certificate"?: string,
            "certificateType"?: string,
            "id"?: string,
            "subject"?: string,
            "issuer"?: string,
            "serialNumber"?: string,
            "url"?: string,
            "hashSubPubKey"?: string,
            "hashIssPubKey"?: string,
            "exponent"?: string,
            "remainder"?: string,
            "parsedCertificate"?: Certificate
        }]
    }
}

the allCertsExtended returns the following, with the contents of the certificates as the one you can see above;

{
    "success" : true
    "data" : {
        "authenticationCertificate": {
            "certificates": [...]
        },
        "nonRepudiationCertificate": {
            "certificates": [...]
        },
        "rootCertificate": {
            "certificates": [...]
        }        
   }
}

Root Certificate

Contains the 'root certificate' stored on the smart card. The root certificate is used to sign the 'intermediate certificate'. The service can be called:

client.luxtrust(reader_id).rootCertificate({ parseCerts: true }, callback);

Response:

{
    success: true,
    data: {
        certificate?: string,
        certificates?: Array<string>,
        certificateType?: string,
        id?: string,
        parsedCertificate?: Certificate,
        parsedCertificates?: Array<Certificate>
    }    
}

There are 2 root certificates on the card, one is the issuer certificate of the intermediate

Authentication Certificate

Contains the 'authentication certificate' stored on the smart card. The 'authentication certificate' contains the public key corresponding to the private RSA authentication key. The 'authentication certificate' is needed for pin validation, authentication and singing. The service can be called:

client.luxtrust(reader_id).authenticationCertificate({ parseCerts: true }, callback);

Response:

{
    success: true,
    data: {
        certificate?: string,
        certificates?: Array<string>,
        certificateType?: string,
        id?: string,
        parsedCertificate?: Certificate,
        parsedCertificates?: Array<Certificate>
    }    
}

Signing Certificate

Contains the 'non-repudiation certificate' stored on the smart card. The 'non-repudiation certificate' contains the public key corresponding the private RSA non-repudiation key. The service can be called:

client.luxtrust(reader_id).signingCertificate({ parseCerts: true }, callback);

Response:

{
    success: true,
    data: {
        certificate?: string,
        certificates?: Array<string>,
        certificateType?: string,
        id?: string,
        parsedCertificate?: Certificate,
        parsedCertificates?: Array<Certificate>
    }    
}

Data Filter

Filter Certificates

All certificates on the smart card can be dumped at once, or using a filter. In order to read all certificates at once:

var filter = [];
client.luxtrust(reader_id).allCerts({ filters: filter, parseCerts: true }, callback);

Response:

{
 "rootCertificate": {
  ...
 },
 "authenticationCertificate": {
  ...
 },
 "nonRepudiationCertificate": {
  ...
 }
}

The filter can be used to ask a list of custom data containers. For example, we want to read only the 'root-certificate' and the 'authentication_certificate':

var filter = ['authentication-certificate'];
client.luxtrust(reader_id).allCerts({ filters: filter, parseCerts: true }, callback);

Response:

{
 "rootCertificate": {
  ...
 }
}

Sign Data

Data can be signed using the LuxTrust smartcard and Signing Stick. To do so, the T1C-GCL facilitates in:

  • Retrieving the certificate chain (root, intermediate and non-repudiation certificate)

  • Perform a sign operation (private key stays on the smart card)

  • Return the signed hash

To get the certificates necessary for signature validation in your back-end:

var filter = ['root-certificates','authentication-certificate','signing-certificate'];
client.luxtrust(reader_id).allCertificates({ filters: filter, parseCerts: false }, callback);

Response:

{
 "rootCertificate": {
  ...
 },
 "authenticationCertificate": {
  ...
 },
 "nonRepudiationCertificate": {
  ...
 }
}

Depending on the connected smart card reader. A sign can be executed in 2 modes:

  • Using a connected card reader with 'pin-pad' capabilities (keypad and display available)

  • Using a connected card reader without 'pin-pad' capabilities (no keypad nor display available)

Security consideration: In order to sign a hash, security considerations prefer using a 'pin-pad'.

Sign Hash

When the web or native application is responsible for showing the password input, the following request is used to sign a given hash:

Without a pinpad reader

var data = {
      "pin":"...",
      "algorithm":"sha1",
      "data":"I2e+u/sgy7fYgh+DWA0p2jzXQ7E="
}
client.luxtrust(reader_id).sign(data, callback);

With a pinpad reader

var data = {
      "algorithm":"sha1",
      "data":"I2e+u/sgy7fYgh+DWA0p2jzXQ7E="
}
client.luxtrust(reader_id).sign(data, callback);

Response is a base64 encoded signed hash:

{
  "success": true,
  "data": "W7wqvWA8m9SBALZPxN0qUCZfB1O/WLaM/silenLzSXXmeR+0nzB7hXC/Lc/fMru82m/AAqCuGTYMPKcIpQG6MtZ/SGVpZUA/71jv3D9CatmGYGZc52cpcb7cqOVT7EmhrMtwo/jyUbi/Dy5c8G05owkbgx6QxnLEuTLkfoqsW9Q="
}

The 'authentication_reference' property can contain the following values: sha1 and sha256.

Avoid using SHA-1: is deprecated on the interface and will not be available in the future

The LuxTrust smartcard and Signing Stick is not supporting SHA512 at the moment.

Calculate Hash

In order to calculate a hash from the data to sign, you need to know the algorithm you will use in order to sign. You might have noticed the algorithm_reference property provided in the sign request. The algorithm_reference can be one of the values: sha1, sha256. For example, we want the following text to be signed using sha256:

This is sample text to demonstrate siging with LuxTrust smartcard or signing stick

You can use the following online tool to calculate the SHA256: calculate SHA256

Hexadecimal result:

135b870026cfbe12dec348069811fcde5bed28800ac54dbf45ecdf04eb13e95b

Notice that the length of the SHA256 is always the same. Now we need to convert the hexadecimal string to a base64-encoded string, another online tool can be used for this example: hex to base64 converter

Base64-encoded result:

E1uHACbPvhLew0gGmBH83lvtKIAKxU2/RezfBOsT6Vs=

Now we can sign the data (remove the pin property for pinpad readers):

var data = {
      "pin":"...",
      "algorithm":"sha256",
      "data":"E1uHACbPvhLew0gGmBH83lvtKIAKxU2/RezfBOsT6Vs="
}
client.luxtrust(reader_id).sign(data, callback);

Result:

{
  "data": "C7SG5eix1+lzMcZXgL0bCL+rLxKhd8ngrSj6mvlgooWH7CloEU13Rj8QiQHdhHnZgAi4Q0fCMIqAc4dn9uW9OP+MRitimRpYZcaDsGrUehPi/JpOD1e+ko7xKZ67ijUU4KTmG4HXc114oJ7xxx3CGL7TNFfvuEphLbbZa+9IZSSnYDOOENJqhggqqu7paSbLJrxC2zaeMxODKb5WSexHnZH6NnLPl2OmvPTYtxiTUMrLbFRsDRAziF6/VQkgM8/xOm+1/9Expv5DSLRY8RQ+wha6/nMlJjx50JszYIj2aBQKp4AOxPVdPewVGEWF4NF9ffrPLrOA2v2d7t5M4q7yxA==",
  "success": true
}

Raw data signing

With the function signRaw you can sign unhashed document data. This means that the Trust1Connector will hash the value itself depending on the provided sign algorithm.

Trust1Connector only supports SHA2 hashing at this point.

When using SHA3, the Trust1Connector will convert to SHA2 implicitly.

Below you can find an example

var data = {
      "algorithm":"sha256",
      "data":"vl5He0ulthjX+VWNM46QX7vJ8VvXMq2k/Tq8Xq1bwEw=",
      "osDialog": false
}
luxtrustClient.signRaw(data, callback);

The function looks the same as a regular sign operation but expects a base64 data object that is unhashed.

Supported hash functions (SHA2) are;

  • SHA256

  • SHA384

  • SHA512

Verify PIN

When the web or native application is responsible for showing the password input, the following request is used to verify a card holder PIN:

Without a pinpad reader

var data = {
      "pin":"..."
}
client.luxtrust(reader_id).verifyPin(data, callback);

With a pinpad reader

var data = {}
client.luxtrust(reader_id).verifyPin(data, callback);

Response:

{
  "success": true
}

Authentication

The T1C-GCL is able to authenticate a card holder based on a challenge. The challenge can be:

  • provided by an external service

provided by the smart card An authentication can be interpreted as a signature use case, the challenge is signed data, that can be validated in a back-end process.

External Challenge

An external challenge is provided in the data property of the following example:

Without a pinpad reader

var data = {
  "pin": "...",
  "algorithm_reference": "sha1",
  "data":"I2e+u/sgy7fYgh+DWA0p2jzXQ7E="
}
client.luxtrust(reader_id).authenticate(data, callback);

With a pinpad reader

var data = {
  "algorithm_reference": "sha1",
  "data":"I2e+u/sgy7fYgh+DWA0p2jzXQ7E="
}
client.luxtrust(reader_id).authenticate(data, callback);

Response:

{
  "success": true,
  "data": "W7wqvWA8m9SBALZPxN0qUCZfB1O/WLaM/silenLzSXXmeR+0nzB7hXC/Lc/fMru82m/AAqCuGTYMPKcIpQG6MtZ/SGVpZUA/71jv3D9CatmGYGZc52cpcb7cqOVT7EmhrMtwo/jyUbi/Dy5c8G05owkbgx6QxnLEuTLkfoqsW9Q="
}

Take notice that the PIN property can be omitted when using a smart card reader with pin-pad capabilities. The 'algorithm_reference' property can contain the following values: sha1 and sha256.

Generated Challenge

A server generated challenge can be provided to the JavaScript library. In order to do so, an additional contract must be provided with the 'OCV API' (Open Certificate Validation API).

The calculated digest of the hash is prefixed with:
DigestInfo ::= SEQUENCE {
      digestAlgorithm AlgorithmIdentifier,
      digest OCTET STRING
  }
Make sure this has been taken into consideration in order to validate the signature in a backend process.

Error Handling

Error Object

The functions specified are asynchronous and always need a callback function. The callback function will reply with a data object in case of success, or with an error object in case of an error. An example callback:

function callback(err,data) {
    if(err){
        console.log("Error:",JSON.stringify(err, null, '  '));
    }
    else {
        console.log(JSON.stringify(data, null, '  '));
    }
}

The error object returned:

{
  success: false,
  description: "some error description",
  code: "some error code"
}

For the error codes and description, see Status codes..

Last updated