Loading...
Loading...
Loading...
Loading...
Loading...
Loading...
Loading...
Loading...
Loading...
Loading...
Loading...
Loading...
Loading...
Loading...
Loading...
Loading...
Loading...
Loading...
Loading...
Loading...
Loading...
Loading...
Loading...
Loading...
Loading...
Loading...
Loading...
Loading...
Loading...
Loading...
Loading...
Loading...
Loading...
Loading...
Loading...
Loading...
Loading...
Loading...
Loading...
Loading...
Loading...
Loading...
Loading...
Loading...
Loading...
Loading...
Loading...
Loading...
Loading...
Loading...
Loading...
Loading...
Loading...
Loading...
Loading...
Loading...
Loading...
Loading...
Loading...
Loading...
Loading...
Loading...
Loading...
Loading...
Loading...
Loading...

T1CSdk.T1CClient.initialize(config).then(res => {
var coreService = res.core();
core.readers(callback);
}){
"success": true,
"data": [
{
"id": "57a3e2e71c48cee9",
"name": "Bit4id miniLector",
"pinpad": false,
"card": {
"atr": "3B9813400AA503010101AD1311",
"description": [
"Belgium Electronic ID card (eID)"
],
"module": ["beid"]
}
}
]
}{
"data": [
{
"id": "ec3109c84ee9eeb5",
"name": "Identiv uTrust 4701 F Dual Interface Reader(2)",
"pinpad": false
},
{
"card": {
"atr": "3B9813400AA503010101AD1311",
"description": [
"Belgium Electronic ID card"
],
"module": ["beid"]
},
"id": "57a3e2e71c48cee9",
"name": "Bit4id miniLector",
"pinpad": false
},
{
"id": "c8d31f8fed44d952",
"name": "Identiv uTrust 4701 F Dual Interface Reader(1)",
"pinpad": false
}
],
"success": true
}{
"data": [
{
"card": {
"atr": "3B9813400AA503010101AD1311",
"description": [
"Belgium Electronic ID card"
],
"module": ["beid"]
},
"id": "57a3e2e71c48cee9",
"name": "Bit4id miniLector",
"pinpad": false
}
],
"success": true
}{
"data": [
{
"card": {
"atr": "3B9813400AA503010101AD1311",
"description": [
"Belgium Electronic ID card"
]
},
"id": "57a3e2e71c48cee9",
"name": "Bit4id miniLector",
"pinpad": false
}
],
"success": true
}{
"data": [
{
"id": "ec3109c84ee9eeb5",
"name": "Identiv uTrust 4701 F Dual Interface Reader(2)",
"pinpad": false
},
{
"card": {
"atr": "3B67000000000000009000",
"description": [
"MisterCash & Proton card",
"VISA Card (emitted by Bank Card Company - Belgium)"
],
"module": ["emv"]
},
"id": "e5863fcc71478871",
"name": "Gemalto Ezio Shield Secure Channel",
"pinpad": true
},
{
"card": {
"atr": "3B9813400AA503010101AD1311",
"description": [
"Belgium Electronic ID card"
]
"module": ["beid"]
},
"id": "57a3e2e71c48cee9",
"name": "Bit4id miniLector",
"pinpad": false
},
{
"id": "c8d31f8fed44d952",
"name": "Identiv uTrust 4701 F Dual Interface Reader(1)",
"pinpad": false
}
],
"success": true
}T1CSdk.T1CClient.initialize(config).then(client => {
var core = client.core();
core.readersExcludeByName("Bit4id,hello", callback);
}, err => {
console.error(err);
});{
"data": [
],
"success": true
}T1CSdk.T1CClient.initialize(config).then(client => {
var coreService = client.core();
core.readersCardAvailable(callback);
}, err => {
console.error(err);
});{
"data": [
{
"card": {
"atr": "3B9813400AA503010101AD1311",
"description": []
},
"id": "57a3e2e71c48cee9",
"name": "Bit4id miniLector",
"pinpad": false
}
],
"success": true
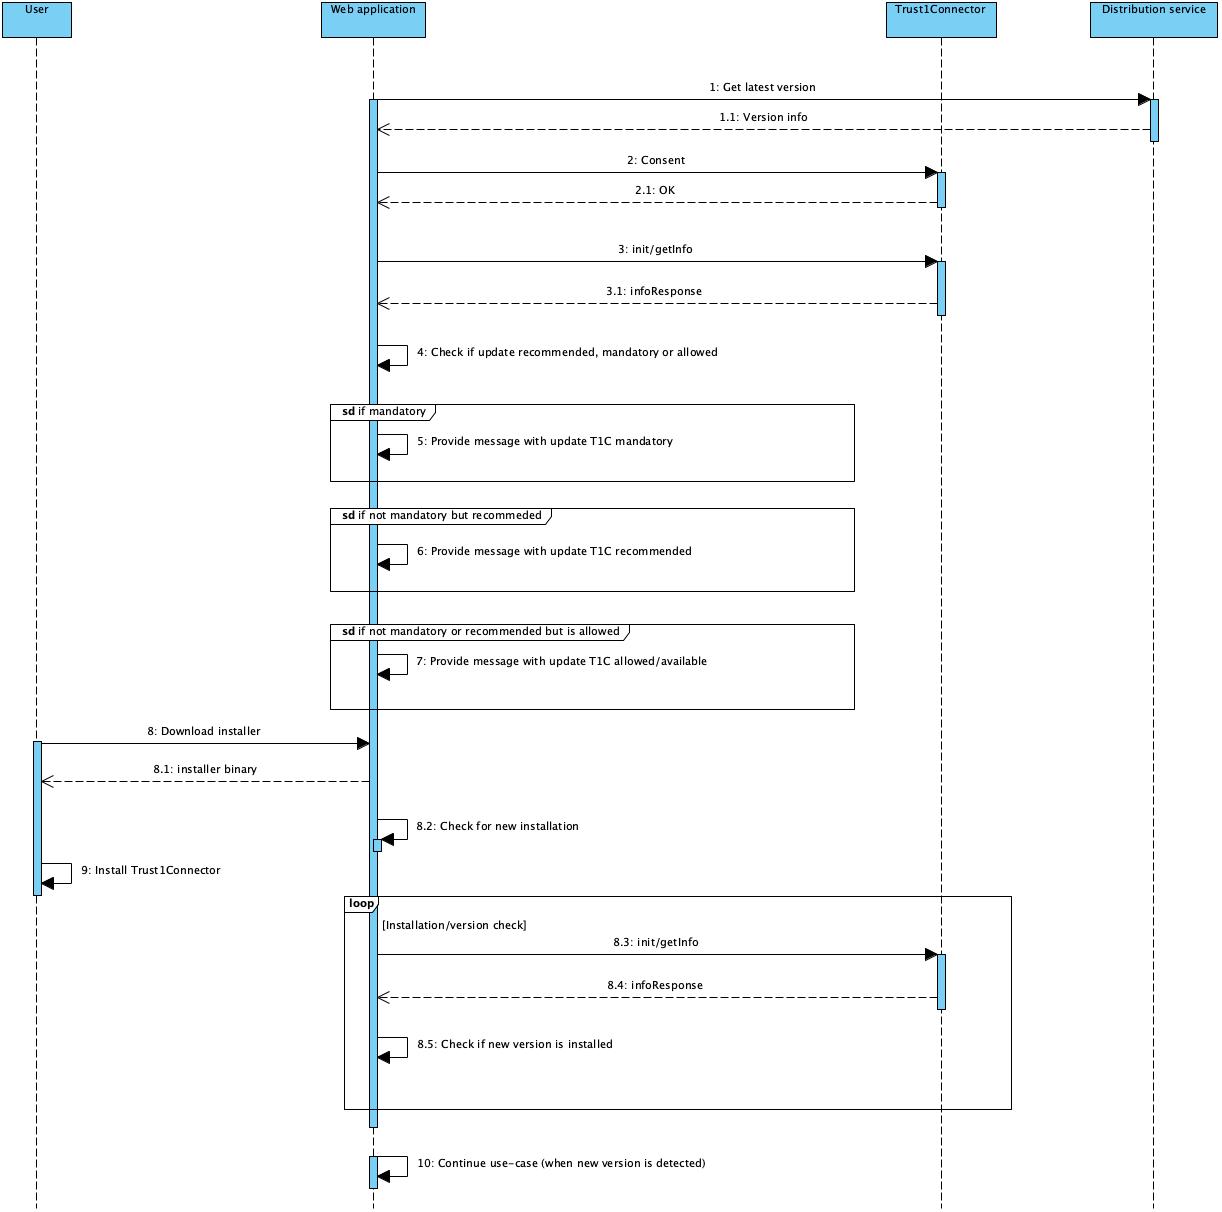
}How the Trust1Connector solves the DNS rebind issue
{
"success": true,
"data": "eyJraWQiOiJ0MWNkcyIsImFsZyI6IlJTMjU2In0...v8_Mg2PfdhCMQ"
}{
"message": "No API key found in request"
}{
"success": false,
"description": "Invalid API key",
"code": 1005,
}class T1CConfigOptions {
constructor(
public t1cApiUrl?: string,
public t1cApiPort?: string,
public t1cProxyUrl?: string, // deprecated
public t1cProxyPort?: string, // deprecated
public jwt?: string,
public applicationDomain?: string, // "rmc.t1t.be"
) {}
}// ...
let environment = {
t1cApiUrl: 'https://t1c.t1t.io',
t1cApiPort: '51983',
t1cProxyUrl: 'https://t1c.t1t.io',
t1cProxyPort: '51983',
jwt: 'eyJraWQiOiJ0MWNkcyIsImFsZyI6IlJTMjU2In0..._Mg2PfdhCMQ',
applicationDomain: 'test-app'
};
const configoptions = new T1CSdk.T1CConfigOptions(
environment.t1cApiUrl,
environment.t1cApiPort,
environment.t1cProxyUrl,
environment.t1cProxyPort,
environment.jwt,
environment.applicationDomain
);
config = new T1CSdk.T1CConfig(configoptions);
// ...// When remote DS is used set the following parameter
config.dsUrl = "https://acc-ds.t1t.io";// ...
T1CSdk.T1CClient.initialize(config).then(res => {
client = res;
console.log("Client config: ", client.localConfig);
core = client.core();
core.version().then(versionResult => console.log("T1C running on core "+ versionResult));
}, err => {
if (err.code == 814500 || err.code == 814501) {
client = err.client;
// (new) Consent is required
}
else if(err.code == 112999) {
// Could not connect with the Trust1Connector
} else {
// an uncatched error occured
console.error("T1C error:", err)
}
});
// ...public getImplicitConsent(codeWord: string, durationInDays?: number,
callback?: (error?: T1CLibException, data?: T1CClient) => void
): Promise<T1CClient>client.core().getImplicitConsent(document.querySelector(".clipboard-data").innerHTML).then(res => {
console.log("Consent Executed")
client = res;
// Use the client for your use-cases
}, err => {
// Failed, use the error client to retry the consent
this.client = err.client;
console.error(err.description ? err.description : err)
})// Global client to be used over the entire application
const client = null
// Prepare the configuration
let environment = {
t1cApiUrl: 'https://t1c.t1t.io',
t1cApiPort: '51983',
t1cProxyUrl: 'https://t1c.t1t.io',
t1cProxyPort: '51983',
jwt: 'eyJraWQiOiJ0MWNkcyIsImFsZyI6IlJTMjU2In0..._Mg2PfdhCMQ',
applicationDomain: 'test-app'
};
const configoptions = new T1CSdk.T1CConfigOptions(
environment.t1cApiUrl,
environment.t1cApiPort,
environment.t1cProxyUrl,
environment.t1cProxyPort,
environment.jwt,
environment.applicationDomain
);
config = new T1CSdk.T1CConfig(configoptions);
// Initialize the Trust1Connector with the previously created configuration object
T1CSdk.T1CClient.initialize(config).then(res => {
client = res;
console.log("Client config: ", client.localConfig);
core = client.core();
core.version().then(versionResult => console.log("T1C running on core "+ versionResult));
}, err => {
if (err.code == 814500 || err.code == 814501) {
// (new) Consent is required
}
else if(err.code == 112999) {
// Could not connect with the Trust1Connector
} else {
// an uncatched error occured
console.error("T1C error:", err)
}
});
// when the user has clicked on the clipboard/consent button we execute the getImplicitConsent function
document.querySelector(".clipboard").addEventListener("click", (ev) => {
if (client != null) {
client.core().getImplicitConsent(document.querySelector(".clipboard-data").innerHTML).then(res => {
console.log("Consent Executed")
client = res;
// Use the client for your use-cases
}, err => {
this.client = err.client;
console.error(err.description ? err.description : err)
})
}
})// ...
T1CSdk.T1CClient.initializeExplicitConsent(config).then(res => {
client = res;
console.log("Client config: ", client.localConfig);
core = client.core();
core.version().then(versionResult => console.log("T1C running on core "+ versionResult));
}, err => {
if (err.code == 814500 || err.code == 814501) {
client = err.client;
// (new) Consent is required
}
else if(err.code == 112999) {
// Could not connect with the Trust1Connector
} else {
// an uncatched error occured
console.error("T1C error:", err)
}
});
// ...const tokenNode = document.querySelector('.consent-token');
var range = document.createRange();
range.selectNode(tokenNode);
window.getSelection().addRange(range);
try {
// Now that we've selected the anchor text, execute the copy command
document.execCommand('copy');
} catch(err) {
console.log('Oops, unable to copy');
}
// Remove the selections - NOTE: Should use
// removeRange(range) when it is supported
window.getSelection().removeRange(range);
const clipboardData = tokenNode.textContent;public static generateConsentToken(): string# regular imported javascript via script tag
T1CSdk.T1CClient.generateConsentToken()# Import loaded via NPM
import {T1CClient} from "t1c-sdk-js";
T1CClient.generateConsentToken()T1CSdk.T1CClient.initialize(config).then(res => {
client = res;
console.log("Client config: ", client.localConfig)
core = client.core();
}, err => {
if(err.code == 814501 || err.code == 814500) {
console.log(err)
client = err.client
$('#consentModal').modal('show', {
keyboard: false
});
$('.consent-token').text(client.core().generateConsentToken());
} else if (err.code == 112999) {
// Unavailable
} else {
console.error("T1C error:", err)
}
}); $('#consentModal .btn-primary').on('click', (ev) => {
const tokenNode = document.querySelector('.consent-token');
var range = document.createRange();
range.selectNode(tokenNode);
window.getSelection().addRange(range);
try {
document.execCommand('copy');
} catch (err) {
console.log('Oops, unable to copy');
}
window.getSelection().removeRange(range);
const clipboardData = tokenNode.textContent;
const validityInDays = 365
client.core().getImplicitConsent(clipboardData, validityInDays).then(consentRes => {
client = consentRes // replace the client and other set variables of the T1C
core = client.core();
core.version().then(versionResult => console.log("T1C running on core " + versionResult));
$('#consentModal').modal('hide');
}, err => {
console.error(err)
})
});
export class ModuleDescriptionResponse extends DataObjectResponse {
constructor(public data: TokenModuleDescription, public success: boolean) {
super(data, success);
}
}
export class TokenCertificateResponse extends T1CResponse {
constructor(public data: TokenCertificate, public success: boolean) {
super(success, data);
}
}
export class TokenCertificate {
constructor(
public certificate?: string,
public certificates?: Array<string>,
public certificateType?: string,
public id?: string,
public parsedCertificate?: Certificate,
public parsedCertificates?: Array<Certificate>
) {}
}
export class TokenAddressResponse extends DataObjectResponse {
constructor(public data: TokenAddressData, public success: boolean) {
super(data, success);
}
}
export class TokenPictureResponse extends DataObjectResponse {
constructor(public data: TokenPictureData, public success: boolean) {
super(data, success);
}
}
export class TokenVerifyPinResponse extends DataObjectResponse {
constructor(public data: TokenVerifyPinResponseData, public success: boolean) {
super(data, success);
}
}
export class TokenVerifyPinResponseData {
constructor(
public verified: boolean
) {}
}
export class TokenSignResponse extends DataObjectResponse {
constructor(public data: TokenSignResponseData, public success: boolean) {
super(data, success);
}
}
export class TokenSignResponseData {
constructor(
public data?: string
) {}
}
export class TokenAuthenticateResponse extends DataObjectResponse {
constructor(public data: TokenAuthenticateResponseData, public success: boolean) {
super(data, success);
}
}
export class TokenAuthenticateResponseData {
constructor(
public data?: string
) {}
}
export class TokenModuleDescription {
constructor(
public desc: string
) {}
}
export class TokenAddressData {
constructor(
public municipality?: string,
public rawData?: string,
public signature?: string,
public streetAndNumber?: string,
public version?: number,
public zipcode?: string
) {}
}
export class TokenAllDataResponse extends DataObjectResponse {
constructor(public data: TokenAllData, public success: boolean) {
super(data, success);
}
}
export class TokenAllData {
constructor(
public picture?: TokenPictureData,
public biometric?: TokenBiometricData,
public address?: TokenAddressData,
) {}
}
export class TokenPictureData {
constructor(
public picture?: string,
public signature?: string,
public width?: number,
public height?: number,
) {}
}
export class TokenData {
constructor(
public rawData?: string,
public version?: string,
public serialNumber?: string,
public label?: string,
public prnGeneration?: string,
public eidCompliant?: string,
public graphicalPersoVersion?: string,
public versionRfu?: string,
public electricalPersoVersion?: string,
public electricalPersoInterfaceVersion?: string,
public changeCounter?: number,
public activated?: string,
) {}
}
export class TokenDataResponse extends DataObjectResponse {
constructor(public data: TokenData, public success: boolean) {
super(data, success);
}
}
export class TokenBiometricData {
constructor(
public birthDate?: string,
public birthLocation?: string,
public cardDeliveryMunicipality?: string,
public cardNumber?: string,
public cardValidityDateBegin?: string,
public cardValidityDateEnd?: string,
public chipNumber?: string,
public documentType?: string,
public firstNames?: string,
public name?: string,
public nationalNumber?: string,
public nationality?: string,
public nobleCondition?: string,
public pictureHash?: string,
public rawData?: string,
public sex?: string,
public signature?: string,
public specialStatus?: string,
public thirdName?: string,
public version?: number,
public issuer?: string
) {}
}
export class TokenBiometricDataResponse extends DataObjectResponse {
constructor(public data: TokenBiometricData, public success: boolean) {
super(data, success);
}
}
export class TokenAlgorithmReferencesResponse {
constructor(public data: TokenAlgorithmReferences, public success: boolean) {
}
}
export class TokenAlgorithmReferences {
constructor(public ref: Array<string>) {
}
}
export class TokenResetPinResponse {
constructor(public data: TokenResetPin, public success: boolean) {
}
}
export class TokenResetPin {
constructor(public verified: boolean) {
}
}
export class PinType {
static PIN = 'Pin';
static CAN = 'Can';
}
// Requests
export class TokenAuthenticateOrSignData {
constructor(public algorithm: string, public data: string, public pin?: string, public pace?: string, public id?: string, public osDialog?: boolean, public txId?: string, public language?: string, public base64Encoded?: boolean, public timeout?: number) {
}
}
export class TokenVerifyPinData {
constructor(public pin?: string, public pace?: string, public osDialog?: boolean, public base64Encoded?: boolean, public timeout?: number) {
}
}
export enum TokenResetPinReferenceType {
issign = "issign",
isauthenticate = "isauthenticate",
isencrypt = "isencrypt"
}
export class TokenResetPinData {
constructor(
public puk: string,
public pin?: string,
public resetOnly?: boolean,
public osDialog?: boolean,
public reference?: TokenResetPinReferenceType,
public base64Encoded?: boolean) {
}
}
export class PaymentVerifyPinData {
constructor(public pin?: string, public osDialog? :boolean, public base64Encoded?: boolean, public timeout?: number) {
}
}
export class PaymentSignData {
constructor(public txId: string, public language: string, public data: string, public timeout?: number) {
}
}
export class TokenCertificateExtendedResponse extends T1CResponse {
constructor(public data: TokenCertificateExtended, public success: boolean) {
super(success, data);
}
}
export class TokenCertificateExtended {
constructor(
public certificates?: Array<T1CCertificate>
) {
}
}
export class T1CCertificate {
constructor(
public certificate?: string,
public certificateType?: string,
public id?: string,
public subject?: string,
public issuer?: string,
public serialNumber?: string,
public url?: string,
public hashSubPubKey?: string,
public hashIssPubKey?: string,
public exponent?: string,
public remainder?: string,
public parsedCertificate?: Certificate
) {
}
}
export class TokenVersionResponse extends T1CResponse {
// use union type to be backwards compatible with versions before 3.6.0
constructor(
public data: TokenVersion,
public success: boolean,
public signature?: string
) {
super(success, data, signature);
}
}
export class TokenVersion {
constructor(
version: string,
) {}
}export interface AbstractEidGeneric {
allData(module: string, filters?: string[] | Options, callback?: (error: T1CLibException, data: TokenAllDataResponse) => void): Promise<TokenAllDataResponse>;
allCerts(module: string, parseCerts?: boolean, filters?: string[] | Options, callback?: (error: T1CLibException, data: TokenAllCertsResponse) => void): Promise<TokenAllCertsResponse>;
biometric(module: string, callback?: (error: T1CLibException, data: TokenBiometricDataResponse) => void): Promise<TokenBiometricDataResponse>;
tokenData(module: string, callback?: (error: T1CLibException, data: TokenInfoResponse) => void): Promise<TokenInfoResponse>;
address(module: string, callback?: (error: T1CLibException, data: TokenAddressResponse) => void): Promise<TokenAddressResponse>;
picture(module: string, callback?: (error: T1CLibException, data: TokenPictureResponse) => void): Promise<TokenPictureResponse>;
rootCertificate(module: string, parseCerts?: boolean, callback?: (error: T1CLibException, data: TokenCertificateResponse) => void): Promise<TokenCertificateResponse>;
intermediateCertificates(module: string, parseCerts?: boolean, callback?: (error: T1CLibException, data: TokenCertificateResponse) => void): Promise<TokenCertificateResponse>;
authenticationCertificate(module: string, parseCerts?: boolean, callback?: (error: T1CLibException, data: TokenCertificateResponse) => void): Promise<TokenCertificateResponse>;
nonRepudiationCertificate(module: string, parseCerts?: boolean, callback?: (error: T1CLibException, data: TokenCertificateResponse) => void): Promise<TokenCertificateResponse>;
encryptionCertificate(module: string, parseCerts?: boolean, callback?: (error: T1CLibException, data: TokenCertificateResponse) => void): Promise<TokenCertificateResponse>;
issuerCertificate(module: string, parseCerts?: boolean, callback?: (error: T1CLibException, data: TokenCertificateResponse) => void): Promise<TokenCertificateResponse>;
allCertsExtended(module: string, parseCerts?: boolean, filters?: string[] | Options, callback?: (error: T1CLibException, data: TokenAllCertsExtendedResponse) => void): Promise<TokenAllCertsExtendedResponse>;
rootCertificateExtended(module: string, parseCerts?: boolean, callback?: (error: T1CLibException, data: TokenCertificateExtendedResponse) => void): Promise<TokenCertificateExtendedResponse>;
intermediateCertificatesExtended(module: string, parseCerts?: boolean, callback?: (error: T1CLibException, data: TokenCertificateExtendedResponse) => void): Promise<TokenCertificateExtendedResponse>;
authenticationCertificateExtended(module: string, parseCerts?: boolean, callback?: (error: T1CLibException, data: TokenCertificateExtendedResponse) => void): Promise<TokenCertificateExtendedResponse>;
nonRepudiationCertificateExtended(module: string, parseCerts?: boolean, callback?: (error: T1CLibException, data: TokenCertificateExtendedResponse) => void): Promise<TokenCertificateExtendedResponse>;
encryptionCertificateExtended(module: string, parseCerts?: boolean, callback?: (error: T1CLibException, data: TokenCertificateExtendedResponse) => void): Promise<TokenCertificateExtendedResponse>;
issuerCertificateExtended(module: string, parseCerts?: boolean, callback?: (error: T1CLibException, data: TokenCertificateExtendedResponse) => void): Promise<TokenCertificateExtendedResponse>;
verifyPin(module: string, body: TokenVerifyPinData, callback?: (error: T1CLibException, data: TokenVerifyPinResponse) => void): Promise<TokenVerifyPinResponse>;
authenticate(module: string, body: TokenAuthenticateOrSignData, callback?: (error: T1CLibException, data: TokenAuthenticateResponse) => void): Promise<TokenAuthenticateResponse>;
sign(module: string, body: TokenAuthenticateOrSignData, bulk?: boolean, callback?: (error: T1CLibException, data: TokenSignResponse) => void): Promise<TokenSignResponse>;
signRaw(module: string, body: TokenAuthenticateOrSignData, bulk?: boolean, callback?: (error: T1CLibException, data: TokenSignResponse) => void): Promise<TokenSignResponse>;
allAlgoRefs(module: string, callback?: (error: T1CLibException, data: TokenAlgorithmReferencesResponse) => void): Promise<TokenAlgorithmReferencesResponse>
resetBulkPin(module: string, callback?: (error: T1CLibException, data: BoolDataResponse) => void): Promise<BoolDataResponse>;
}T1CSdk.T1CClient.initialize(config).then(res => {
client = res;
}, err => {
console.error(error)
});var core = client.core();
core.readersCardAvailable(callback);{
"data": [
{
"card": {
"atr": "3B9813400AA503010101AD1311",
"description": ["Belgian eID Card"]
},
"id": "57a3e2e71c48cee9",
"name": "Bit4id miniLector",
"pinpad": false,
"suggestedModule": "beid"
}
],
"success": true
}var generic = client.generic(selected_reader.id, pin, pinType);generic.biometric(module, options, callback);function callback(err,data) {
if(err){
console.log("Error:",JSON.stringify(err, null, ' '));
}
else {
console.log(JSON.stringify(data, null, ' '));
}
}{
"birthDate": "15 JUL 1993",
"birthLocation": "Roeselare",
"cardDeliveryMunicipality": "Avelgem",
"cardNumber": "592..8233",
"cardValidityDateBegin": "27.05.2015",
"cardValidityDateEnd": "27.05.2025",
"chipNumber": "U0xHk...EstwAjEpJQQg==",
"documentType": "01",
"firstNames": "Gilles Frans",
"name": "Platteeuw",
"nationalNumber": "930...154",
"nationality": "Belg",
"nobleCondition": "",
"pictureHash": "Fqva9YCp...JKyn8=",
"rawData": "AQw1OTIxMjQwNTgy...TARFBar2vWAqTW+axEIuyskBgFySsp/",
"sex": "M",
"signature": "hKys9WMjUm4ipg...14xUCg/98Y9/gP/vgG7JTRZJoKgDXLLTvLZO4qlfA==",
"specialStatus": "0",
"thirdName": "J",
"version": "0"
}generic.address(module, callback);{
"municipality": "Hoeselt",
"rawData": "ARJLZXJrc...AAAAAA==",
"signature": "mhPyeRg25H...w==",
"streetAndNumber": "Kerkstraat X",
"version": "0",
"zipcode": "3730"
}generic.picture(module, callback);{
"data": "/9j/4AAQSkZJRgABA...59aVpcklSDzyKUTEDGK//9k=",
"success": true
}{
"data": {
"eid_compliant":48,
"electrical_perso_interface_version":0,
"electrical_perso_version":3,
"graphical_perso_version":7,
"label":"BELPIC",
"prn_generation":4,
"raw_data":"MCcCAQAEEFNMSU4z...JFTFBJQwMCBDCeBAcDAAA=",
"serial_number":"534C494E..1231C",
"version":0,
"version_rfu":0
},
"success": true
}allCertsExtended(module: string, parseCerts?: boolean, filters?: string[] | Options, callback?: (error: T1CLibException, data: TokenAllCertsExtendedResponse) => void): Promise<TokenAllCertsExtendedResponse>;
rootCertificateExtended(module: string, parseCerts?: boolean, callback?: (error: T1CLibException, data: TokenCertificateExtendedResponse) => void): Promise<TokenCertificateExtendedResponse>;
intermediateCertificatesExtended(module: string, parseCerts?: boolean, callback?: (error: T1CLibException, data: TokenCertificateExtendedResponse) => void): Promise<TokenCertificateExtendedResponse>;
authenticationCertificateExtended(module: string, parseCerts?: boolean, callback?: (error: T1CLibException, data: TokenCertificateExtendedResponse) => void): Promise<TokenCertificateExtendedResponse>;
nonRepudiationCertificateExtended(module: string, parseCerts?: boolean, callback?: (error: T1CLibException, data: TokenCertificateExtendedResponse) => void): Promise<TokenCertificateExtendedResponse>;
encryptionCertificateExtended(module: string, parseCerts?: boolean, callback?: (error: T1CLibException, data: TokenCertificateExtendedResponse) => void): Promise<TokenCertificateExtendedResponse>;
issuerCertificateExtended(module: string, parseCerts?: boolean, callback?: (error: T1CLibException, data: TokenCertificateExtendedResponse) => void): Promise<TokenCertificateExtendedResponse>;{
"success" : true
"data" : {
"certificates": [{
"certificate"?: string,
"certificateType"?: string,
"id"?: string,
"subject"?: string,
"issuer"?: string,
"serialNumber"?: string,
"url"?: string,
"hashSubPubKey"?: string,
"hashIssPubKey"?: string,
"exponent"?: string,
"remainder"?: string,
"parsedCertificate"?: Certificate
}]
}
}{
"success" : true
"data" : {
"rootCertificate": {
"certificates": [...]
},
"authenticationCertificate": {
"certificates": [...]
},
"nonRepudiationCertificate": {
"certificates": [...]
},
"intermediateCertificates": {
"certificates": [...]
},
"encryptionCertificate": {
"certificates": [...]
}
}
}generic.rootCertificate(module, parseCertsBoolean, callback);{
success: true,
data: {
certificate?: string,
certificates?: Array<string>,
certificateType?: string,
id?: string,
parsedCertificate?: Certificate,
parsedCertificates?: Array<Certificate>
}
}{
"success" : true
"data" : {
"certificates": [
"certificate"?: string,
"certificateType"?: string,
"id"?: string,
"subject"?: string,
"issuer"?: string,
"serialNumber"?: string,
"url"?: string,
"hashSubPubKey"?: string,
"hashIssPubKey"?: string,
"exponent"?: string,
"remainder"?: string,
"parsedCertificate"?: Certificate
]
}
}generic.authenticationCertificate(module, parseCertsBoolean, callback);{
success: true,
data: {
certificate?: string,
certificates?: Array<string>,
certificateType?: string,
id?: string,
parsedCertificate?: Certificate,
parsedCertificates?: Array<Certificate>
}
}{
"success" : true
"data" : {
"certificates": [
"certificate"?: string,
"certificateType"?: string,
"id"?: string,
"subject"?: string,
"issuer"?: string,
"serialNumber"?: string,
"url"?: string,
"hashSubPubKey"?: string,
"hashIssPubKey"?: string,
"exponent"?: string,
"remainder"?: string,
"parsedCertificate"?: Certificate
]
}
}generic.intermediateCertificates(module, parseCertsBoolean, callback);{
success: true,
data: {
certificate?: string,
certificates?: Array<string>,
certificateType?: string,
id?: string,
parsedCertificate?: Certificate,
parsedCertificates?: Array<Certificate>
}
}{
"success" : true
"data" : {
"certificates": [
"certificate"?: string,
"certificateType"?: string,
"id"?: string,
"subject"?: string,
"issuer"?: string,
"serialNumber"?: string,
"url"?: string,
"hashSubPubKey"?: string,
"hashIssPubKey"?: string,
"exponent"?: string,
"remainder"?: string,
"parsedCertificate"?: Certificate
]
}
}generic.nonRepudiationCertificate(module, parseCertsBoolean, callback);{
success: true,
data: {
certificate?: string,
certificates?: Array<string>,
certificateType?: string,
id?: string,
parsedCertificate?: Certificate,
parsedCertificates?: Array<Certificate>
}
}{
"success" : true
"data" : {
"certificates": [
"certificate"?: string,
"certificateType"?: string,
"id"?: string,
"subject"?: string,
"issuer"?: string,
"serialNumber"?: string,
"url"?: string,
"hashSubPubKey"?: string,
"hashIssPubKey"?: string,
"exponent"?: string,
"remainder"?: string,
"parsedCertificate"?: Certificate
]
}
}generic.encryptionCertificate(module, parseCertsBoolean, callback);{
success: true,
data: {
certificate?: string,
certificates?: Array<string>,
certificateType?: string,
id?: string,
parsedCertificate?: Certificate,
parsedCertificates?: Array<Certificate>
}
}{
"success" : true
"data" : {
"certificates": [
"certificate"?: string,
"certificateType"?: string,
"id"?: string,
"subject"?: string,
"issuer"?: string,
"serialNumber"?: string,
"url"?: string,
"hashSubPubKey"?: string,
"hashIssPubKey"?: string,
"exponent"?: string,
"remainder"?: string,
"parsedCertificate"?: Certificate
]
}
}generic.allCerts(module, parseCertsBoolean, callback);{
"rootCertificate": {
...
},
"authenticationCertificate": {
...
},
"nonRepudiationCertificate": {
...
},
"intermediateCertificates": {
...
},
"encryptionCertificate": {
...
}
}{
"success" : true
"data" : {
"rootCertificate": {
"certificates": [...]
},
"authenticationCertificate": {
"certificates": [...]
},
"nonRepudiationCertificate": {
"certificates": [...]
},
"intermediateCertificates": {
"certificates": [...]
},
"encryptionCertificate": {
"certificates": [...]
}
}
}var filter = [];
generic.allData(module, { filters: filter}, callback);{
"picture": {
"picture": "/9j/4AAQSkZJRgABAgEBLAEsAAD/.../wAALCADIAIwBAREA/8QA0gAAAQUBAQEBAQEAAAAAAAAAAAECAwQFBgcICQoLEAACAQMDAgQDBQUEBAAAAX0BAgMABBEFEiExQQYTUWEHInEUMoGRoQgjQrHBFVLR8CQzYnKCCQoWFxgZGiUmJygpKjQ1Njc4OTpDREVGR0hJSlNUVVZXWFlaY2RlZmdoaWpzdHV2d3h5eoOEhYaHiImKkpOUlZaXmJmaoqOkpaanqKmqsrO0tba3uLm6wsPExcbHyMnK0tPU1dbX2Nna4eLj5OXm5+jp6vHy8/T19vf4+fr/2gAIAQEAAD8A9JpKKWiikooooopaKSilooooopKr3d9bWaFriVEwM4J5Ncjq3jUxkixQADozjJNcze+L9WndWF20OOCI/lzRb+KtYjhIN67Z7vyf1qT/AIS3Wc5F2OnQgY/lWrovjC7hYLqJ86IkksPvCustPEumXbbUuAjYzh+K1UkWRA6MGU9CDkGn0UUUUUUUhOBk8CuY1zxOls/kWjbnH3pAMgewrz7VtWmu7gvJIzZ65NZk1wSBjOagWbn5lB+vagy7+2KlilUE7eRj1qS3ncSEE4X3qwzNs81Dgg9K19G8VXumTLFv8yDOWjb+len6bqMGp2qz2zZU8Ed1PpVyiiiiio5pkgiaSRgqKMkmuH8ReKXlMlpAAkHRnB5b29q4+e5HzAHjPFZkoLyhevH6014XUcjBqAow5xQEYjFPClDxkCnq20AkZ/xqyl2oUK4xu6n0qwgguZQ28K2Ofc1v6Pqs2lSRGJzsLAOv94d69MtriO6gSaFgyMMg1LS0UUlcn491FbfS/sicyzEH6AGvOCzuApPOakt7CWYk7TjNXE0iUNnyyfpVqPQ53XiNwPepYfDMhb94GAq5/wAIzbhc4IPpVK/8OYjzEMmsWbRZ0XIUnHtVRrR4/vqR9RSwQGXdt4Zav2rbFww6DI5ruvBuqIIjaSuMu2Y8/TpXYUtFFIa8r8W6h9v1d9mCqHYuO4FVdM0t7iZWb8a6y10+KNQCOlXFijQfKop6g9hUmw4pjoRzmopEyvIqrJEjDGKpXGnwzoQ68+1YNxpv2Ry8RPHrVGUqse4MN38Qq7o8o8kOh+dG3AjsRXpejapHqVsDkLMo+dM8/WtOiis/WrxrHTJp1GWAwOeme9eWqqzTln6k5rqNLhWKFcDmtJRk1aSPPWp0i21J5dRSx8VWKVXkQA1WmwvGDzWVegSRsp4zXNT2WwMASSxqa1kNimMBkOB9fWt7QLx4ddgaNCyyLtIHevR6Wiuf8ZsRobAdWcD+dcLYQZlHck/lXWQKEjUVZj69OlXI+manXnvTiADioXPJ4qBhVaQ/NVWbkZ7VlXeDmqRYY27Rn1rOmkDXOwKBgH8av6XOba9guVz8hA2+1epg5GaWiuf8ZqTom4fwyKf5iuS0uFiQcV0MYwgBqxH1FWl6VLGeKcxOOaaRmoZAcVTkBqrOcL61j3B5NVgducVXkeOOXLKMt1p9tIsyjaAMGvVI+I1+gp9FZXiOAT6LcKRnaN35Vy+lhfKJ9Kv+cifeYACpIry3A5kA+tW1uYmXKuD+NSRzDseKl3gjrTS47UhYAGqFxINxqhcSA8ZrPlQmq8kZArNujljkdBUuhAy3cUOOWdRXrY4FLRUN0iSW8iSkBGUg5riLGMrbzxq3IkI3CozpuWZmnkye+6qT6TlmPnkk9M1Smsbq3OUuOOvWtDTrq4j+V5CRn1rpIZy6ZNSbiBz1qneXphFcpqmqzyNiJiBnqKyl+33DDZJL9dxq2i6pDg7mYehNX7a/lx5d5EADwGHUVBeR/MfT2q/4It2n10vtykY3H29K9MpaSsLxKJJo4oI5Ci53NjvWbbweUGAH3sE5qG8DpnqB7CsKNru7umitUKgdXbqay3m1L7cluxlMm/DAqMYrqLfTW5DKAw7joa1LRCnDVNelYo91cXq13NcMfLDbAcA+tVbXTppyzMrNtGSq9RTP7VhgZY44HBP+1k1Zi1LzZNgbOexGCKS8kwQcc1LM4ayeT0Sl8M+IhpDzfuA4kwCe+BXqFldxXtrHcQnKOMjNWKSsfV48zI3qMVVwpIA5xxTpI1bqBVNrRQ25EwfVaja3cybtgz/eK81ahjKrz1pTwR6k1U1aQ/Zm57VhQKDGhAyBWxatHACUXbuHOO9Yt3plol01wkWSTnGazLixaW5EsSbSO4q5HZu6Ey9R0qLUQYNOcdA3FY1vGS4wK9f8NQtBolurdSC2PrWtRWfqoHlI3cHFZUXJJ9TU3U4xxTguKdsyM1FINtQNjcKpauC1uwHORWLYsAAhPStqOPKAjoaHhU8Fc1G0KDouKgmUBTisDXCTBGoxgtk1W02AysoUclgK9it4hDBHGOiKFqWiqWppvtT7EGsgKoGVJB7ip161KoWlY4qrctjGOpqCJd74JqLUlVYic8YrlI22ySSKehzXUWDCa2RxzkVaaMVUnXaDWXdzBVIzziuf1Pc80MS9x1rd8Maa39qxRucqhDtj2r0elopkiCRGRuhGKxJreaFipQlB/EBTA2Dih5tg4ySeAKlUnbufr6VBOpkBA4PassR3NtIZJJ/MB/h24xWDr+rySYihU+/NZULXMkXlrHyepFdfoYaG1RG5IFa7yZTIrNv5gqHmudnn3zgdeazrjL3+7PyggV6J4QgY28ly643YRT64610tFFJTXXcjL6jFc+/BIP8ACcUKoEm888YFI13GuVkbafehZ4uu8UOYpVwGGazp9KtmYs2AfempZQx524pyusRAyKkEuXU9jxWNrUxUsnc1k26F50U9WIFd1F4N08XCzu0rdCUJ4Jro0RY0VEUKqjAA7U+iiikrCvV2Xki9ic1BExDYPOKL6xhvIdrqM9j6VjmwNuNiu6/8CzUiW0uw73bOOCADVO7hulGRIxY9iOKy5RfgnbKB+NLZWWp3EwMtwBHnPU8106xrFGiZzt5JNcpqdyLnVWVOUU81a0GL7TrdsmMgOCfoDmvUaWiiiikrM1aHlJh0HBrNBAcZqcnH0qJ1EnBGaqvGy/dPFU51mfv+tVRaNnLc/Wp0cRLgHmqup35hs2AJ8xxgYrBijKRlm+8eSa6nwLbbryW4b+EYFd5RRRRRRVXURmxlz7fzrmDJ820noavoQ0WCcmlQZpXjBGarMijpzVedBtJNZczbSTmsW6k864BY/Kvaomk3sFB4rtfBO398F6BcV19FFFFFFVr/AJs5fpXLXEJK716imWt5tOxzir6Tqe9JLcAcbhUTTrt4Iqhc3IOQGrA1C/CcZ56VkPOzHr1p0JZ32r07mu/8ELsaYZ5K5rsKKKKSloqtfnFnL9KwkAP41Qv7I53R9ax5ri5tzhg31qm+qzdDzUb6zKBjAqlNqkrZxwTWe8jSOSSSalhiaRgO1a1tAsYA711/hA7bpx6qa7CikpaSio1njZioYZHWs/UdQtmhlgjnjeUYyinJHPes2M5HNPYDbiqr28cvyuoIqjceH7eQ5AI+lZ0vhyME4Z/zqjPoiRZ5aqBslRulXbe3woOKtLGc8itvQJxbXqseh4NdRPqaxpujjMnqAcYHrToNShlAz8h96mkvLeJQ0k8aKe7MBT0uIZF3JNGy+qsCKqajfx2gUFvmJ6ZrB1HxUkSttIGOOtcpfeK5jC8dsxDP1f0+laehxeVp8cjcyTfOxPU1uRmpm6VAchqkEmKjkcYz0rJvGDZrJMe+Tgd6vRwbU6UpTBqS1O2ZT71vRkSJtakaARITyy+3UVyXiXUTvijEqugB+6en1rJi1AqmN7D6Gut8S61a6XKipbieSRSSXPSuBv8AUZbyQlwFXP3VGAKp7q9B0OTzdLtG/wBnH5VtR1Z6ionXnIprDI6VWkjB/i5qnPCMHAqCCAeZyKutGoWqsvBqOM4cH3rcgOQKvRNxisbxB4ettQgaZcRToM7gOv1rgEvzAvl+VE+D1K1//9k="
},
"biometric": {
"birthDate": "15 JUL 1993",
"birthLocation": "Roeselare",
"cardDeliveryMunicipality": "Avelgem",
"cardNumber": "592124058233",
"cardValidityDateBegin": "27.05.2015",
"cardValidityDateEnd": "27.05.2025",
"chipNumber": "...==",
"documentType": "01",
"firstNames": "Gilles Frans",
"name": "Platteeuw",
"nationalNumber": "...",
"nationality": "Belg",
"nobleCondition": "",
"pictureHash": "...=",
"rawData": "...+axEIuyskBgFySsp/",
"sex": "M",
"signature": ".../OlA44h4YCM/h+J14xUCg/98Y9/.../C/RB2dtVbHwFvDuafmr4ZEshTlZTLidHKlISFvFWOtsLAEPCbl5LjfQwcOKe0pDADtHb4IStBnr+aaE8oHsTaKq66Y+zt+AbwdmWOrMA5URKKf7dZkY7jt3h8KZDw36VjcytUgjxVIdqwHsDkmIjK6mJtakIwybS5wn3RiQj33/vgG7JTRZJoKgDXLLTvLZO4qlfA==",
"specialStatus": "0",
"thirdName": "J",
"version": "0"
},
"address": {
"municipality": "Hoeselt",
"rawData": "...==",
"signature": "...+Evety1PnTE4pqXaHgBxIpk+P8kRL5W3zDV+../../..+YoHBC9KqTmSpl5KULxdnKiyCt+2RyJdzE2wyoymjRmysIhJy1wW9PRnx99S1TFqQLuc0tyBmkBPR4aFqmOq4a7zqd0q2Q1g+BbnwJ4d3oa10ia5+0kBXf0THoXv3HYIHlnwhBMfAtWzPnFrYBuAKTwyl7yBF5IFfXFpGWuVZUTJElgNcmNvsHMnAhVwDw==",
"streetAndNumber": "Kerkstraat X",
"version": "0",
"zipcode": "3730"
}
}var filter = ['biometric'];
generic.allData(module, { filters: filter }, callback);{
"biometric": {
"birthDate": "15 JUL 1993",
"birthLocation": "Roeselare",
"cardDeliveryMunicipality": "Avelgem",
"cardNumber": "592124058233",
"cardValidityDateBegin": "27.05.2015",
"cardValidityDateEnd": "27.05.2025",
"chipNumber": "...==",
"documentType": "01",
"firstNames": "Gilles Frans",
"name": "Platteeuw",
"nationalNumber": "...",
"nationality": "Belg",
"nobleCondition": "",
"pictureHash": "...=",
"rawData": "...+axEIuyskBgFySsp/",
"sex": "M",
"signature": ".../OlA44h4YCM/h+J14xUCg/98Y9/.../C/RB2dtVbHwFvDuafmr4ZEshTlZTLidHKlISFvFWOtsLAEPCbl5LjfQwcOKe0pDADtHb4IStBnr+aaE8oHsTaKq66Y+zt+AbwdmWOrMA5URKKf7dZkY7jt3h8KZDw36VjcytUgjxVIdqwHsDkmIjK6mJtakIwybS5wn3RiQj33/vgG7JTRZJoKgDXLLTvLZO4qlfA==",
"specialStatus": "0",
"thirdName": "J",
"version": "0"
}
}var filter = [];
generic.allCerts(module, parseCerts, { filters: filter}, callback);{
"rootCertificate": {
...
},
"authenticationCertificate": {
...
},
"nonRepudiationCertificate": {
...
},
"intermediateCertificates": {
...
},
"encryptionCertificate": {
...
}
}var filter = ['rootCertificate'];
generic.allCerts(module, { filters: filter}, callback);{
"rootCertificate": {
...
}
}var filter = null;
generic.allCerts(module, { filters: filter}, callback);{
"rootCertificate": {
...
},
"authenticationCertificate": {
...
},
"nonRepudiationCertificate": {
...
},
"intermediateCertificates": {
...
},
"encryptionCertificate": {
...
}
}var data = {
"pin":"...",
"algorithm":"sha1",
"data":"I2e+u/sgy7fYgh+DWA0p2jzXQ7E=",
"osDialog": true
}
generic.sign(module, data, callback);{
"success": true,
"data": {
"data" : "W7wqvWA8m9S...="
}
}var data = {
"algorithm":"sha1",
"data":"I2e+u/sgy7fYgh+DWA0p2jzXQ7E=",
"osDialog": false
}
generic.sign(module, data, callback);{
"success": true,
"data": {
"data" : "W7wqvWA8m9S...="
}
}var data = {
"algorithm":"sha256",
"data":"vl5He0ulthjX+VWNM46QX7vJ8VvXMq2k/Tq8Xq1bwEw=",
"osDialog": false
}
generic.signRaw(module, data, callback);const data = {
algorithm: "sha256",
data: "E1uHACbPvhLew0gGmBH83lvtKIAKxU2/RezfBOsT6Vs=",
pin: "1234"
}
const bulk = true;
generic.sign(module, data, bulk).then(res => {
}, err => {
console.error(err)
})generic.resetBulkPin(module).then(res => {
}, err => {
console.error(err)
}){
"success": true,
"data": true
}var data = {
"pin":"..."
}
generic.verifyPin(module, data, callback);{
"verified": true
}var data = {}
generic.verifyPin(module, data, callback);{
"verified": true
}var data = {
"pin": "...",
"algorithm": "sha1",
"data":"I2e+u/sgy7fYgh+DWA0p2jzXQ7E="
}
generic.authenticate(module, data, callback);{
"success": true,
"data": {
"data" : "W7wqvWA8m9S...="
}
}generic.allAlgoRefs(module, callback);{
"success": true,
"data": ["sha1", "sha256"]
export interface AbstractAventra {
allCerts(parseCerts?: boolean, filters?: string[] | Options, callback?: (error: T1CLibException, data: TokenAllCertsResponse) => void): Promise<TokenAllCertsResponse>;
tokenData(callback?: (error: T1CLibException, data: TokenInfoResponse) => void): Promise<TokenInfoResponse>;
rootCertificate(parseCerts?: boolean, callback?: (error: T1CLibException, data: TokenCertificateResponse) => void): Promise<TokenCertificateResponse>;
authenticationCertificate(parseCerts?: boolean, callback?: (error: T1CLibException, data: TokenCertificateResponse) => void): Promise<TokenCertificateResponse>;
nonRepudiationCertificate(parseCerts?: boolean, callback?: (error: T1CLibException, data: TokenCertificateResponse) => void): Promise<TokenCertificateResponse>;
encryptionCertificate(parseCerts?: boolean, callback?: (error: T1CLibException, data: TokenCertificateResponse) => void): Promise<TokenCertificateResponse>;
issuerCertificate(parseCerts?: boolean, callback?: (error: T1CLibException, data: TokenCertificateResponse) => void): Promise<TokenCertificateResponse>
allCertsExtended(parseCerts?: boolean, filters?: string[] | Options, callback?: (error: T1CLibException, data: TokenAllCertsExtendedResponse) => void): Promise<TokenAllCertsExtendedResponse>;
rootCertificateExtended(parseCerts?: boolean, callback?: (error: T1CLibException, data: TokenCertificateExtendedResponse) => void): Promise<TokenCertificateExtendedResponse>;
authenticationCertificateExtended(parseCerts?: boolean, callback?: (error: T1CLibException, data: TokenCertificateExtendedResponse) => void): Promise<TokenCertificateExtendedResponse>;
nonRepudiationCertificateExtended(parseCerts?: boolean, callback?: (error: T1CLibException, data: TokenCertificateExtendedResponse) => void): Promise<TokenCertificateExtendedResponse>;
encryptionCertificateExtended(parseCerts?: boolean, callback?: (error: T1CLibException, data: TokenCertificateExtendedResponse) => void): Promise<TokenCertificateExtendedResponse>;
issuerCertificateExtended(parseCerts?: boolean, callback?: (error: T1CLibException, data: TokenCertificateExtendedResponse) => void): Promise<TokenCertificateExtendedResponse>;
validateSignature(body: TokenValidateSignatureRequest, callback?: (error: T1CLibException, data: TokenValidateSignatureResponse) => void): Promise<TokenValidateSignatureResponse>;
verifyPin(body: TokenVerifyPinData, callback?: (error: T1CLibException, data: TokenVerifyPinResponse) => void): Promise<TokenVerifyPinResponse>;
authenticate(body: TokenAuthenticateOrSignData, callback?: (error: T1CLibException, data: TokenAuthenticateResponse) => void): Promise<TokenAuthenticateResponse>;
sign(body: TokenAuthenticateOrSignData, bulk?: boolean, callback?: (error: T1CLibException, data: TokenSignResponse) => void): Promise<TokenSignResponse>;
signRaw(body: TokenAuthenticateOrSignData, bulk?: boolean, callback?: (error: T1CLibException, data: TokenSignResponse) => void): Promise<TokenSignResponse>;
resetPin(body: TokenResetPinData, callback?: (error: T1CLibException, data: TokenResetPinResponse) => void): Promise<TokenResetPinResponse>
allAlgoRefs(callback?: (error: T1CLibException, data: TokenAlgorithmReferencesResponse) => void): Promise<TokenAlgorithmReferencesResponse>
resetBulkPin(callback?: (error: T1CLibException, data: BoolDataResponse) => void): Promise<BoolDataResponse>;
}
T1CSdk.T1CClient.initialize(config).then(res => {
const aventra = res.client.aventra(readerId);
}, err => {
console.error(error)
});module.tokenData().then(res => {
// see response below
}){
"success": true,
"data": {
"info": {
"slot": "string",
"label": "string",
"manufacturerId": "string",
"model": "string",
"serialNumber": "string",
"flags": {
"isRandomNumberGenerator": "boolean",
"isWriteProtected": "boolean",
"isLoginRequired": "boolean",
"isUserPinInitialized": "boolean",
"isRestoreKeyNotNeeded": "boolean",
"isClockOnToken": "boolean",
"isProtectedAuthenticationPath": "boolean",
"isDualCryptoOperations": "boolean",
"isTokenInitialized": "boolean",
"isSecondaryAuthentication": "boolean",
"isUserPinCountLow": "boolean",
"isUserPinFinalTry": "boolean",
"isUserPinLocked": "boolean",
"isUserPinToBeChanged": "boolean",
"isSoPinCountLow": "boolean",
"isSoPinFinalTry": "boolean",
"isSoPinLocked": "boolean",
"isSoPinToBeChanged": "boolean"
},
"mechanisms": [
{
"mechanism": "string",
"flags": {
"isHardware": "boolean",
"isEncrypt": "boolean",
"isDecrypt": "boolean",
"isDigest": "boolean",
"isSign": "boolean",
"isSignRecover": "boolean",
"isVerify": "boolean",
"isVerifyRecover": "boolean",
"isGenerate": "boolean",
"isGenerateKeyPair": "boolean",
"isWrap": "boolean",
"isUnwrap": "boolean",
"isExtension": "boolean",
"isEcFP": "boolean",
"isEcNamedcurve": "boolean",
"isEcUncompress": "boolean",
"isEcCompress": "boolean"
},
"ulMinKeySize": "number",
"ulMaxKeySize": "number"
}
],
"ulMaxSessionCount": "number",
"ulSessionCount": "number",
"ulMaxRwSessionCount": "number",
"ulMaxPinLen": "number",
"ulMinPinLen": "number",
"ulTotalPubLicMemory": "number",
"ulFreePubMemory": "number",
"ulTotalPrivateMemory": "number",
"ulFreePrivateMemory": "number",
"hardwareVersion": "string",
"firmwareVersion": "string"
},
"infoType": "TokenInfoType"
}
}
//ENUM
TokenInfoType {
Token,
PKCS11,
File,
Payment,
HSM,
Vault,
Wallet,
}aventra.allCertFilters().then(res => {
}, err => {
console.error(err)
}){
success: true,
data: ['rootCertificate', 'authenticationCertificate', 'encryptionCertificate', 'nonRepudiationCertificate', 'issuerCertificate']
}aventra.allKeyRefs().then(res => {
}, err => {
console.error(err)
}){
success: true,
data: ['authenticate', 'sign', 'encrypt']
}allCertsExtended(parseCerts?: boolean, filters?: string[] | Options, callback?: (error: T1CLibException, data: TokenAllCertsExtendedResponse) => void): Promise<TokenAllCertsExtendedResponse>;
rootCertificateExtended(parseCerts?: boolean, callback?: (error: T1CLibException, data: TokenCertificateExtendedResponse) => void): Promise<TokenCertificateExtendedResponse>;
authenticationCertificateExtended(parseCerts?: boolean, callback?: (error: T1CLibException, data: TokenCertificateExtendedResponse) => void): Promise<TokenCertificateExtendedResponse>;
nonRepudiationCertificateExtended(parseCerts?: boolean, callback?: (error: T1CLibException, data: TokenCertificateExtendedResponse) => void): Promise<TokenCertificateExtendedResponse>;
encryptionCertificateExtended(parseCerts?: boolean, callback?: (error: T1CLibException, data: TokenCertificateExtendedResponse) => void): Promise<TokenCertificateExtendedResponse>;
issuerCertificateExtended(parseCerts?: boolean, callback?: (error: T1CLibException, data: TokenCertificateExtendedResponse) => void): Promise<TokenCertificateExtendedResponse>;{
"success" : true
"data" : {
"certificates": [{
"certificate"?: string,
"certificateType"?: string,
"id"?: string,
"subject"?: string,
"issuer"?: string,
"serialNumber"?: string,
"url"?: string,
"hashSubPubKey"?: string,
"hashIssPubKey"?: string,
"exponent"?: string,
"remainder"?: string,
"parsedCertificate"?: Certificate
}]
}
}{
"success" : true
"data" : {
"rootCertificate": {
"certificates": [...]
},
"authenticationCertificate": {
"certificates": [...]
},
"nonRepudiationCertificate": {
"certificates": [...]
},
"encryptionCertificates": {
"certificates": [...]
},
"issuerCertificates": {
"certificates": [...]
}
}
}const filter = ['rootCertificate', 'authenticationCertificate', 'encryptionCertificate'];
aventra.allCerts(parseCertsBoolean, filter).then(res => {
res.data
}, err => {
console.error(err)
}){
"rootCertificate": {
...
},
"authenticationCertificate": {
...
},
"nonRepudiationCertificate": {
...
},
"intermediateCertificates": {
...
},
"encryptionCertificate": {
...
}
}aventra.tokenData().then(res => {
}, err => {
console.error(err)
}){
success: true,
data: {
version?: string,
serialNumber?: string,
label?: string,
changeCounter?: number,
}
}aventra.rootCertificate(parseCertsBoolean).then(res => {
}, err => {
console.error(err)
})aventra.authenticationCertificate(parseCertsBoolean).then(res => {
}, err => {
console.error(err)
})aventra.nonRepudiationCertificate(parseCertsBoolean).then(res => {
}, err => {
console.error(err)
})aventra.issuerCertificate(parseCertsBoolean).then(res => {
}, err => {
console.error(err)
})aventra.encryptionCertificate(parseCertsBoolean).then(res => {
}, err => {
console.error(err)
}){
success: true,
data: {
certificate?: string,
certificates?: Array<string>,
certificateType?: string,
id?: string,
parsedCertificate?: Certificate,
parsedCertificates?: Array<Certificate>
}
}const data = {
pin: "1234", // optional
osDialog: true // optional
}
aventra.verifyPin(data).then(res => {
}, err => {
console.error(err)
}){
success: true,
data: {
"verfied": true
}
}const data = {
algorithm: "sha256",
data: "E1uHACbPvhLew0gGmBH83lvtKIAKxU2/RezfBOsT6Vs=",
id: "123"
}
const bulk = false;
aventra.sign(data, bulk).then(res => {
}, err => {
console.error(err)
}){
success: true,
data: {
data: string
}
}var data = {
"algorithm":"sha256",
"data":"vl5He0ulthjX+VWNM46QX7vJ8VvXMq2k/Tq8Xq1bwEw=",
"osDialog": false,
"id": "1ooidifhv183"
}
aventra.signRaw(data, callback);aventra.resetBulkPin().then(res => {
}, err => {
console.error(err)
}){
"success": true,
"data": true
}const data = {
algorithm: "sha256",
data: "E1uHACbPvhLew0gGmBH83lvtKIAKxU2/RezfBOsT6Vs=",
id: "123"
}
aventra.authenticate(data).then(res => {
}, err => {
console.error(err)
}){
success: true,
data: {
data: string
}
}const data = {
pin: "3214", //optional
puk: "123123"
}
aventra.resetPin(data).then(res => {
}, err => {
console.error(err)
}){
success: true,
data: {
verified: boolean
}
}aventra.allAlgoRefs(data).then(res => {
}, err => {
console.error(err)
}){
success: true,
data: {
ref: ['sha256', 'md5']
}
}const body = {
"algorithm": 'sha256',
"hash": '...',
"signedHash": '...',
"osDialog": false,
"id": 'cert_id',
"pin": 'pin_code',
"timeout": 120 //timeout in seconds
}
safenet.validateSignature(body).then(response => {
response.valid
).catch(error => {
errorHandler(error)}
){
"success": true,
"data": {
"valid": true
}
}export interface AbstractOberthur73 {
allCerts(parseCerts?: boolean, filters?: string[] | Options, callback?: (error: T1CLibException, data: TokenAllCertsResponse) => void): Promise<TokenAllCertsResponse>;
tokenData(callback?: (error: T1CLibException, data: TokenInfoResponse) => void): Promise<TokenInfoResponse>;
rootCertificate(parseCerts?: boolean, callback?: (error: T1CLibException, data: TokenCertificateResponse) => void): Promise<TokenCertificateResponse>;
authenticationCertificate(parseCerts?: boolean, callback?: (error: T1CLibException, data: TokenCertificateResponse) => void): Promise<TokenCertificateResponse>;
nonRepudiationCertificate(parseCerts?: boolean, callback?: (error: T1CLibException, data: TokenCertificateResponse) => void): Promise<TokenCertificateResponse>;
encryptionCertificate(parseCerts?: boolean, callback?: (error: T1CLibException, data: TokenCertificateResponse) => void): Promise<TokenCertificateResponse>;
issuerCertificate(parseCerts?: boolean, callback?: (error: T1CLibException, data: TokenCertificateResponse) => void): Promise<TokenCertificateResponse>
allCertsExtended(parseCerts?: boolean, filters?: string[] | Options, callback?: (error: T1CLibException, data: TokenAllCertsExtendedResponse) => void): Promise<TokenAllCertsExtendedResponse>;
rootCertificateExtended(parseCerts?: boolean, callback?: (error: T1CLibException, data: TokenCertificateExtendedResponse) => void): Promise<TokenCertificateExtendedResponse>;
authenticationCertificateExtended(parseCerts?: boolean, callback?: (error: T1CLibException, data: TokenCertificateExtendedResponse) => void): Promise<TokenCertificateExtendedResponse>;
nonRepudiationCertificateExtended(parseCerts?: boolean, callback?: (error: T1CLibException, data: TokenCertificateExtendedResponse) => void): Promise<TokenCertificateExtendedResponse>;
encryptionCertificateExtended(parseCerts?: boolean, callback?: (error: T1CLibException, data: TokenCertificateExtendedResponse) => void): Promise<TokenCertificateExtendedResponse>;
issuerCertificateExtended(parseCerts?: boolean, callback?: (error: T1CLibException, data: TokenCertificateExtendedResponse) => void): Promise<TokenCertificateExtendedResponse>;
validateSignature(body: TokenValidateSignatureRequest, callback?: (error: T1CLibException, data: TokenValidateSignatureResponse) => void): Promise<TokenValidateSignatureResponse>;
verifyPin(body: TokenVerifyPinData, callback?: (error: T1CLibException, data: TokenVerifyPinResponse) => void): Promise<TokenVerifyPinResponse>;
authenticate(body: TokenAuthenticateOrSignData, callback?: (error: T1CLibException, data: TokenAuthenticateResponse) => void): Promise<TokenAuthenticateResponse>;
sign(body: TokenAuthenticateOrSignData, bulk?: boolean, callback?: (error: T1CLibException, data: TokenSignResponse) => void): Promise<TokenSignResponse>;
signRaw(body: TokenAuthenticateOrSignData, bulk?: boolean, callback?: (error: T1CLibException, data: TokenSignResponse) => void): Promise<TokenSignResponse>;
allAlgoRefs(callback?: (error: T1CLibException, data: TokenAlgorithmReferencesResponse) => void): Promise<TokenAlgorithmReferencesResponse>
resetBulkPin(callback?: (error: T1CLibException, data: BoolDataResponse) => void): Promise<BoolDataResponse>;
}T1cSdk.initialize(config).then(res => {
const oberthur = res.client.oberthur(readerId);
}, err => {
console.error(error)
});module.tokenData().then(res => {
// see response below
}){
"success": true,
"data": {
"info": {
"slot": "string",
"label": "string",
"manufacturerId": "string",
"model": "string",
"serialNumber": "string",
"flags": {
"isRandomNumberGenerator": "boolean",
"isWriteProtected": "boolean",
"isLoginRequired": "boolean",
"isUserPinInitialized": "boolean",
"isRestoreKeyNotNeeded": "boolean",
"isClockOnToken": "boolean",
"isProtectedAuthenticationPath": "boolean",
"isDualCryptoOperations": "boolean",
"isTokenInitialized": "boolean",
"isSecondaryAuthentication": "boolean",
"isUserPinCountLow": "boolean",
"isUserPinFinalTry": "boolean",
"isUserPinLocked": "boolean",
"isUserPinToBeChanged": "boolean",
"isSoPinCountLow": "boolean",
"isSoPinFinalTry": "boolean",
"isSoPinLocked": "boolean",
"isSoPinToBeChanged": "boolean"
},
"mechanisms": [
{
"mechanism": "string",
"flags": {
"isHardware": "boolean",
"isEncrypt": "boolean",
"isDecrypt": "boolean",
"isDigest": "boolean",
"isSign": "boolean",
"isSignRecover": "boolean",
"isVerify": "boolean",
"isVerifyRecover": "boolean",
"isGenerate": "boolean",
"isGenerateKeyPair": "boolean",
"isWrap": "boolean",
"isUnwrap": "boolean",
"isExtension": "boolean",
"isEcFP": "boolean",
"isEcNamedcurve": "boolean",
"isEcUncompress": "boolean",
"isEcCompress": "boolean"
},
"ulMinKeySize": "number",
"ulMaxKeySize": "number"
}
],
"ulMaxSessionCount": "number",
"ulSessionCount": "number",
"ulMaxRwSessionCount": "number",
"ulMaxPinLen": "number",
"ulMinPinLen": "number",
"ulTotalPubLicMemory": "number",
"ulFreePubMemory": "number",
"ulTotalPrivateMemory": "number",
"ulFreePrivateMemory": "number",
"hardwareVersion": "string",
"firmwareVersion": "string"
},
"infoType": "TokenInfoType"
}
}
//ENUM
TokenInfoType {
Token,
PKCS11,
File,
Payment,
HSM,
Vault,
Wallet,
}allCertsExtended(parseCerts?: boolean, filters?: string[] | Options, callback?: (error: T1CLibException, data: TokenAllCertsExtendedResponse) => void): Promise<TokenAllCertsExtendedResponse>;
rootCertificateExtended(parseCerts?: boolean, callback?: (error: T1CLibException, data: TokenCertificateExtendedResponse) => void): Promise<TokenCertificateExtendedResponse>;
authenticationCertificateExtended(parseCerts?: boolean, callback?: (error: T1CLibException, data: TokenCertificateExtendedResponse) => void): Promise<TokenCertificateExtendedResponse>;
nonRepudiationCertificateExtended(parseCerts?: boolean, callback?: (error: T1CLibException, data: TokenCertificateExtendedResponse) => void): Promise<TokenCertificateExtendedResponse>;
encryptionCertificateExtended(parseCerts?: boolean, callback?: (error: T1CLibException, data: TokenCertificateExtendedResponse) => void): Promise<TokenCertificateExtendedResponse>;
issuerCertificateExtended(parseCerts?: boolean, callback?: (error: T1CLibException, data: TokenCertificateExtendedResponse) => void): Promise<TokenCertificateExtendedResponse>;{
"success" : true
"data" : {
"certificates": [{
"certificate"?: string,
"certificateType"?: string,
"id"?: string,
"subject"?: string,
"issuer"?: string,
"serialNumber"?: string,
"url"?: string,
"hashSubPubKey"?: string,
"hashIssPubKey"?: string,
"exponent"?: string,
"remainder"?: string,
"parsedCertificate"?: Certificate
}]
}
}{
"success" : true
"data" : {
"rootCertificate": {
"certificates": [...]
},
"authenticationCertificate": {
"certificates": [...]
},
"nonRepudiationCertificate": {
"certificates": [...]
},
"encryptionCertificates": {
"certificates": [...]
},
"issuerCertificates": {
"certificates": [...]
}
}
}oberthur.allCertFilters().then(res => {
}, err => {
console.error(err)
}){
success: true,
data: ['rootCertificate', 'authenticationCertificate', 'encryptionCertificate', 'nonRepudiationCertificate', 'issuerCertificate']
}oberthur.allKeyRefs().then(res => {
}, err => {
console.error(err)
}){
success: true,
data: ['authenticate', 'sign', 'encrypt']
}const filter = ['rootCertificate', 'authenticationCertificate', 'encryptionCertificate'];
oberthur.allCerts(filter).then(res => {
res.data
}, err => {
console.error(err)
}){
"rootCertificate": {
...
},
"authenticationCertificate": {
...
},
"nonRepudiationCertificate": {
...
},
"intermediateCertificates": {
...
},
"encryptionCertificate": {
...
}
}oberthur.tokenData().then(res => {
}, err => {
console.error(err)
}){
success: true,
data: {
version?: string,
serialNumber?: string,
label?: string,
changeCounter?: number,
}
}oberthur.rootCertificate(parseCertsBoolean).then(res => {
}, err => {
console.error(err)
})oberthur.authenticationCertificate(parseCertsBoolean).then(res => {
}, err => {
console.error(err)
})oberthur.nonRepudiationCertificate(parseCertsBoolean).then(res => {
}, err => {
console.error(err)
})oberthur.issuerCertificate(parseCertsBoolean).then(res => {
}, err => {
console.error(err)
})aventra.encryptionCertificate(parseCertsBoolean).then(res => {
}, err => {
console.error(err)
}){
success: true,
data: {
certificate?: string,
certificates?: Array<string>,
certificateType?: string,
id?: string,
parsedCertificate?: Certificate,
parsedCertificates?: Array<Certificate>
}
}const data = {
pin: "1234", // optional
osDialog: true // optional
}
oberthur.verifyPin(data).then(res => {
}, err => {
console.error(err)
}){
success: true,
data: {
"verfied": true
}
}const data = {
algorithm: "sha256",
data: "E1uHACbPvhLew0gGmBH83lvtKIAKxU2/RezfBOsT6Vs=",
id: "123"
}
const bulk = false;
oberthur.sign(data, bulk).then(res => {
}, err => {
console.error(err)
}){
success: true,
data: {
data: string
}
}var data = {
"algorithm":"sha256",
"data":"vl5He0ulthjX+VWNM46QX7vJ8VvXMq2k/Tq8Xq1bwEw=",
"osDialog": false,
"id": "1235s"
}
oberthur.signRaw(data, callback);diplad.resetBulkPin().then(res => {
}, err => {
console.error(err)
}){
"success": true,
"data": true
}const data = {
algorithm: "sha256",
data: "E1uHACbPvhLew0gGmBH83lvtKIAKxU2/RezfBOsT6Vs="
id: "123"
}
oberthur.authenticate(data).then(res => {
}, err => {
console.error(err)
}){
success: true,
data: {
data: string
}
}oberthur.allAlgoRefs(data).then(res => {
}, err => {
console.error(err)
}){
success: true,
data: {
ref: ['sha256', 'md5']
}
}const body = {
"algorithm": 'sha256',
"hash": '...',
"signedHash": '...',
"osDialog": false,
"id": 'cert_id',
"pin": 'pin_code',
"timeout": 120 //timeout in seconds
}
safenet.validateSignature(body).then(response => {
response.valid
).catch(error => {
errorHandler(error)}
){
"success": true,
"data": {
"valid": true
}
}export interface AbstractCertinomis {
allCerts(parseCerts?: boolean, filters?: string[] | Options, callback?: (error: T1CLibException, data: TokenAllCertsResponse) => void): Promise<TokenAllCertsResponse>;
authenticationCertificate(parseCerts?: boolean, callback?: (error: T1CLibException, data: TokenCertificateResponse) => void): Promise<TokenCertificateResponse>;
nonRepudiationCertificate(parseCerts?: boolean, callback?: (error: T1CLibException, data: TokenCertificateResponse) => void): Promise<TokenCertificateResponse>;
allCertsExtended(parseCerts?: boolean, filters?: string[] | Options, callback?: (error: T1CLibException, data: TokenAllCertsExtendedResponse) => void): Promise<TokenAllCertsExtendedResponse>;
authenticationCertificateExtended(parseCerts?: boolean, callback?: (error: T1CLibException, data: TokenCertificateExtendedResponse) => void): Promise<TokenCertificateExtendedResponse>;
nonRepudiationCertificateExtended(parseCerts?: boolean, callback?: (error: T1CLibException, data: TokenCertificateExtendedResponse) => void): Promise<TokenCertificateExtendedResponse>;
validateSignature(body: TokenValidateSignatureRequest, callback?: (error: T1CLibException, data: TokenValidateSignatureResponse) => void): Promise<TokenValidateSignatureResponse>;
verifyPin(body: TokenVerifyPinData, callback?: (error: T1CLibException, data: TokenVerifyPinResponse) => void): Promise<TokenVerifyPinResponse>;
authenticate(body: TokenAuthenticateOrSignData, callback?: (error: T1CLibException, data: TokenAuthenticateResponse) => void): Promise<TokenAuthenticateResponse>;
sign(body: TokenAuthenticateOrSignData, bulk?: boolean, callback?: (error: T1CLibException, data: TokenSignResponse) => void): Promise<TokenSignResponse>;
signRaw(body: TokenAuthenticateOrSignData, bulk?: boolean, callback?: (error: T1CLibException, data: TokenSignResponse) => void): Promise<TokenSignResponse>;
allAlgoRefs(callback?: (error: T1CLibException, data: TokenAlgorithmReferencesResponse) => void): Promise<TokenAlgorithmReferencesResponse>
resetBulkPin(callback?: (error: T1CLibException, data: BoolDataResponse) => void): Promise<BoolDataResponse>;
tokenData(callback?: (error: T1CLibException, data: TokenInfoResponse) => void): Promise<TokenInfoResponse>;
}T1CSdk.T1CClient.initialize(config).then(res => {
client = res;
}, err => {
console.error(error)
});var core = client.core();
core.readersCardAvailable(callback);{
"data": [
// List of reader with cards found
],
"success": true
}const moduleName = 'certinomis';
var client = client.generic(selected_reader.id);var client = client.camerfirma(selected_reader.id);client.tokenData().then(res => {
// see response below
}){
"success": true,
"data": {
"info": {
"slot": "string",
"label": "string",
"manufacturerId": "string",
"model": "string",
"serialNumber": "string",
"flags": {
"isRandomNumberGenerator": "boolean",
"isWriteProtected": "boolean",
"isLoginRequired": "boolean",
"isUserPinInitialized": "boolean",
"isRestoreKeyNotNeeded": "boolean",
"isClockOnToken": "boolean",
"isProtectedAuthenticationPath": "boolean",
"isDualCryptoOperations": "boolean",
"isTokenInitialized": "boolean",
"isSecondaryAuthentication": "boolean",
"isUserPinCountLow": "boolean",
"isUserPinFinalTry": "boolean",
"isUserPinLocked": "boolean",
"isUserPinToBeChanged": "boolean",
"isSoPinCountLow": "boolean",
"isSoPinFinalTry": "boolean",
"isSoPinLocked": "boolean",
"isSoPinToBeChanged": "boolean"
},
"mechanisms": [
{
"mechanism": "string",
"flags": {
"isHardware": "boolean",
"isEncrypt": "boolean",
"isDecrypt": "boolean",
"isDigest": "boolean",
"isSign": "boolean",
"isSignRecover": "boolean",
"isVerify": "boolean",
"isVerifyRecover": "boolean",
"isGenerate": "boolean",
"isGenerateKeyPair": "boolean",
"isWrap": "boolean",
"isUnwrap": "boolean",
"isExtension": "boolean",
"isEcFP": "boolean",
"isEcNamedcurve": "boolean",
"isEcUncompress": "boolean",
"isEcCompress": "boolean"
},
"ulMinKeySize": "number",
"ulMaxKeySize": "number"
}
],
"ulMaxSessionCount": "number",
"ulSessionCount": "number",
"ulMaxRwSessionCount": "number",
"ulMaxPinLen": "number",
"ulMinPinLen": "number",
"ulTotalPubLicMemory": "number",
"ulFreePubMemory": "number",
"ulTotalPrivateMemory": "number",
"ulFreePrivateMemory": "number",
"hardwareVersion": "string",
"firmwareVersion": "string"
},
"infoType": "TokenInfoType"
}
}
//ENUM
TokenInfoType {
Token,
PKCS11,
File,
Payment,
HSM,
Vault,
Wallet,
}allCertsExtended(parseCerts?: boolean, filters?: string[] | Options, callback?: (error: T1CLibException, data: TokenAllCertsExtendedResponse) => void): Promise<TokenAllCertsExtendedResponse>;
authenticationCertificateExtended(parseCerts?: boolean, callback?: (error: T1CLibException, data: TokenCertificateExtendedResponse) => void): Promise<TokenCertificateExtendedResponse>;
nonRepudiationCertificateExtended(parseCerts?: boolean, callback?: (error: T1CLibException, data: TokenCertificateExtendedResponse) => void): Promise<TokenCertificateExtendedResponse>;{
"success" : true
"data" : {
"certificates": [{
"certificate"?: string,
"certificateType"?: string,
"id"?: string,
"subject"?: string,
"issuer"?: string,
"serialNumber"?: string,
"url"?: string,
"hashSubPubKey"?: string,
"hashIssPubKey"?: string,
"exponent"?: string,
"remainder"?: string,
"parsedCertificate"?: Certificate
}]
}
}{
"success" : true
"data" : {
"authenticationCertificate": {
"certificates": [...]
},
"nonRepudiationCertificate": {
"certificates": [...]
}
}
}client.authenticationCertificate(parseCertsBoolean, callback);{
success: true,
data: {
certificate?: string,
certificates?: Array<string>,
certificateType?: string,
id?: string,
parsedCertificate?: Certificate,
parsedCertificates?: Array<Certificate>
}
}client.nonRepudiationCertificate(parseCertsBoolean, callback);{
success: true,
data: {
certificate?: string,
certificates?: Array<string>,
certificateType?: string,
id?: string,
parsedCertificate?: Certificate,
parsedCertificates?: Array<Certificate>
}
}var filter = [];
client.allCerts(parseCerts, { filters: filter}, callback);{
success: true,
data: {
certificate?: string,
certificates?: Array<string>,
certificateType?: string,
id?: string,
parsedCertificate?: Certificate,
parsedCertificates?: Array<Certificate>
}
}var filter = ['authenticationCertificate'];
client.allCerts({ filters: filter}, callback);{
success: true,
data: {
certificate?: string,
certificates?: Array<string>,
certificateType?: string,
id?: string,
parsedCertificate?: Certificate,
parsedCertificates?: Array<Certificate>
}
}var filter = null;
client.allCerts({ filters: filter}, callback);{
"authenticationCertificate": {
...
},
"nonRepudiationCertificate": {
...
}
}var data = {
"pin":"...",
"algorithm":"sha256",
"data":"dGVzdA=="
"osDialog": true
}
client.sign(data, callback);{
"success": true,
"data": {
"data" : "W7wqvWA8m9S...="
}
}var data = {
"algorithm":"sha256",
"data":"vl5He0ulthjX+VWNM46QX7vJ8VvXMq2k/Tq8Xq1bwEw=",
"osDialog": false
}
client.signRaw(data, callback);const data = {
algorithm: "sha256",
data: "dGVzdA==",
pin: "1234"
}
const bulk = true;
client.sign(data, bulk).then(res => {
}, err => {
console.error(err)
})client.resetBulkPin(module).then(res => {
}, err => {
console.error(err)
}){
"success": true,
"data": true
}var data = {
"pin":"..."
}
client.verifyPin(data, callback);{
"verified": true
}var data = {}
client.verifyPin(data, callback);{
"verified": true
}var data = {
"pin": "...",
"algorithm": "sha256",
"data":"dGVzdA=="
}
client.authenticate(data, callback);{
"success": true,
"data": {
"data" : "W7wqvWA8m9S...="
}
}client.allAlgoRefs(callback);{
"success": true,
"data": ["sha256"]
}const body = {
"algorithm": 'sha256',
"hash": '...',
"signedHash": '...',
"osDialog": false,
"id": 'cert_id',
"pin": 'pin_code',
"timeout": 120 //timeout in seconds
}
client.validateSignature(body).then(response => {
response.valid
).catch(error => {
errorHandler(error)}
){
"success": true,
"data": {
"valid": true
}
}(prerequisite: driver installation neeeded)
Custom modules

/// Filepath abstraction for VDDS
#[derive(Debug, Deserialize, Clone)]
pub struct FileDescriptor {
pub entity: String,
#[serde(rename = "type")]
pub entity_type: String,
#[serde(skip_serializing_if = "Option::is_none")]
#[serde(rename = "relPath")]
pub rel_path: Option<Vec<String>>,
#[serde(rename = "fileName")]
pub file_name: String,
}#[derive(Debug, Clone, Deserialize)]
pub enum VddsCmd {
import,
export,
view,
}#[derive(Debug, Serialize, Deserialize, Clone, Validate)]
pub struct VddsExecutable {
#[validate(length(min = 1, max = 256))]
#[serde(rename = "entity")]
pub entity: String,
#[validate(length(min = 1, max = 256))]
#[serde(rename = "type")]
pub entity_type: String,
#[serde(skip_serializing_if = "Option::is_none")]
#[serde(rename = "relPath")]
pub rel_path: Option<Vec<String>>,
#[serde(rename = "cmd")]
pub cmd: String, //import, export, view
#[serde(rename = "argFilePathQuotesDisable")]
pub arg_file_path_quotes_disable: Option<bool>,
}export interface AbstractVdds {
import(body: VddsImportRequest): Promise<VddsResponse>;
export(body: VddsExportRequest): Promise<VddsResponse>;
view(body: VddsViewRequest): Promise<VddsResponse>;
}
// Models
export interface VddsImportRequest {
exec: ExecDescriptor,
file: FileDescriptor
}
export interface VddsExportRequest {
exec: ExecDescriptor,
file: FileDescriptor
}
export interface VddsViewRequest {
exec: ExecDescriptor,
args: Array<String>
}
export interface ExecDescriptor {
entity: String,
type: String,
relPath?: Array<String>
argFilePathQuotesDisable?: boolean,
}
export interface FileDescriptor {
entity: String,
type: String,
relPath?: Array<String>
fileName: String
}
export class VddsResponse extends T1CResponse {
constructor(public success: boolean){
super(success, null);
}
} T1CSdk.T1CClient.initialize(config).then(res => {
client = res;
}, err => {
console.error(error)
});var vdds = client.vdds();let body = {
exec: {
entity: "Crossuite",
type: "vdds",
relPath: ["build"],
},
file: {
entity: "Crossuite",
type: "vdds",
relPath: ["files"],
fileName: "somefile.txt"
}
};
vdds.import(body).then(res => {
// handle response
}).catch(error => {
// handle error
});let body = {
exec: {
entity: "Crossuite",
type: "vdds",
relPath: ["build"],
},
file: {
entity: "Crossuite",
type: "vdds",
relPath: ["files"],
fileName: "somefile.txt"
}
};
vdds.export(body).then(res => {
// handle response
}).catch(error => {
// handle error
});let body = {
exec: {
entity: "Crossuite",
type: "vdds",
relPath: ["build"],
},
args: ["rnd_image_id"]
};
vdds.view(body).then(res => {
// handle response
}).catch(error => {
// handle error
});# InvalidInput
{
"success": false,
"code": 106997,
"description": "Invalid Input"
}
# ConfigurationError
{
"success": false,
"code": 505126,
"description": "Configuration Error"
}
# FileNotFoundException
{
"success": false,
"code": 505126,
"description": "File not found"
}
# checkout
git clone https://github.com/Trust1Team/vdds-test-exec
# build
mkdir build
cd build
cmake ..
cmake --build .```powershell
curl --location 'https://t1c.t1t.io:55000/v3/modules/fileexchange/apps/file/create-type' \
--header 'X-CSRF-Token: t1c-js' \
--header 'Content-Type: application/json' \
--header 'Authorization: ••••••' \
--data '{
"entity": "MyCompany",
"type": "vdds",
"modal": true
}'
```{
"success": true,
"data": {
"entity": "MyComp",
"type": "vdds",
"absPath": "/Users/michallispashidis/_git/vdds-test-exec",
"accessMode": "d",
"total": 0,
"appId": "unknown"
}
}curl --location 'https://t1c.t1t.io:55000/v3/modules/vdds/cmd/exec' \
--header 'Content-Type: application/json' \
--header 'Authorization: ••••••' \
--data '{
"exec": {
"entity": "MyComp",
"type": "vdds",
"relPath": ["build"],
"cmd": "import"
},
"file": {
"entity": "Crossuite",
"type": "vdds",
"relPath": ["files"],
"fileName": "somefile.txt"
}
}
'{
"exec": {
"entity": "MyComp",
"type": "vdds",
"relPath": ["build"],
"cmd": "export"
},
"file": {
"entity": "Crossuite",
"type": "vdds",
"relPath": ["files"],
"fileName": "somefile.txt"
}
}{
"exec": {
"entity": "Crossuite",
"type": "vdds",
"relPath": ["build"],
"cmd": "view"
},
"args": ["rnd_image_id"]
}export interface AbstractRawPrint {
list( callback?: (error: T1CLibException, data: PrinterListResponse) => void): Promise<PrinterListResponse>;
print(name: string, job: string, data: string, callback?: (error: T1CLibException, data: PrintResponse) => void): Promise<PrintResponse>;
}export class PrinterList {
constructor(public printers: Array<string>) {}
}
export class PrinterListResponse extends T1CResponse {
constructor(public data: PrinterList, public success: boolean) {
super(success, data);
}
}
export class Print {
constructor(public printed: boolean) {}
}
export class PrintResponse extends T1CResponse {
constructor(public data: Print, public success: boolean) {
super(success, data);
}
}
T1CSdk.T1CClient.initialize(config).then(res => {
client = res;
}, err => {
console.error(error)
});var print = client.rawprint();function callback(err,data) {
if(err){console.log("Error:",JSON.stringify(err, null, ' '));}
else {console.log(JSON.stringify(data, null, ' '));}
}
print.list(callback);client.rawprint().list(callback);function callback(err,data) {
if(err){
console.log("Error:",JSON.stringify(err, null, ' '));
}
else {
console.log(JSON.stringify(data, null, ' '));
}
}{
"printers": ["123"],
}const name = "test"
const job = "test-job-01"
const data = "SSdtIGRlZmluaXRseSBub3QgYSBNQUxBS0E="
client.rawprint().print(name, job, data, callback);function callback(err,data) {
if(err){
console.log("Error:",JSON.stringify(err, null, ' '));
}
else {
console.log(JSON.stringify(data, null, ' '));
}
}{
"printed": true/false,
}Wacom’s Signature can capture handwritten signatures from a pen tablet. The mdoule simplifies the interaction with Wacom pen tablets for signatures.
Guidlines new Partner token/smart-card or other hardware device
This page summarized 'know' solution for connector connection troubleshooting
export interface AbstractSimpleSign {
getInfo(): Promise<GenericT1CResponse<SimpleSignInfoResponse>>;
initializeContext(origin: string): Promise<GenericT1CResponse<SimpleSignInitializeResponse>>;
uploadFileContext(origin: string, request: SimpleSignUploadFileContextRequest): Promise<GenericT1CResponse<SimpleSignUploadFileContextResponse>>;
}
export interface SimpleSignInfoResponse {
version: string;
localFolder: string;
}
export interface SimpleSignInitializeResponse {
folderBootstrap: string;
folderExternalUploaded: string;
folderExternalSigned: string;
filexOrigin: string;
filexEntity: string;
filexTypes: Array<string>;
}
export interface SimpleSignUploadFileContextResponse {
origin: string;
entity: string;
filename: string;
callback: string;
externalId: string;
}
export interface SimpleSignUploadFileContextRequest {
filename: string;
callback: string;
externalId: string;
} T1CSdk.T1CClient.initialize(config).then(res => {
client = res;
let simplesign = client.simplesign();
}, err => {
console.error(error)
})simplesign.getInfo();{
"success": true,
"data": {
"version": "0.2.5",
"localFolder": "/Users/someuser/Desktop/simplesign"
}
}let origin = 'https://acc-rmc.t1t.io';
simplesign.initializeContext(origin);{
"success": true,
"data": {
"folderBootstrap": "/Users/someuser/Desktop/simplesign",
"folderExternalUploaded": "/Users/someuser/Desktop/simplesign/_uploaded/_external",
"folderExternalSigned": "/Users/someuser/Desktop/simplesign/_archived/_external",
"filexOrigin": "https://acc-rmc.t1t.io",
"filexEntity": "SimpleSign",
"filexTypes": [
"UPLOAD",
"SIGNED"
]
}
}let origin = 'https://acc-rmc.t1t.io';
let request = {
"filename": "T1T_test.pdf",
"callback": "https://test.app",
"externalId": "123456"
}
simplesign.uploadFileContext(origin, request);{
"success": true,
"data": {
"origin": "https://acc-rmc.t1t.io",
"entity": "SimpleSign",
"filename": "T1T_test.pdf",
"callback": "https://test.app",
"externalId": "123456"
}
}interface AbstractRemoteLoading {
atr(sessionId?: string, callback?: (error: T1CLibException, data: DataResponse) => void): Promise<DataResponse>;
apdu(apdu: APDU, sessionId?: string, callback?: (error: T1CLibException, data: CommandResponse) => void): Promise<CommandResponse>;
apdus(apdu: APDU[], sessionId?: string, callback?: (error: T1CLibException, data: CommandsResponse) => void): Promise<CommandsResponse>;
ccid(feature: CCIDFeature, command: string, sessionId?: string, callback?: (error: T1CLibException, data: CommandResponse) => void): Promise<CommandResponse>;
ccidFeatures(sessionId?: string, callback?: (error: T1CLibException, data: DataResponse) => void): Promise<DataResponse>;
command(tx: string, sessionId?: string, callback?: (error: T1CLibException, data: CommandResponse) => void): Promise<CommandResponse>;
commands(tx: string[], sessionId?: string, callback?: (error: T1CLibException, data: CommandsResponse) => void): Promise<CommandsResponse>;
closeSession(sessionId?: string, callback?: (error: T1CLibException, data: DataResponse) => void): Promise<DataResponse>;
isPresent(sessionId?: string, callback?: (error: T1CLibException, data: BoolDataResponse) => void): Promise<BoolDataResponse>;
openSession(timeout?: number, callback?: (error: T1CLibException, data: DataResponse) => void): Promise<DataResponse>;
}export enum CCIDFeature {
VERIFY_PIN_DIRECT = 'VERIFY_PIN_DIRECT',
MODIFY_PIN_DIRECT = 'MODIFY_PIN_DIRECT',
GET_TLV_PROPERTIES = 'GET_TLV_PROPERTIES'
}openSession(timeout?: number, callback?: (error, data)){
data: string // sessionId string
success: boolean
}{
data: {
tx: string, // input
rx?: string, // output
sw: string // status word
}
success: boolean
}{
data: string // ccid response
success: boolean
}{
success: true
}{
data: boolean // true if present, false if not
success: boolean
}{
data: string // ATR string
success: boolean
}{
data: Ccid[]
success: boolean
}{
cla: string
ins: string
p1: string
p2: string
data?: string
le?: string
}{
data: {
tx: string, // input
rx?: string, // output
sw: string // status word
}
success: boolean
}{
cla: string
ins: string
p1: string
p2: string
data?: string
le?: string
}{
data: {
tx: string, // input
rx?: string, // output
sw: string // status word
}[] // Array of response objects
success: boolean
}{
data: {
tx: string, // input
rx?: string, // output
sw: string // status word
}[] // Array of response objects
success: boolean
}iVBORw0KGgoAAAANSUhEUgAAAXgAAABSCAIAAADRv1gVAAAAAXNSR0IArs4c6QAAAARnQU1BAACxjwv8YQUAAAAJcEhZcwAAHsIAAB7CAW7QdT4AAE1xSURBVHhe3b0HgBRF+v+NCIrEBZYFFnaBJeeMZEFBARVFVMyBQ+QMKKY70ymKCooBA/7OnFD0FPXM2VMU1FM8jIcJUVEMCJ6gIizv53mqeqZDdU/P7urd+/+6DtXVVU89uZ7qmZ2tVr51c/nW8vKtW/i/vHxzeTkNXjdvlU7p2Ur/VlrSKXdlJDBjKgFDPjWRyq+oFFQ6FSgEc9de/A/AKNlepIYKGJBC5fLoCE2HjEZ2dQMZrGPEHezt1DAWFTpBzvGZrfKTJ4QTAGOxMKzai98Fqp98VlQRbDsC1VgeVtbVbdtApsfTD0Cd37ZTQD3Ajpd1vbaFyBXSQ5Klqtl/7RDxM9OKRSK7unrgrrIonQnqDkA48YmXTjUyLEHKSsPQV35sTxrY9C2vqWSPl5f+/MWTtWNnid94d3XReD2L7EoqnlrFoFqND0Krbf8A2eds0wejN/NjuxIRGOmTSftt24FEDRjGlEIqW1cMsn4ChzHwywt7WdmDEFf1IyKvn05qWG14iabygAMnE5p7hMUEV84T3sYbUY0PaZSimqxCrtCpn58qcLiq5dCmjPRQy3lt/9ywbm106X3VvDRC0P741fPlzQdlM6ttE0thvUE8cfXw+BTIe5UIlEIV+IkFK7ukMGGSY8NLso1FVt6ksWY1A+MVYg57dNJeC6UVTyioypzpQ4bbpoHWV79N1rcKVXXIj+lNBx0cmKGazyFdEEzIJReC+7RnwLVya9h2UNB+A9MOcmVu+BCgE7lrIGMqmfqVE2HGRd9C5MXPpGU60sMIW7kEBHu2HYCStu3KwyghD4THq3o8ZRrkKzVj8xou9HnFNFWnBx/U/TzKKlegolGfTFBZokL9xoszcKUBAxVXjYpn2xGo6hOkE8Pr5IqmSJ/qc6yVBijbtv73IGqupHQkQVOV5KFtVUhQK8JJoEcIauILO0LGr0L9EajiA1xpuFZE3ryks1A/tO0UUKGyvDk3wjR61jE2N9muPFFNSNh2OojtAmoVs9mmB+lKSRXD25YfypVLpDwV7YDwbykY9WlHkGalV9FiwdNSlH56iF1RpuFHgsT25wlPUnWXiiNkd+s5buFUsXGalDvpZIkN49yyWPq5pFb2hJ/KaCYB4dVV8Byyq8tUytb2QmENYdtYxCRxMyxeamXCWFAauXhOhu9hcEYw9YJMW9cwzWy3A8qQbcfAnA4yFyGo5EoiiQ7OnWMVccGYJBUynq5WKfVVEKyb+YlFVlDPJwysFHobnZtOCxlpawGXA/lX9E/MOlNVwKdn5SSVhmN5rjwsD7zajkohnTg5kUotMByvE7VXViTRnkgqPb5DsX+6O2WL5kNu5IP6Rd52EZoyC24s5TweButMtVZ04TCfXFfUHsKbkNu0adMrS1+78cabZ8+efcEFF1xz9bWPPvbw999/r0NQjUqiI7Pw5iYhxRhVU9X4kxtRzn0QL4lqWODvRArnmBTwra7/JEjKEjn0ENg8IlBN5sOn+rVtR+G4G6WfRIEbkXvuwYbzZOn8kGF5Sfq7Q8UJCKt7km3HQcYEfUCNkGtaBPklmvzpVwQ/bdx4zz33jB2ze6dOndu3b9e+ffuuXbv26tVrzJgxp512msk1ArhxM4S9K5ImMupTk4QQcLjssqKT7IUzPSk1o7oI1QzETePvKiQB6aufk98UavFcXGmA6cgErtyaqQwgmIOzLBiYeuzvC9FuLtaMhu2FA8a1UgNTiFH5v+q8SOnZtkK9NGDx/N/eFtXkcpqs2zmEiXNKmN248ce777571KhRLVu2LCoqKiws5JV2mzZtOnbsSK4ZPnz4ddddZyfEQOjnsl5suMrcCiJOLuWlCsJM9xYXfYVKFOTdeFQcYNW7yz8ZzsU/PPvKVhaQKHZ1BxJXj9siLPy8Ga3qq0sDsJpEKQOlY9ux8K37PwThqqL+gzj6o0jyHz+i0YFSsoqJ0RILyK0opLM8VaJRI6UTVUYGmIhdPoKnnnpqt912I62QXxo1asRr8+bNKWe6devWuTOlTfuysrK+fftOmDDBFjWRtRyQ1QEloks1ztIxxK1SsO1EmEiwFz7o7FQU/FCdx+pNXMFuGnlT9mBkDyZW70KWdq8uTmObPiRzayGGiOVWKKRMZHGPhyNQu1uL+DnUtmn64e9So9tBTpuK8o3+Y6hl4JNaZEwaWhHEWioRwlRVc5KIvCsaUWtA9UEzqAG8tv03BLGQN0sa5ZtXr149bdq0Vq1aNWnShBTDK+099tjj9ttuW7r01Zdeemn27NkDBw6kqCHXDBs2bNmyZWZ6BupDGXWnTQ1+KFf8F+M04lXeDRp50U9lVAbkdBfIZMYE1V45aKgEVpeYz8d9oxTiEDfSsYv6RkZnyaWLjh9pM1cIecmSjyGiUgThl1cFrBB0FfOaj5PkGA8zwbsyOA8OExKNsJsMvZ9PyEWwefNmzkrUKRyRGjRoUFBQ0Lp16wMOOODVV1+V216Irl+/ns62bdu2bt2WwUzRm7haPqr8rwKPzOn36hwIrCZXp1QFaOkRdjsRXAfE0tRZRoV5OERloLZirSSuKgMvGWWTvmggqlV704KxIX7kvkw0bSGozf+noCryFCF+YmU0W7tpu8C8PLShjmrbyYhNNGLCAEMpl88Gf4SC9timYN26dSeffDKZpaBh4wYN6pFrRo0a9dxzz3FL58prRilz5szp1KlTq9LSTp26nH/++aZToOP4yThfLKRmkbFZWdLMciAslwekqwA1gZ+gkVpZc66SG0wMiaUK4n9p+aEjQzzrKOEhY/GwvDorb94iCwWgNG3bguvEKQnQmRXUnio/dvUKMhQHtbVtVwpRi6BvR8wiVcL2zJwEywbsHlGEzo1VTzDRyMjAMnoZu3AOSGDHzl2+fDlppVmz5g3q12/YsGG3bt2uu+66X375xd428Bn73nvvZUxpaSl1zfTp001nheGveGUFbxWpO4Jm4DJB9S74NMZEn+pjjVAVEE15C9CIMXnYvjmAY4W59mlDl7FtA72SPufisWBGhqssRV1IlkvgOfluPpCdWYX1rJ9aCuHBNvNAHOeybLC/YvSZlvGBuLVi4ZubLzRebJsL+VGEEo1oWSMt5TIxAsQpUdaVJR544IFu3XsWFDRuWNCoRXHxpEmTPvzwQ7tmREhlfcuLL77IoamkpIQKaOrUqdrPKvnwKT8hyvQH0oofete2o4jTkkzJZVRlRrKwzmeGsKFeXhHotFgp/FDeNHTjx2u4aXWdIHyloLb4HaEO9RuuqP4pr/Y6CNXnb6TJtHLp8nak+p5pOiC+ER8RcRDxk4iKxQOJRp8jeFD76IkOwKW8Bu7aFk0hJNchFkWk8PKbNm3i4NOqVSvzvhLlyfz58+m0t+OxfPmbvXr1Li4uJtFMP+G4nIWxRq9dXfjPmMTFVQZGUnvhhyghdlZ6qBUdnOu6eUDZyUxJz5qaqRLQdeMjyjRkjXTiJNrChSz/mqYdnHj3fRZPAWU+H05UEer2sWGp5CxNZTtAX/3TtoGSMjzDi0czhX7kfq4xeUHp5ae9AFQvtu1DNTqTspGBDMpHGB+Xfkv8+OOPRx99NMmifv36ZJmhQ4fah74pwFGrS5cuTZo04fR0ySWX2N6cSGEqB4T/WAeyiFGo9Bk7he8SGC5OovpHYz4FZiC+6I2Edszq6q9BhMfFcB4LXcxrOugnAlmsJvVYapo5oMMCq2hY2h7lwTRpx5kJERP4ZFYu+1YIft4qCOYbfeen5yqCXdf85IbyadvJiHsYLHZymsrfj5lDq/gdQmj4tL5u3br999+/efPmBQ0LipoW0V6zZo0OUb16I+PWfeyxx9q3b096atO69Z133ml7QxAa/C+mstCTgtfOrhKH+DMFkuqhw60TYdte+CCrufuhk4ej++moAJrFgrLkEEwXta1EqO5yEouBTyi/6f0Qnwlx4pNFPco1MSqvrJWfDkN01QohTsI9MiY0z7iswxNYwd8T5pY59iJPBNaSdkBqiMqPiBfmPOx7yrdt/3aQdR2rxL7rFICIoQrPsm6OUQHxIqrP4ptvvtlr/F5FRUUFBQUtWrQ45ZRTfvrpJ3vPTAwxJwuqjb3uW265pWXLlo0aFXTo2O4f//iH9ql6EyNWWI7nSpYILeszpBbngbl6N9iTeYlHjtv/CzD2TYRqw4Pf3SM6qRj0kO61Y2jKos616Iznn1k5OZQBkTEh1zJRKryFvELu5KAfhU7JCMxCsfwbyLo5hiQhgUOlmgf/yLtu/Q/EL+CMYnvD8EmnyCSapHCNQtUdO0VXyC6zevXqUaNGUcs0bty4pKRkzpw58lBG0qtLczFOdsYZZ+jvJRT26tX7k08+sb1AyOAl9ioRrCeDE5SejMrMrWKoKLYdQRUzKeuk0m8QEhjGSVRv+ipVIeDVjIlCk4IMlthLEEQSXzARWOgCdqIsk8OxlY5t+6E8Z1ZnRDwnMrIC+vmtEavkUKJMBqnk7bfffvDBBy+99NLp06fvtddeo0eP3mmnnYYOHTp27NiJEycefvjhV1555ZIlS+KTjiBdRROFGtO2HTCSIOoWk2WKi4sbNWrE2eeee+7RWxkk7UUGEAET9t6nebPiZs2ajRw50v8ueEoLh7mN4V97jaM7jCHdmX4ajHX6ehC55IuD39HDkPBwuYuGje3XePbYM9ymgMjkBac2vLaEEwR9GlCIwuL5TIaQCs0VavAZ6Y+FDvMlBW1YSYVh06owIvNVD147ejsNROrK8uUDpFLqKglQyfCEjO++++6VV8074MCD+/bt27Fjx3bt2peVtS5pWVpc3Kxp06aEM43iFs1KS0sJ6u7du48YMeLAAw9ctGiRSTdiRo8royVXopE1q4B18Pnnn++884iioqZkmS5dujz22GP2hgAXNW9pqYyJEbt+/XoEbtKkSYvi5scdV9kP0eQFdayqMGRcAa82iUK6TWzbjgpCieRBQ4amyJ5VjmQe1VWqxicFqlzbjsC6pbbENvmum4eyZQU1kL2QnwjUB34ni6xZs+bqq6+mZmnVqhW5hJxC0BXq7zbTKGpaxAU/TYuKOKAADhkGJt3svPPOF110EblG5QjoLZRosjuJyG9aFQW1zJgxY6hB4LJz586PPvqovZE/li5d2qZNG+i0bt36jjvusL3JiDFbKiTONfV/7L6U7c9oUpzJtPVuno7rgslB9iIPxEuVF2R1n5/Ec6K38ljTkpVZPppB+hWV/bcC4uEN9sIPYdJoyW9950ifv/nbDpjtyudRlYG6pmmuWrXqrLPO6tq1KwHbuHHjAkVhExJKi1alLcvKytq1a9epUycG9O3Tu1+/fv379+/Tpw/VA53cIjERm7169aK04ZxlaFqgh/It8vZ2Ttf3F+QOuNTy3XffjRs3pqRlCdmB0uupp56yN0JIVKvkcr07Z84c8iuZFVIff/yxuZsMdUd5dbKXDJ2bnaaXiG81wA29zA2jt+DgVBMzkLnx+olBHuNlqJu+VlKqQXPNPyqLSbIgKpoLMtJJPwUqInsqeP5sfMO3oUpIeE0ND3uRArL9BDwk80/lEa1ofNWxaklswpg0FjHwjfzhP+suvHAWGYSapYGCFEMtQ3Ihm0yZctS8eVeSO/75z38Sel9//fWnn35KDfHvf//7xRdfvObq+TNOPGmnnXaikqAUoLTp3bv39OnTVXtK31uFRJOkTbgJqypuvApsmtRO++23H+c3WEeAJ554wvTr8qbpgDqxQ02bN28eO3YspBB+770nbGGUdsty3oo5UmEKCKEMBR9lv1xyIzsmfrmo0jIQypXj0+ci0ghSy3LtKrb9c/OFaNiZJWXJWHEtROrAmHw4STFSIs2OkUau8bp6PM8R3nR8sEd+xDGcdKLj4+AaGenxcRuzYCroWgSP3UIMIc4ZO+64o3k7uL7+MhC1ye7jxnGAevPNNzdt2uTiMADC84033jjssMPatm1LNUR1Q+zTaW97CBydhGI6BSXgp59+mjp1CrkN7imr7rvvPnsjCBXAtpPx3nvvtW1bhgooai677DLbCwXRloNboZzT9VPDkYjhO8h6nCCqz4pykjhXBMzIHhmZh/giSnAwl+51o5kradvIF7qsJacWVC7Mj+lxc1V1qGLy4pz5sezV7zGQNGGbKZIvlJLHfP/99zNmnFxS0lIPSQWNGjUixZx66qnLlr1uR8TCmIqfLP3nnn22ffv2VAMtWrSYNGlSjkQTD7+QSdiyZcuZZ54Jx+aYs2DBAo0H0UtO1Rjd2LYPF198MbVMg/r1qeU++OAD6UJO10gD8w4/6xp6udetOBw8aJcs7QNXCdpz61Y1lkrnqoocI9PqX31IKTI45er6Av1gvaMiB7RQUQgb6bWRB8SJHByqLFUMXSlAFXHUIrY+zwm1isOCQsdr2n9joLdtFfbWW28NHz68SWFR3XoN2MI5fMyYMeOLL77QgQxN4S0K1ZWMXLJkCeHJsYtEc9ZZZ5m7fthEI1qoCkPOmzevdevW8vndNm2ovrRPqjU4kp/UUG2IAKQMToDoApr77LOPyZRKKExtzVdr7r777qlTp07YW3DOOed89tlnaCGlygCHT055d9xxx6JF91INJn8uwI9Uq6hItm3AlHx0YmHohGl5sO6bGkrKtuOQL5+GQ9vEqXz8eGRUgACfkTySQwodn4MrlsikP2nnpRk/ZK5tehBq+iMXvmj3QdzeW914iFjHdPxO0EXDSy5atKhDhw5UMXXq1CGydt5553/+85/2XnqICbP6vPHGGznB1KtXr2VJ6aOPPmx7fchR0Rht2otcePrppxGA9UpLW5511jlUN/ZGEGHnS8TixYupj1AKx7/IZ3AsSEbz588fMGBAScuWlIIlJSVdunQZPHjwSSedFC3h1CcCnQj4+ONPHnroob179+as169fP06tEyZMuPLKK9evX28HOeAMaadc8jAvTWCAbO0jmpclQnP0UsYIQYwdoulzLB2QMQHUQiPDoZ4vZLqfZtXEkFFUFspkAmWff4pEnuz0m1YGos+8OWRGiJ80MHyo7TJzs0Ry1Hq6pG1HIaTzkMIwYi9Q1ubNl19+OQFSt25dsgyNCy+8UMr/fOBkYLfddoMmiWbgwIE//PCD7fUhNtGIvBI2kLWGVPKxSl+6dGnfvn0pnFq2bHncccel+YVsQchZQygvP2rKVGqZxo0b9+nT69tv19p+Hyg9Ro8e3aK4WUFBY/M1oKQkqioObrvsssvbb7/NGNcK2ldevm7dD6eccgr5RT6B1KwZ/JtvokAWastrr73WjGZkSL/qRs5ARSLb8oO+cFKIRTgV/iZwbsLx0HhL4MoXSOI6mUvfKnG2Ts2H5mv3aHr1JxUtsZ2Es6TyTI+wVylA0kEhSlkliOVTUqRwFSNnDHRWcHWV0LYVZBkONc2aFZMR2LnZjM2XzOWA8J+DFyoAQm+77bZr2rQp27PtFRYUEhFbUlQ0KZz+k08+GTZsmMky++6773/+8x97w1Bw7QnaHzSACBQYydmHfEF1R5V01ll/sb0yUoxHLps7d27btm3r169PKkV31D7du3dvW1ZW2qoVtRW1ycKFC+0cF9577z3OZWQxKDRuVNCiuLi9fgU6r5Ai1+w9YZ93333Xjv7fg9M6X375Jen166+/Mpei5JAL/nZI4ZQVg3qLbRtE/ccPldrhdXFQNcZyLkt7a+m6HmVuVIW8lmaKNOlfXRfPISMDhGp5OcFy+ul/btRIjks4PHvwRx99ZAdFoJSNvGJQyRUKWT3C45o1a3r06LH99tvXqlWLM4GznAEpHwb7EFEGaWW//fZrTjlQXDxixIjsI6U8oVoLuA55hCqjoGHDsrZtQgG/fPlyzpaorEGDBqQJhh144IEvv/zyhg0bpk2b1q5dO1PUzJ49206wyNJ/4YUXunXrRiYmSUFnwIB+c+deevPNNx955JE9e/Yk15CqyDXnnntu9PyVhXF3nzFccB6yVN6cnpUPyMtnnnnmrrvuOnbsWCzCSdbeqHKIuPE6cR9bEsbnB484Gk8IsyR7pIJGm20HgDW5I7WVNEKJ3jqDIyCB9qfSg4zUwbpQto7T/kybRVJRw4FnzpxZVFRYp3YtgmXvvff+7rvv7L0QoO1bKySE4cpeeJg8eTLJi3KGOuOBBx6wvRHo39421L0F1C2CK0SgSUGwZcuWGTNmtGnTprCwiArCHFXE1TyGLHNQzJJMpZ0ff/xxwIAB5o23P/zhD7ZXtUZ5RirhlskRpAP/LzfcftstFDVkvU6dulx11VW2N4i///3vGQqlpaWzZs3KnFQpc/bZZx/ztaGdO3ceM2aMfasrA9WVyGWvPQSuGeMMAzoTwsMNa6NELFu2jMzbtm0ZRSWiDRky5MQTT7T3glDOjYF8hshwK6LZxcTF440Vd5BRblOZOA1U16k0pnnHrit8VQkPPm2YJGLbFugHJUT7w9D78WO4nYtCnghQY8Nu3rw5JyZCiR0oruhIQjaKM5Rpbr711lvZ6WvWrEkcTZ9+nJhe1g6sLp2hb9hLhq4SNt51112HW3M2IyaJXtsbA5keoRAHZCgulvMkr88//7zKsJkTwSGHHFJYWEgS5RbqO+aYY7799ls7R7FgwV3FxfIxakqSxx9/3Pb6cOedd3Lgqle3Adqh6rFJSmxteSMx77jjjiUlJRyg+vfrd9+9i0x/LNQGpqWvVrmmHYXqwRE8XvznB1Z+//33hw4dSlnHfoXhSZEk/SOP+MMvP8c/KUv27YCt1Xl8UOkSJitkH7bNKkHuFWOg8xxa1RQW6Fe5XCMTrSlBmKHPsMqJLYq3zRxwcaVO5fNkcO+997L31K5du2HDhnvuuWf6LKP0bdsiKB2BQ+BzaKKcGTx4YPZPyHrQoaJkfryKxiJCOhEU5927d6dkIqT9D4GSISvKPqBbQQyoL0aOHGmeWu2xxx7m8PLKK68MGjSInh1q1a5Xtz5Lh3+rQnHCCScgP4mGAatXr7a9HhYuXMipihSD3qmY3nrrLXvDB4opihrCFdG6du168cUX2xuVgPpPUF56jFvF79g6Isd+jq7Gjx9fVFSERCRlMj7m4LR8xBFHxL3xVyWINx8y2XXVu2Kt/BsiGGx5QRUuzhmiIJfyYy/UcmEYc9oLhVxXQgOONUDM6lG8+tprHTt0YPsBQ4fu9P1amwuUpVQUGOr0z1dffZVtmBRDoikrK/OOMrGowDMam9XYRQcPHsxiLHPKKads2QLrLrcWRk1EKcdZpctgI6vetGKrgbeQDkjD5lxjfhvzhhtuIEGQmAEV4F577fXZZ5+ZKVmUl/+66WdijAFNmjQ9+OCDbLeSpfHQ3/8Ot5AlW3G48H5tSuo9A3Umubrggguo1IhbFj311FPN3XxBnL/++us33ngjtV7gQY+I67v0kHdFo8Fw7rnnUtk1lD+J1fbhhx/mmNmlS5c+ffpU/m9FGPq2/f8ojICemGG7eJ4rW6PtioHaLuNHVQ/hwRXw2m951gE4sB22bt066lxcHfTs2dPGi8qj912Iu6OKsO2tW1977TXiyGQZYiTNu1fVQiQSoDq3bcokdlFyQZs2bTj1bdy4Ue646WgYo4ugCRPwyy+/jB49Gu00qF939Khd2bGJGYqL2rVrAaqV888/3/n2Od5AYBN15G94u+WWW2y/qv6ZZ54xb1FBmVomk6dU82HeHnroIUoDDiOlpS2nTfujDEilpewYpLj55puPOGLysccee8kll9jznWobfqIr5oJ7dcpXTI5EVDSnnXbapk0/jx+/J5sYicb/6xo+BJxV3ZTXJH6k/AyurrNC420PspnrNJAp9sdRQVQVlLIjRM3ScteMcWiGTr9vZJ9Y2X4xpZVXVZSDf52SWUUFryooq7atYGPD8fAKHJ7dWr6cW5Zz6SEO6hm27QNphfKiRo0aJBrom7/mmIXozTHLq2hUrbYtSGKIjZrjCUFL8I8YMWLVqpWqQdG7GSD/plMiE7PnW4vNf7vn7pKSEuoOksX8+fP33XdfDgU77LADPd26dXv00UfsQBemTJli3orq0aPH2rXe527KN1NDtm/fHqVT7AwcOHDVqlX2FrDM2yuDZ599lkSDHklbRx11lO31yQhC7itC26bcW7FixfHHH3/kkUeeeOKJ119/faCiSYbPVLJPxrvv2rXfDxu2kynQhg0bxvH7k08+6du3L7XY8OFD/R/3FD27zP/fhYRpvJ8gzjfffPPVV/Z9eic0RQZ91WcjlTpCn/FBO4bwW6hJ6x0/J/kvosqy7QhE0qCfUERTBBAIbJbz5l2ZoOc4yGKRFSHLTl9Ts0xhYSFbqb2RC+YZjSOtaL+Tuc033HhD505dKJnYNl988UXb7UNwbpaIqkrWCrGv4nBPZlEI7LbbbmQE0K9fv+HDh5NlKGQIp5EjR362aqUZHQFkNxPbpD+U26RJk7/8Jfu5mw9WrOjdqw/RWL9BPXhO80UTlD8kO5Ym0fzpT3+yvXGQ3QSPF8Ftz9atH3744YwZM9hVrrnmmtDj6srAr9uzzjqLvMlZEibN9yhTOnXsSEHTYfLkydEHNCEOBWETOzwhX4g7hcnmgZUrV95xxx2HHnrorrvuttPwoZyRL7744ugjTPEl1ypR59BhOZJLMqJ605CpuIwZCOWQznUx27agksoPHJoGDx5MIBQ0LNh/0v7pNznEzErq40T+LS+/4YYb2MVrKgix2267zdwVVbhyiB85P7AHAiSef/55YpUgpLgI5LOAguKSlCIw0gd1BfOQnLRCCJlDEIGEVJQqmV8+UnWYJhdKUEHtYMoZtvTM9wp/8cUXZCio0U+Rsnz5ctOfjJtuuolMChtsCNQjtjc1RMLyLZRUHND8pzwV3aWZOJ0oVN7w3XfeeQcx69Spg4rMO9mIPGTwkLZt5WPNVGRmmJ2mujXNykA5ibWsCuEtmOwDClTk5+m7776bOXMm3kVlbt7y45U6lFyTZm/48ssvH3zwwfvvv7/Cn+RSvwXZ6kBFyLajVqhyyPo5UpiPtxgNn3766U2bFjUsaIj23nvvPdubHmpI21b8tHHj4YcdVq9u/Zo1tqtZc3uKmti/RKIQ60t+1MOm8Fkuz2ic6nN6Cbs0JQYlGS5+9tlnkyllZgyFCoByZtSoUXXr1qUwq169OimGWoZQnzt3rs3KvhQTMjxhZg5HZCXOLKaTUB87dmyDBvUbNmzM3eB3icajvHzq1Kkmx+Huy5Yts/0BsHq6/T8uuRioGWw7H7Dn161XFw116NDxs1WfmQ80lZWVUdNRRv3666+6aDoO/YAZjx/VcI7tVMdih7CAOte24+BPRhz1KWCbFhU2aiSfnCoqkt87IY2S7kePHh37ATMFpdu1115D+cNGwlmeCujXTT8LZwme6bSdTElpU7fVrEvo0tphoR2Wsoocugu14LoRCrmg8azAXalqGzSoW9S0aO6ll7m9NEEzQcAbNebIkbvUqVO7Ro0a5j2mCnwWNPOMxv4viBFy/fr1EydOJMWA/ffff+PGjfZGBDo/7Hlu4I7euuS/hQvvIa2QZapVq4ZUxDl+5qvQHFCHlrVILjgoNQgJhYQIB79u+vWggw4i7+CvpaWl4adWOlc9xpcyVHYct0+fvuajOkOHDt24Me2vcQMRJ5UFU0Gks80AXnjxeeo+9MPhznyw4JFHHunatStiDho06M03/6UT8aV0VjDw6+F3BIXqSSed1KZ1WUGBVJ1IhCDki3p169WqVQd/4K4d6odwC7b8/POv06dPR3DstcMOO+CcZ5xxRvpfFAyfXIzOK6MHT+cSQwl0xK72bpyljOmFjPxLxjcdcbDUqP3RYUFBAZ5gjpzqDPl4ggd29zvuWEBlyX5fo0ZNApN6M+6XckQEt7wwHvrAngx1C0PQnnrqqdQybdqU7bTTTp9++qm9kRLqFLYdgVH0999/379/f1LmNttUJ9HgNGVlrR9/POY7QIEmBdNcunRp69atyQuomLqRHnR02mmnUeOReshWMW/BuPHkk08WFRWh3MLCwssvv9z2elCFSnaLFygPKJ3NHA3+9re/LX7pZSGeCA2tn/fcc0+yDMDwOBPm2HHHHUk9bOnJkjL47bff/fjjTwLndpGoEqEVglDLoRpum2BetWrV7rvvjp4JDPYJ6sfZs2d/8MEHs2bNwpQUlWzOCV9iQEKZPHlyk8IiYmCbbbapWbMmiebxJ560tyNe51ktR5kWhtIxlrI9DiTfFSe3LQXi6/kCmFk57M4E+bFNy0w0SxIIHTp0IF83b9789ttvN50yPIk+ty0dP8Fvv/32yCOPhBS6RbHE0YQJE7JvsFhANoXn5Pylygyuv/76rl06tSwp7d69+wsvvGB7/UAJFXVW1Vr5FVdcQabYphpZpjrlDCnt1VeXJhvPQJ4f77pr3br1mc5muPb772GG+plkQQ+55uSTT87ElZwbc9GcNGkSMbzddjXIdJ9//rnpzG+XE9uGnTnSYfHRRx9xDiUtXnvttSQR2xsP8yEjOORwgTPhEOPGjSNEWxS3OPjgg/2/0WqwZs2aW2655ZRTTmPYgAEDyE1sFXvsscfNN9+cfuePg7q7QzDt93QuqSeoc7H4lldeeYXjknmshrH22muvTz75mMEU/0ZAUo8pZ1T5SsGnRJg/7LDDyEdsCRy0AdE1fvx4/EFWT+E5aSHvbWmcx5kwJ1z+IFCaEt45uU23+rRp08ja6IRyJuHM4YfTfA899FCXLl3Y7IlEskzjRo3PPvucTZt+dkuRAvGJBoIe0X+9+Wafvn3Nhjl//ny5KXfi3SgVsq5Ag0zJXkQhA9ia2rdrR5Yxd6MIuREBg5uiFFR800030fPXv/61tFVL9kicmB3vV/nqU6eCIKLvFikzZsRzzz1njm9sp3/+85+1Lwl+TvwI9aubqKKCnJABjzjiCCJ/7NixyW8WatwyfPOuklXr1q69A1UMFQrBVtKylBgbOHDgv//9gUpkLfLWW29NnToVxVLTIRT6AZwlS0pK6Bw8ZODll1GveQlUWMyRTFVXDphu/d/el39jNGNgXJmQIMuQJTOfjaLG6d27NwIC0tDq1Z87VyTLsN9i31q1dtBdQb6jgFNz5il4CGJfFz9x/TkgihCfysxVOg5OdVRGw9ExWYULBbd202LFive7detR0FCecOVVwvvx/vvvk6xJ8SbLcCBl8zYfyRP3qICuFLk/sMeGOX78XhxMSktLjjv+BOcn5dICLmPW4rxDLaPlTDVCYunS13Kq3ATeF1980alTJ5SCt1GEs5vddtstrVvLB/PwvAMOOGDDhg12QgowfeTIkaRwHJdQpJwRT3KGX9RBE9UYBP4m0xFh3rx5ZWVlLVq0GDZsmPdOmbkVhskCTzz+JGkFYckXZFXyCEmEPNutW7dnnnnGjASkGBIQZPEYVEHdSzw3btSwSWETvBANl7Vt07VLl9GjR+NYdo6HSrp7Gtx6661ITSqBMUp9eXyma65cuZKCq04d5KuNy2Ue3stOoOY2SiDbsnVrlqmFgC1aSBplI9x/0v5YUMfr+x2/DXxlYO4jmOU83vMrC6FqKV92+WXFxWLxHj16OD43nwtE+jnnnMMmhPJNQKHho446Kq8PZxiv9tq82NiJrWh0ggxiVyeSW7cuGzN29/Xrnb+RFdGgRBFz6Y8YOxi0Jt7IxBRo22g5s/3226d9b0hBOYC/ohf87M0337z33ntxUJNlxowd9/XXXzPGGbdAd6UsP7QphaAGDwUFBfPmXcVEey8A5nmzEh3ISGcvLGR0Zot75JFH2MzxDM6JF1xwgelMBqkT6WCyV69e++67L4UM3sD0G264wXDy6aefHn/88WQfhtXaoRYO07BhYzIRgc2xl4qaiez8+BNziWo2KwT3yRDZdBUuWRIBmRjNcI4radmybj35RTbyo3xoVfHGG29Qy0iOqV2ruLi5fLA75C0iodR0nKcozbbbvqahgOkRkProtddes0M95MezAFdRE7GUx7/Izotcli9Z8tKZZ56OFU444YSnnnzSFMvuVWJ9A6G88SJgQMY4yBKJsqCWoUOH4gx4PlnY9qYDmzHHdioXdiOcH9CgXs58Sk5Fz6ye9QTRTCJXGTgTDVSzkdCzZ0/8mCJ26VL3WUYWq9zuga9okhFEv9k4Koxcag87YVFR0+22q4HDzZw584EHHiBuCTB2ew4jmccrxuRROiF8/PHHTKeW2W777QcNHBj3/EJ0Hi+vup3TvXxQTihACHhSBtzutttuye/gGrz++utlZa3r1JaPL5JPiS6SFI05c+bgZz/++OOVV17JroA2amtRgLu0btP2wAMOQDPvvvsu/sS6FDs7DhhACYBHMpjgVM3k4jkOMtdpoww0dL2UceONN8KwqbBwKv2AjIy577772rZtS4VDkdK8WbOrrrzCjA8BMc8880xTy6C6/v37U3gWFha1Km3J4YsBmCbEiUR1MGFVGAsWLBg8eDBWa9e+46CBg8eMGXPVVVelf86lu1qSB1YYUH7m6edgjKMo0ep8+1kNwbFanzd5gPnbbrsNNeJIkuD1k7EYaNasWXkdBWKgK5JMIu86CWxbf6Fp1113he/OnbvOm+c2vCLspiKSy7TGI+2FBw6TNsdUqzZgwAA8yd5wwdYCSohqRZ5XoZtaOwwfPvz2228vLS1FTYQZqd1fOqqj5wgk1uXkRWVEnmnWrMXixUvsDV3Ltn1QGW1bNZCfAz344IOUGCbe2Maj5xcnzFv4nJyrV69OsHEOat1GsgznWfIFh69GjQtEH7VqQbZ9uw5nnHFGNttmUF6+2667Mh2npMYJ/DYGiLFdItKO58TEaQ6pAcXUyk/FRhx2cGsSn6RG/UADx0kzXiDGy9JHWGoZI+DAgQM7d+6MIFRnnBMzn+dMC59VdefAi8WOYlaXNZ/VvyhCckdvrNixY8e++n2vphSVADbj/kvAN9Ah2kAtIVWIULaZxQ8//HD99dcTcYiD2nF7XtHtgQce+O9//9sO8iAqcelEgsPTozZjo8BV0TBaY+iiiy7q2LEDW+g+++yT8gm2cpRZLCpdFsJi+eaPPvoICU2WIX7SHyzJC3vssQd7Gj6H1fE/ipG69eo30F8yCH9VVSKMe11++eWUQjVr1uT1jDPlDXLTb8ZEsWXz5jffXM6G5nz6qAk7VvwrrriCeKtTpw7xRqjHfCAwjK/WfFPcotk228gRs3r1amz75Fm2ox9+WH/aaafo2zQ7UPRCE1VQ2PsKOvuvAaoz37bRqHFjMvLP+h5NgotUDOpBgYUpP7GUOTFRlmstI+4+ZcoUohcvx5oUNYsWOb/9R2zBYaqgoCEOg4xSVrRrx0SiC0/45ptv7ECF7tvZ9PTzz/J2SYI145DRzMqVK823Akg0Nink+Nm3Ty/0T+fo0aOdf4iVueIFfigTjnZqCE1Pq+JhGkRcb9jwo3n/jir11FNOS6S85euv11x22aXdu/WklEbn6JNXNElVYX6RBYS9V/TgopkYIzLDs0LsMxpSwIgRI7Bl7PvZ8VA5LVuuUlZRvnnLlq3sCSbLgIsvma1VFoiMj8jIGQF/JcuQjw899NC2ZWV4QMOCRj179HjnnXfsoBDULLYdxEsvvYS/onEIcuaintyyZQsxYG97kMkegccff/zggw8m/Tu/61PMH5JCTUXp8ec//xlvoHRiT8Zf33zzTXs/vo6A1IoVH3C8MlkGIDvW4TC7ZMkS81stcA6aN28+YcKEzFMPJ1au/Ky01L55TD6yvR6UbYeW0Nx336399ttv5Q14I52MclnWQOyYpUMoUpCTW2G1f/8dzY7CfjBu3DjCg8SBHSngbc6NOoB+uIk8ZcSEc6rXJk2KSlq2RC2ff/5FHCe//vrr4sWLr7nmGv+T8jTw+y2lPdmkfv16jRpJDcjWMvPc8wcPGcLBk1M/G5vzI4UI79fAbwSYxHOee+451IsOydRxH9tl5JerV3PA7Nq1Kx6IzskvbKt4/s477+w9GCVG4m1qYCwrL2krWRCbaDjR9OjRo0OHDkceeaTt8kHFy8WQD2q2sNKvu+66TORgsEC4ihiB8XphB+COHOjYvYkWNEsyRmXEHgzHZpl44EZU4GQZyhlqgffee2/58uXwdt+996kHO/DFF1+Qj+CZMhUnVmYD2lD92LYBlvn22+/2228/+CTLwDBxlfk9FCnd452SmmX+/PkEJIraZpttt922+rRp0yhYWFpjr/YOO9RCFfBz98J7QnqLgoMJgVqndp2SklaLFt2b044UC9RNhxxy+LhxY6htTzzxRM59aT7vk8G//vUvHAnPNu+Vkl/QxhvLlnHWw3YwwytZO+HdjZeXvNymTVtSDGXvtttWa9JEfkEB2cmqmV9qc4II5EwxceLEI444IrofZIHS1IgRq23+aeNGpGa5unWlVDTftcZWNGPGDPYJPAfR9thzD7xIJ+QXF3FQI4bsGHi2EgJnZPIFmqRUXPv9t9GBJNz7778fpyUfkevJL/ghyZpEz5aZoBnVSdS3tdALK0t0aNsRBBKNFpzy/OannzZieMpCgoF6NZFCPjDMiUXlCQuimixD6Lz88st2TAShlZmo74DK9yHXqFmDiK1dR75ymc5MdRCCqsa2Q0DFBxxwADmLLIOdLr300nPOOWffffc96qijrr/+r1+ujjzgUJx11lmcZjFYly5dV62yH5K2BvBB1tSjOzJ/8fnnw4cPZc8hWgg5ytT0v/u3evXqmTNnIi+6ql69OtkKR58+fTqlL9ToJ1CPO+446+sgYjB9zCH7DxMHDRxcTz/cSCm06Vf548pmjIGahx5k2cK6f/nLX/ABsjnhxEmB0KKImzt3ruPRD1DL2rYHEgF1KwbCZJx3zFsKLy1ePGTwYI57bK1UzeS+OF+H3uefr+7ZsyeSIjs7EzokqGCJUF+3bp2OMZrPLi6XlMyby08++WSyDDjllFOyTy5kK0ZQHRaFhIAF6qJeRs/wz2mXM6+9IR9aWYECUQt1DVVVyl/WTYBIkVAh+hEsJVAdBRc6gcOpU6dKFEfooHYEQY3UvEVFhRhi7733jqvyTB6wFwrhTclm+122zkDHByh4iUYMY6cxf82ar0h1nPpGjRqVfQbBAPnRwREo6fDCOpz/7Hj/8gcddJAmGVynOknNdIYQYFdobVm/fj1ZgLxgfk2BGMN9zXtMoecyhBaqsRcestQ8XHTRRQ3q161ZQ+j06Nljl112Ia6GDx9+zDHHmJBQEQJ0cCl8iyxDeM+aNUu6jNLNjwUdolLp37r13XffJWuTX0zZz+6a9smlUqB8OPPMM0kNTGcXwj/YyWGATEtx1Kq0VL59PsYuITz00EMwgN5QWtw3twOOjZdccgmZRfbJxo0bNZb3tqiY8Ic//vGP99xzDzukHZoIAhVWTZahHDBVPUmKtEg5Q4rp12/HJ554wgzOQOzuhcratWtZ1CRZgA4pZNi37RfuRxzaD5QMt4cffihZxgsqvEL/TYENGzYcfvjh5mSHHs4997zNPkcgvBENEXCGAQMGPPyw488zAg3a1Eumg18/4P333+/YsSM7H2V+3B9ZvOuuuw477JA+fXqhdjaP6JYsSUR8yA9Nx2mgXmrbMXAfnT766KO99toLnvbff3/iTQQLEtKrWAOHFJFJwNoveP3112vW3L7aNtsa18luxTJmS4J0HBbQJhUQE3llLpfHHnus+bxMFjmktuBcihuZN3FwZdJ8t27d2WnZBkNvA2kut212BmKVowrW/fLLL22v4j//+c/ixYtfe+21zeKSVgMYtXv3nnVq195+u+0aNyr48+lnmt1bTSvPpIw2I9Axkq2kQd5nUWrAfv13HDNmTO3adWrUrEn0cnYzT1UZL4N90Llaonrkf/nlF8abgxuJT5KdjPFue+6CCCNGjCC0SBCkM/ZAzqSE3Kmnnkq+W7hwYeCM49/9/NQU+DQZDV3xmvnc85IlS844488cNziSOL+z2Y+pRx/NUVGTTDXyLIF9/HHHf/mloxjUlQNbArjppptmz56NRIEv64joKgpqpUmTJlFwoStecYlfoRCUDm1Q0eCB3bt3z/6tQQ/+VWRaYGpVgnqwtLRlYWET2Ih7G4StbtGiRZwb0nyKQn1GmdeAVcZVAtvvqJhywpVoyss/+vDjKVOmTJ48eea55635KhjDCsuHbcuLaXuwLpuB4c9ebN3KjmRch0rY/E6DE0o4O4tKHl83TwSJsZYlJbuPG/uk64F/Gnz22WfssaQYw0nTpoUdOsgX091+++3sw3aQB+Ff8kL5e++9g2/hfARh6LuEcc2LL76YfW/hwrszjzAwMPUq46nC2HOuvPJKsoxsHZFqKwGcPliUmMfjy/SLO0mLMMChT5NFWNtBcE9zWXn5pXPncjqvtUMtnPLWW2518kBkshbESeK8du7cmUDNnPLyejSDW5uP/8I5FWLGTaho7rzzrnvvvde/wThQXj537mXVZVMRG7EfDBo05P77F6m8bkdftWrVc889zVHLXlcEQpn9g42WitXUMieccILzZLdgwYKuXbtyAERL5513nu31oEzmYeUKg2qguLiY/WDs2LFhPiVZoHT+V2bEC9T9ogh4UTa642DSqFLLMdJAEk2UKGnv//7v/2644Ya4X5zVNRxK1EIxx8LPPvu0F93VunTp/MsvqYpwQBV9waxZHEeHDBmy++67ExJkBI0gl+IUWh857jKRGgHfNWwQCe3atzv88MNyvi9+6aWXmif25Dv2Sdurb3+Smqk1jppy1EuL7fMmag2KaoiTGZkV+rOZUR2qrR3a44zDdJNfzCd9oHnYYYdFE2Isyjcveflljj/m/W+iyHxU30KVyL8zZ87kaEZ+ITtw4D/5pBNXrXJ94MC6rx9cZjinvQWP33+SfAcrpCiIOIupaA5bWKjX2raCUwBFq3m3gP3gyCOPjP/OgM0//LCOYyy+MX78+Cvjj4Sx8PH13nvvDR48GG2jKAL4T3/6U9yv3VARc5xkDPn0nHPOsb0hOHSVhNA5PSfYfXv16kU2LG3V8txzz7W9GXiWrUJIjOs/zoSlXs0PzYAgjoqGcVT+X3+95rvvHH/rOgeiweMXlFb5Fk62mdPKG2/8MyFNRAFnH374IWVCpX7lSv/YjXmniZKqXt26ffr0YXeKfvdlCKw+ceJETlvEee/efU01wQ9nJRJf//4DRo0add111xk6ZIHdx40rKGhElmG3WbDgrpDqdaoXWonuCHHOTebAWLNmTUL3j9OmSSXvg1ILad6UuEIWZkaOHEmWQWRSSTSfos8ZM2bAZ726DRoWNMZ3OeDYe1nk0I8fy5YtgwjhirrkgwvBJALEF4TpcL8B5iDOJcdo2cshJbxX+/DGG2+goqKiJnXrNaC+IAX/uunXDGVdyDRjIbGh0j3zzDOkRXNKZS/xP6WGV9VlFs//44V27TqyB1AaRz/R7gGyOfSmq+cP9RkYJs3BAwf5p59+WlUKNlMraIwQjw7aZkV5zWdhHa8Ew56GimAm68NKP0A6mGiExezQOCdIgGHFXvgg0uvCJGB8Am9gw2T/NHcrBhWmgrj++uuHDh1aXNysfbuOFMahDwpCNiyFykVm6du3L5HDRr3LLrvgguahae/evUlbFC/nn3++eUqK6udeelkTfVcIl0147Oo3jywb0d5bb72FukwNKGmxXr399tsvUI9EIPSCdDjlcdgky8C5/60Tg02/bpp69BTzMIUcmvCOmBbMtp2MW2+9tZ38ckAheS36oFQrzVjvevDBBwcNGrTNNpQzUs9Qe9obEZBAOdm1129WZOsCnHemTp2akJXigHEvvHBWy5Yl2BdA87777rP31Ebib9LI2ouaq23btgwmJc2ZM8d0KhgZTS7pFJcCqj35h9cLLrgADZNocD/z7AydLFq06PLLL7/66qvj9mMrS4WQ2b0yUGq2HQebaGSoUxGRXoRMy6LYJkyT4w9F5rHHHsvRLH3lr7uNj5pfMJ/ho9CnrTZ52y7FP19f9tf/u55goDiyXSJpLB2Djz/+sFfvPrgyYBP7wx/+MGjgwFalpRxJ2AbZ0zKPMFatWtmlSyeSAqAIMp1RoIGAEiIag+3p048jQUia0aehFE1SSeUDAoZgoBRiOuWkCUJJGSovDBx//PEmy5CG4DZDP5WhYdilf9IZOy0x0KFDB/93JKr/JOn5q6++Ovnkk0noJnFQXIS+8UArNcGLL744YsQIRCM5muKUkg1B2EUwK9kNwZP+sJmPcxLrPvvsY55/o4R+/fq98MKL4lqJ4PCOG8Ahrzn+TKt4KauBAE1lwUtJetu2xeHtSJ3i1himJAuzZwOOllwC1LXnnntiR7bADRt+zKyoFndIBGk39SDSjMkiMtqraISbaA4GWdWoHhyM5gUUsWbNmsivGgTzq2sVnw08MCzUGZMENaLy5hxSJk9lVlm5cuWwYcNIK2zUOCXbCBlH3pTp2XPOnIsRzZTfgJIb2xMADAh9TpeDFTvP4sWLcVNC4uWXXw6JJleeFKtXf0k5Y7IMIPzsuwZqDB0SgDqzbRuganZdsgyhyC5NRWlveOBU0rSILCPvu0+aNGnDj/onulwIfaUWtRtJ6vPPP8eg/kOnVj1brrnmmi5duph3f4855hiUY28rJFm4LAVWrFgxd+5cCkb4QXukqoMOOii0M7/++uuHHnoomm/YsMAomfxC5cihknRJaqPGHD58+B//+Me7774754mYMYxnOUhh1j322OPjjz9Gjc6w9CCJA9UVFTXldNyxY4dVnwV/ZcyayGWjyP5vr2RJaWa8KCc+/fTTnj174mlt2rQxhepdd91Fcd21a9fddtstk/syqTkD9RO7ivp53tGRLxzPaKoaTm0HoD5XOVHFeJWioOaPpWBcgARxxBFHULywg5W2KmnRojk+jUNTqeLNGQoEFcUOEUI+YiRHM7bWJ598EieYNWvWtGnTDlRMmTKFzWfZsmXqkGFja88WqiSbY+R9sabsz7qKHZMTcELuMMeKGjVqcOZasGCB/9sYSYiEK8FpskygvPLhm2++mX/t/KOnHrX33nsffNDBJ510EjXp4YrTTz+dk07w/SOy8xa8HM3g8UQCZ7FXXnnF3swFcgpiUvn36tWLIwlnmf79+9180w1frl4N55xW9t13X7SKbvUBUKPWbdqeccYZ48ePJ6khBRmH1ExuHThwIHz6fsPDEU6kXZIRUQopsgzLnXbaaRs2bFi3bp3j/TWhkAW63XnnndEtJdVOO+3kz6SSo+THXjjf3csBHCliZuNdfqBk8jjJET9E0meffbZbt25IgfgclkPZ2XiUvVCoLwVpqi/ath+JPqeTkgYAk2jCAlQlfJIEeUGVjnWj6jDQzsrxGVWrHxFFSZEfWfH+++9ng8Wx+vTpg5/NnDkzWiPgc1OnTmWTxOQcH0yw9VcMGjRo6NCh7DYkmhkzZjzxxBM/bdwYZ8Wvv/6aw44mmW2qb1v9b3/7m73hAqxGpaNu2nHHHTm+kWVaFDc78IADrrxq3kcffWTuPvroo3BIFVCnTh1yQeBE5umKTg6Y1BekVyoUPBifxrm5RJYxY8bg0I899lj0WQDMcxjp328AYDrD0v5eruKNN95gVseOHckavKJDQghlsnsT2GSTRo0KmjVrvuuuo958Uz6Se+6557IQjJFu2NKHDBlCBlmyZInzg4XoCrmuvfZacpmSakQSx17sBwjy8suLH3jw79GvtgnhX//6F7UtBoKfnH+dXSuIynlvFtnoIC1iEVSEvC+88AInvpKSVlxS7uV7vgbZuFPrC8PimH6/YkCOhBKHSlY0JpHBR0CJwqVtBqDBYNsROJKLE9kzbRok51q5GWd+uRWdSxL55JNPnn76aTaQ0KcEVWrLG2eiUaNG4ccEJ95vQoVLHILK/Pjjj6cKWLv22/jVBUSaZhnB5MmTbW8+ePzxx3faaTj7P+E3dNgw82tK5kHy+++/T8ogxZCGYCz0ByFR8oYff2TwhAkT4J8IL2lJFdcyE8kkzdGjR1OU3X777ZlyRk2Tlei6664bN24ceiCxHn300eZvqKtWk6Q2oLYyxSP5hVgq1m8RbNKkaeNGkmVIN0MGD77xhpvMd6aw7gcr3qf6YwrbwEUXXbR06dK4zy5TrVCBjh07FiKkGEBkHnzwwea9cw5uFFNnn3323QsXQtdMcaC8fMaJJ6E9ikHYc/7tpITZbkhg2znqSzm0hCuiWKRgt4B/XIvilOqG7J/mU3kpYW2a+sms374SXl47mGgQ09zLV0cZpFBQesTlFBXGcStQColq3NMzYIBWubmhQuUh15o1a/BXinyqHjyACmjEiBHEwNy5c9mr494zUqvYVR55+LFq2/Bf9WrVqlPVOzcokTfRnb/44ourrrrquOOO4/h2ySWXPP/88+ZEwBkQxqhl2JBJHP4PpHMG5KB0yy23cBjp2bN7585d2rdv3717d04iu+++O4UPoFQ555xznnrqqeyXM8BGhhPxH/GiH/6z7qyz/0IMcJC88MIL7VcQyK1UOl++fDkKZF2yG8HMUZSMSYMcsXDhQvNbTiFkjn7iIajHz5Ueyh599OF9Ju5NhiW5EJYUMuSy2267LXPwITWbbEWW5FI9TXZNNU0WbyxbBjPbb789OiTb2l4ZluxyacM1DT744AN2CDILnKCiJk2KOE4iTiDrqSG8pjvFq0Hy4ErLhVQW9EMTTa6ATA+1bL7UcjAt6SCoCBEzb0lTQp4vKP08pFCRiS7dkUQDwi2+S9Xw7LNPc7IgxlauXOn8WK2YP5PCPFdgLgeB6vo7hLw6v+7EDcNDEARYJpAAXnLt/KsJNoKEUDGnv7Vr15IBb7rpJsKM0xb1F1UY7suhj6LmoYce+uXnTR9++PHHH3+4evXnJp5lmVxWIKP99a9/vfrqqx944AH/syFxVm+y8usm9OGHH15xxRUHHHDA3nvvPXHiRFjlNGSPaRofOioWao2s4C+99JL5HSsikxoN6Tjhhj4EuGDBAhYiyYZOQ6GV4Gc7+SLG7du0aWN+nZKkn5EoDTRcM3YHWT5TAlYxIvVdfflNkboNGsh39Dz77LPiUR41Va31ZO2M9Wq5mwf7ecNxdGI5pwmNakweyT+bZJHTPxKgvGXNYxs5IR6XanBGQCe0gnA4hJJ39zvH58Q777xDhBcUFOBDoU8bJXOYBhs2/HTUlKkEG4UShTcZbfDgwSSXvn37sii+i79mUsw999yT/rQvvNlmFj/88AN7b+wHf9LpJ+4ptfpkQvDonqEg1ZLvqK2oyAYPHnjSySc6n8LMmzeP88jIkSPNXwdzgnNx3boNtttevi8q/nN6ISBmDqtJXAS1ofzH6ueYY47BfNSkbEXGlDBm71UQAev5c3Qs1PVlWtTwQVTyGc1vBWUfw0hqs13pIcLbZtUCnoxWKwQm5nQ15JUGO/mf/vSnSZMm4TrZYkQWt20dWcF0A5Wjp07t06dP586dO3Ts0K59x7Ky1mVtW5NiQJcuXfr378/SeaaYLG9+qB96tV5qyCTbtOAyJK9qIKON8F0n2O0vuuiiu+66K/BASujIfPN63nnnDh8+nOR7+OGH6zuJYbJLX1narFnzGjXIMzVI0NFvR8sLIoUXzypRrJb0rm0D1uVQyT5EzbvtttsWFRWeeOKJ/rrVASNjJeB/NKHE8vDGaoESLj2UYZlYUXf/raG8+RWhvl4BRVsBmavazI9CyBhBPautbDsCgsH58VwHnfzBWezggw8mokg3VC4c9WkMGjRw/Pg9zzvvvBdeeOEXTnlO3nyrow0n/3KIcHJIp0gMBduRQYJSdZXKypseVCgUdyhkzJgx0e/ceffdd8vK2my3XQ3OTaWlpenfs49C9RCQK8kbIli6dGnz5s3NJ6cpajjK/Vi57xL3zitZFuTSxLkLLv6lntVXh73iK5oY62pWs7d0MdMEuTNOHBM5wBrpLKD8hISXTq/N3Xgm5a5Zxslh3MTsW+B6So+XLsJbFOJqmTHKuna5ZtFpuc0JWVcJSeblH9NL0XT77bdzLqN0uuCCC9jn33777Z9//lkczggbpK+8GFJOVdCfA0YYe+FAljfl0zZTQRmz7XQIWUrSmTbOPvvsfv36de3albRr3ibL4B//+Efr1q3l7zbW3K6wsND/cecYiBSqNCuM6DZs3/R29KF889ln/cV8Xpxcwzax6rNVCRpQq4Xk9Wss21ZeYulEEaXsh5D1Ii6QaHxrVwGiChS2KrCEsOswhlLLtPPb9wwnzHbQDcGoUmIkdqyhZi8iSL6bBhqiUQr50BQdWpNrxRGXN+W2vCSrRqjl1lwKIJkxHAJSLdpePzIpIAyNYdvUEXnoOd6al1122aBBgzt37tqjR4+JEyd+v3YtDKxcuZKDSb169cwHrMkyod+KyECpWsp+zoW3sL3cDASgfKpmMpKK0/7000/Dhg2DGfN05skn5W+NB7SRUg8RoNR169Y9+OCDCHjjjTe+9tpr3iekYnQr/Hh+5bNI1EO8RKMCeU2IxjuiQmQJ0AnABoaQZGFRjR8yN68gsTDUIoiI5IeykUsWhxMIVHHBucJ6DmpVANGb5AK3vIkQWTwORSlubmM0GYMEQwuEW5f2Uqyi3OYtYwJysJoC991335DBQzp2lK+z6qRfnTd48GAOKRxPauhfoS4qKpo9e7Yd7ZNddyNPlni5mODw2EhPgFoEHKv79+9fXFzcsmXLuL/arLq1NKUdH3HcgifTXrFiBSkVkaE8eMjA6dOPy/41nqx0GcJ5oIIPg/WYYCGeLeoDIo+qmJtOwbJJx1pC1KHXuSGU9ccLnoh5ckBWdHClJKwImesKQ5VgofQCK/rvVgaivbxk90PnRhOZ6tb2KJ9xuhKE5hqIClOoL2vB1FDe8pBXx+e/ytbyFSve32effXr16lXaqlVxcbMmhU3q1WuwQ63a2+s34ZeVld155512NBA1elxFLCK3XFpKD5XCQeHrr78++eSTDznkkDlz5rjfj8upKteAjRs3Xn755ePGjSsra4vsQ4YMIYuF/+xXfkAH1go20ajC0ilF1Bdh063QiuzJflTMXQIQwUA2bLjgxbbplCVkIdPjR/zqkmSVZlAPMXQsfNQccysGlc02fdpmoSAngbVUFfF85o+0nqMQxpxaEv3k0omayrYj0M3PZS+fluKgE2FgM7jwwgs5mHTp0oVCprBJYaNGBY3l08OlkyZNyvyNDbWgJ4VIlIt+wPruQ2J6wOQHH3zw/vvv53ibKYKwfoQrSwFxSLKnn346+YVyhlQ7efLkRx55xNz1wy9LelSwojHQJQOiuntsMx4pTGXCOxfwKJfqk+n7E4Rwm8RwNEFElB7DQwDhRKNayikfQ3JSToIuYLwkwLPqJsZ1gkypaGSxJBmhJnflNW93jEJJBdYSXcVTzu1HGagYti0XdhUOJpdccsnYsWM5nnTv3p2Mc9BBB8X8kVlRhb0AXjOqHOHZNrkIx8jvA1k0yyHR5ONc8csvvzz88MMnnXTS6aefMX/+NfYbNmSWHSnCKvN5KJlZ8v+W+ESTaE4/VNdWccpEKiX62Q3PClKQyM/2YFrbsqjQs4xk6IqhUPSvy60AE2GHA1xVOVfGIroSL2EOk/OjMJNwPzV0YTF3vHTKp7+tyslfGzo3M0sFV5jr4F0BNyLBg4pcPuyj48SWzeWfffbZ0qVLly9fvn79ettrwKLxc5WwiB/iLQg9p/+X4JlDEk3IhaLIyaaWSJlBSR7oSjTJqpT/g3e58jqUe5eKE2mmR8C9RF9GNul0riudRpvyGqOIKuItDiZtCbNOp/dD3dS2f0coh/lrQJUvzurxrHRMs6IQDVSBLdTuXluIVk6rOTykChh2Q7w6Zy7wDRCLZMWWFz+F1GwqkUyUZWiqErJ6gLIr4hjhDdHhdvW8j07CenqWPaj/BNkSOpUzvySOPCioCgLj1QzBnjj1ic6c/WSQnDxkjZMeUd7ygH9BiFRkfR/EdrZpoLw5AkAYrvhaWBMSekCuBMOxehMpPLIyIMQ/s2wr6icVg3AikRJd678EJKyEYiuJSj2jSQ+VMdZ4Kn3WCXKaOTggyZBqbM0FVeE6OZExoxi04jbNOrrf6VUKucz0VBWEZiZlG3cU5s1apreSyPKcu6wDhocY+DcDYdsbqVLEzxJZzNJ5a0+0HuRHO2LpKIepFKdcZUaKXObHLGC7FcGRYeitVCv+nlCepZYnQqsg0ah1kTSnmeMNI/tYOvOL/oOrRHuiiI7JOYUhGD4rUSJ7idL54Q+SZMSNVF3lDcSNmeVLMTEQVXn1i8Sqk/+ohgMQh7PNKIS5wFz1luyKWQ6t48bp0NcvY3LoSQYH6fjXjSJ+3RSQtXLw878Dh2Z8z0bT+7Df56pJsZowLYWCxABBN9ae/18Db6uoS1UMKFn1nDM8YmGn838c5yzBLUcgib0SEkEEOv43t3CyF/ldP4A0Hstctx4E9iIODEiIlyxy6jP1I2HlyUaZSCdxLu2qggidQyK1uGOMMBYfKTCpP1vLy7f+f+h8JjcHfTgSAAAAAElFTkSuQmCCexport interface AbstractWacom {
signData: (body: WacomSignDataRequest, callback?: () => void) => Promise<WacomSignDataResponse>
getDevices: (callback?: () => void) => Promise<WacomGetDevicesResponse>
systemInfo: (callback?: () => void) => Promise<WacomSystemInfoResponse>
}export class WacomDevice {
constructor(public name: string,
public type: string,
public model: string,
public width: number,
public height: number,
public certificate?: string) {
}
}
export class WacomGetDevicesResponse {
constructor(public data: Array<WacomDevice>, public success: boolean) {
}
}
export class WacomSignDataRequest {
constructor(public name: string, public reason: string, signer: string, hash: string, image: WacomImage) {
}
}
export class WacomImage {
constructor(
public data: string,
public rectX: number,
public rectY: number,
public rectW: number,
public rectH: number
) {
}
}
export class WacomPackage {
constructor(
public component: string,
public version: string
) {
}
}
export class WacomSignDataResponse {
constructor(public data: WacomSignDataResponseData, public success: boolean) {
}
}
export class WacomSignDataResponseData {
constructor(public image: string, public metadata: Array<{ string: string }>) {
}
}
export class WacomSystemInfoResponse {
constructor(public data: WacomSystemInfoResponseData, public success: boolean) {
}
}
export class WacomSystemInfoResponseData {
constructor(public device_list: Array<string>, public package_list: Array<WacomPackage>) {
}
}T1CSdk.T1CClient.initialize(config).then(res => {
client = res;
}, err => {
console.error(error)
});var wacom = client.wacom();function callback(err,data) {
if(err){console.log("Error:",JSON.stringify(err, null, ' '));}
else {console.log(JSON.stringify(data, null, ' '));}
}
wacom.getDevices(callback);client.wacom().getDevices(callback);function callback(err,data) {
if(err){
console.log("Error:",JSON.stringify(err, null, ' '));
}
else {
console.log(JSON.stringify(data, null, ' '));
}
}export class WacomDevice {
constructor(public name: string,
public type: string,
public model: string,
public width: number,
public height: number,
public certificate?: string) {
}
}
export class WacomGetDevicesResponse {
constructor(public data: Array<WacomDevice>, public success: boolean) {
}
}client.wacom().systemInfo(callback);function callback(err,data) {
if(err){
console.log("Error:",JSON.stringify(err, null, ' '));
}
else {
console.log(JSON.stringify(data, null, ' '));
}
}export class WacomSystemInfoResponse {
constructor(public data: WacomSystemInfoResponseData, public success: boolean) {
}
}
export class WacomSystemInfoResponseData {
constructor(public device_list: Array<string>, public package_list: Array<WacomPackage>) {
}
}
export class WacomPackage {
constructor(
public component: string,
public version: string
) {
}
}let body = {
name: "wacom1",
reason: "signing some document",
signer: "test user",
hash: "...hash to sign..."
}
client.wacom().signData(body, callback)function callback(err,data) {
if(err){
console.log("Error:",JSON.stringify(err, null, ' '));
}
else {
console.log(JSON.stringify(data, null, ' '));
}
}export class WacomSignDataResponse {
constructor(public data: WacomSignDataResponseData, public success: boolean) {
}
}
export class WacomSignDataResponseData {
constructor(public image: string, public metadata: Array<{ string: string }>) {
}
}localhost or 127.0.0.1. We do this because Self signed certificates are not allowed by browsers and using an insecure protocol from a secured website is not allowed either.// open the host file (write enabled)
// use your own editor of choice
sudo nano /etc/hosts##
# Host Database
#
# localhost is used to configure the loopback interface
# when the system is booting. Do not change this entry.
##
127.0.0.1 localhost
255.255.255.255 broadcasthost
::1 localhost// add these line
127.0.0.1 t1c.t1t.io
127.0.0.1 localhostc:\Windows\System32\Drivers\etc\hosts# Copyright (c) 1993-2009 Microsoft Corp.
#
# This is a sample HOSTS file used by Microsoft TCP/IP for Windows.
#
# This file contains the mappings of IP addresses to host names. Each
# entry should be kept on an individual line. The IP address should
# be placed in the first column followed by the corresponding host name.
# The IP address and the host name should be separated by at least one
# space.
#
# Additionally, comments (such as these) may be inserted on individual
# lines or following the machine name denoted by a '#' symbol.
#
# For example:
#
# 102.54.94.97 rhino.acme.com # source server
# 38.25.63.10 x.acme.com # x client host
# localhost name resolution is handle within DNS itself.
# 127.0.0.1 localhost
# ::1 localhost// add these line
127.0.0.1 t1c.t1t.io
127.0.0.1 localhostGet-DnsClientServerAddressSet-DnsClientServerAddress -InterfaceIndex {your_interface_ref_number} -ServerAddresses ("8.8.8.8","1.1.1.1")


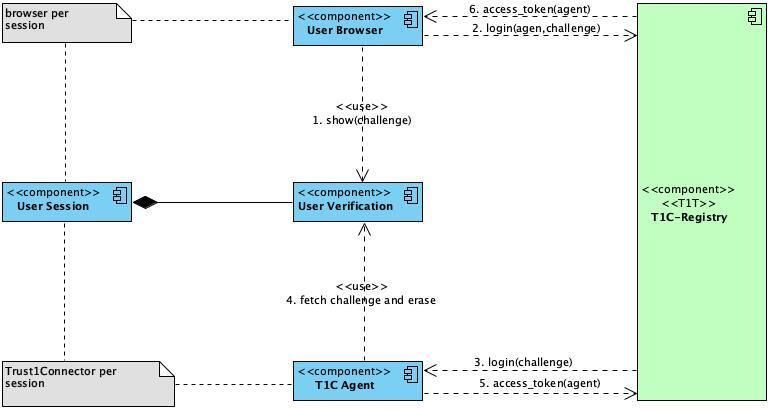


<!DOCTYPE html>
<html lang="en">
<head>
<meta charset="UTF-8">
<meta http-equiv="X-UA-Compatible" content="IE=edge">
<meta name="viewport" content="width=device-width, initial-scale=1.0">
<title>Document</title>
<script defer src="./T1CSdk.js"></script>
</head>
<body>
...
</body>
</html><script defer src="./T1CSdk.js"></script>CurrentUser\RootBrowser / Web App
│ HTTPS (localhost:51983)
▼
t1c-api.exe ← main REST API (Rust)
│ spawns
▼
t1c-sandbox.exe ← sandboxed process for card reader I/O
t1c-reg.exe ← device registry daemon (default package only — not present in standalone)C:\Program Files\Trust1Connector\ ← managed by MSI (removed on uninstall)
t1c-launch.exe
t1c-api.exe
t1c-sandbox.exe
t1c-reg.exe ← device registry daemon (default package only; absent in standalone)
t1cds.pub ← Directory Service public key
t1c.cer / t1c.pem ← T1T wildcard cert (DS communication)
install-ca.bat ← admin fallback script (see §10)
C:\Users\<user>\AppData\Local\Trust1Connector\ ← runtime data (removed on uninstall)
device.priv / device.pub / device_der.* ← device identity keys
ds-txs.json ← Directory Service sync state
*.log ← application logs
C:\Users\<user>\AppData\Local\T1CConnector\ ← shared cert store (all T1C packages)
t1c-ca.pem ← Root CA certificate (PEM)
t1c-ca-key.pem ← Root CA private key
t1c-tls.pem ← localhost TLS leaf certificate
t1c-tls-key.pem ← localhost TLS private keyGet-ChildItem Cert:\LocalMachine\Root, Cert:\CurrentUser\Root |
Where-Object { $_.GetCertHashString('SHA256') -eq '<thumbprint>' }msiexec /i Trust1Connector-x64-<version>.msi /quiet /norestartmsiexec /i Trust1Connector-standalone-x64-<version>.msi /quiet /norestartmsiexec /x {3D6B46ED-C178-4ED9-8F0E-FFCC13C6BE7D} /quiet /norestartHKLM\SOFTWARE\Microsoft\Windows\CurrentVersion\Uninstall\{<ProductCode>}
Key: DisplayName
Value: Trust1ConnectorPath: C:\Program Files\Trust1Connector\
File: t1c-api.exe$cert = Get-ChildItem Cert:\LocalMachine\Root |
Where-Object { $_.Subject -like "*T1C Local Root CA*" }
if ($cert) { Write-Output "Installed"; exit 0 }
exit 1# 1. Root CA in machine trust store
certutil -store Root "T1C Local Root CA"
# Expected: certificate details printed; exit 0
# 2. API process running
Get-Process t1c-api -ErrorAction SilentlyContinue
# Expected: process listed
# 3. HTTPS endpoint responding
try {
$r = Invoke-WebRequest https://localhost:51983/v3/status -UseBasicParsing
Write-Output "API OK: $($r.StatusCode)"
} catch {
Write-Output "API not reachable: $_"
}
# 4. CA file present on disk (shared cert folder)
Test-Path "$env:LOCALAPPDATA\T1CConnector\t1c-ca.pem"
# 5. Registry daemon running (default package only — skip for standalone)
Get-Process t1c-reg -ErrorAction SilentlyContinue1. killApi — taskkill /F on t1c-launch.exe, t1c-api.exe, t1c-sandbox.exe
+ t1c-reg.exe (if present — default package only)
+ 2 s pause for OS to release file handles
2. CleanLocalAppData — rd /s /q %LocalAppData%\Trust1Connector\
(device keys, ds-txs.json, logs — package-specific files)
NOTE: %LocalAppData%\T1CConnector\ is NOT deleted (shared cert store)
3. CA_RemoveRootCA — certutil -delstore Root "T1C Local Root CA"
4. RemoveFiles — removes C:\Program Files\Trust1Connector\
5. Registry — removes Run key and Uninstall entrymsiexec /x Trust1Connector-x64-<version>.msi /quiet /norestart1. killApi — kills all running T1C processes (same as uninstall step 1)
2. Old version removed (file replacement only — LocalAppData is NOT deleted)
3. New version files installed
4. Service restarted
5. API finds existing t1c-ca.pem in shared folder → reuses it (no cert regeneration, no re-trust needed)C:\Program Files\Trust1Connector\install-ca.bat:: Removes any stale copy and re-installs the Root CA from the shared cert folder
C:\Program Files\Trust1Connector\install-ca.bat:: Remove stale entry (ignore error if not present)
certutil -delstore Root "T1C Local Root CA" >nul 2>&1
:: Install from the shared cert folder (written by the API on first run)
certutil -addstore Root "%LocalAppData%\T1CConnector\t1c-ca.pem"%LocalAppData%\Trust1Connector\<date>.logThe different architectures supported by the Trust1Connector


T1CSdk.T1CClient.initialize(config).then(res => {
var coreService = res.core();
core.readers(callback);
}, err => {
console.error(err);
});){
"success": true,
"data": [
{
"id": "57a3e2e71c48cee9",
"name": "Bit4id miniLector",
"pinpad": false,
"card": {
"atr": "3B9813400AA503010101AD1311",
"description": [
"Belgium Electronic ID card (eID)"
],
"module": "beid"
}
}
]
}{
"data": [
{
"id": "ec3109c84ee9eeb5",
"name": "Identiv uTrust 4701 F Dual Interface Reader(2)",
"pinpad": false
},
{
"card": {
"atr": "3B9813400AA503010101AD1311",
"description": [
"Belgium Electronic ID card"
]
},
"id": "57a3e2e71c48cee9",
"name": "Bit4id miniLector",
"pinpad": false
},
{
"id": "c8d31f8fed44d952",
"name": "Identiv uTrust 4701 F Dual Interface Reader(1)",
"pinpad": false
}
],
"success": true
}{
"data": [
{
"card": {
"atr": "3B9813400AA503010101AD1311",
"description": [
"Belgium Electronic ID card"
]
},
"id": "57a3e2e71c48cee9",
"name": "Bit4id miniLector",
"pinpad": false
}
],
"success": true
}core.readersExcludeByName("Bit4id", callback);{
"data": [
],
"success": true
}{
"data": [
{
"card": {
"atr": "3B9813400AA503010101AD1311",
"description": [
"Belgium Electronic ID card"
]
},
"id": "57a3e2e71c48cee9",
"name": "Bit4id miniLector",
"pinpad": false
}
],
"success": true
}{
"data": [
{
"id": "ec3109c84ee9eeb5",
"name": "Identiv uTrust 4701 F Dual Interface Reader(2)",
"pinpad": false
},
{
"card": {
"atr": "3B67000000000000009000",
"description": [
"MisterCash & Proton card",
"VISA Card (emitted by Bank Card Company - Belgium)"
]
},
"id": "e5863fcc71478871",
"name": "Gemalto Ezio Shield Secure Channel",
"pinpad": true
},
{
"card": {
"atr": "3B9813400AA503010101AD1311",
"description": [
"Belgium Electronic ID card"
]
},
"id": "57a3e2e71c48cee9",
"name": "Bit4id miniLector",
"pinpad": false
},
{
"id": "c8d31f8fed44d952",
"name": "Identiv uTrust 4701 F Dual Interface Reader(1)",
"pinpad": false
}
],
"success": true
}T1CClient.initialize(config).then(client => {
var coreService = client.core();
core.readersCardAvailable(callback);
}, err => {
console.error(err);
});{
"data": [
{
"card": {
"atr": "3B9813400AA503010101AD1311",
"description": []
},
"id": "57a3e2e71c48cee9",
"name": "Bit4id miniLector",
"pinpad": false
}
],
"success": true
}T1CSdk.T1CClient.initialize(config).then(client => {
var coreService = client.core();
core.version().then(version => {
console.log(version)
});
}, err => {
console.error(err);
});3.5.3export interface AbstractCore {
getImplicitConsent(codeWord: string, durationInDays?: number, callback?: (error?: T1CLibException, data?: T1CClient) => void): Promise<T1CClient>;
validateConsent(consent: string, callback?: (error?: T1CLibException, data?: T1CClient) => void): Promise<T1CClient>;
updateJWT(jwt: string, callback?: (error: T1CLibException, data?: T1CClient) => void): Promise<T1CClient>
info(callback?: (error: T1CLibException, data: InfoResponse) => void): void | Promise<InfoResponse>;
reader(reader_id: string, callback?: (error: T1CLibException, data: SingleReaderResponse) => void): Promise<SingleReaderResponse>;
readers(callback?: (error: T1CLibException, data: CardReadersResponse) => void): Promise<CardReadersResponse>;
readersCardAvailable(callback?: (error: T1CLibException, data: CardReadersResponse) => void): Promise<CardReadersResponse>;
readersExcludedByName(name: string, callback?: (error: T1CLibException, data: CardReadersResponse) => void): Promise<CardReadersResponse>;
readersCardsUnavailable(callback?: (error: T1CLibException, data: CardReadersResponse) => void): Promise<CardReadersResponse>;
getUrl(): string;
getDevicePublicKey(): void;
dsCorsSync(): Promise<boolean>;
pushLogs(): Promise<boolean>;
version(): Promise<string>;
}# Intel x86_64
https://ds.t1t.io/v3_5/downloads/installers/macos
# ARM64
https://ds.t1t.io/v3_5/downloads/installers/macosarmcurl --location --request GET 'https://acc-ds.t1t.io/v3_5/versions/latest' \
--header 'Authorization: Bearer eyJh...BCr8Q'{
"success": true,
"data": {
"id": "3.6.0",
"createdOn": "2022-03-21T07:47:48.590425Z",
"updatedOn": "2022-05-30T10:46:36.532283Z",
"recommended": false,
"mandatory": false,
"allowed": true,
"visible": true,
"uris": [
{
"os": "MACOSARM",
"uri": "https://storage.googleapis.com/t1c-dependen....e/trust1team/Trust1Connector-arm.dmg"
},
{
"os": "UNIX",
"uri": "https://storage.googleapis.com/t1c-depend....trust1team/trust1connector.deb"
},
{
"os": "MACOS",
"uri": "https://storage.googleapis.com/t1c-dep....Trust1Connector Acceptance-x86.dmg"
},
{
"os": "WIN64",
"uri": "https://storage.googleapis.com/t1c-depe....t1Connector-Acceptance-x64.msi"
},
{
"os": "WIN32",
"uri": "https://storage.googleapis.com/t1c-dependenci...ust1Connector-Acceptance-x86.msi"
}
],
"installationApiKey": "6257cbe3-e25a-.....-9fb9-02ad17d1f193"
}
}curl --location --request GET 'https://acc-ds.t1t.io/v3_5/versions/3.6.0' \
--header 'Authorization: Bearer eyJh...BCr8Q'export class GCLConfigOptions {
constructor(public gclUrl?: string,
public gwOrProxyUrl?: string,
public apiKey?: string,
public gwJwt?: string,
public tokenExchangeContextPath?: string,
public ocvContextPath?: string,
public dsContextPath?: string,
public dsFileContextPath?: string,
public pkcs11Config?: Pkcs11ModuleConfig,
public agentPort?: number,
public implicitDownload?: boolean,
public forceHardwarePinpad?: boolean,
public sessionTimeout?: number,
public consentDuration?: number,
public consentTimeout?: number,
public syncManaged?: boolean,
public osPinDialog?: boolean,
public containerDownloadTimeout?: number,
public localTestMode?: boolean,
public lang?: string,
public providedContainers?: T1CContainerid[]) {
}
}class T1CConfigOptions {
constructor(
public t1cApiUrl?: string,
public t1cApiPort?: string,
public t1cProxyUrl?: string, // deprecated
public t1cProxyPort?: string, // deprecated
public jwt?: string,
public applicationDomain?: string, // "rmc.t1t.be"
) {}
}config = new GCLLib.GCLConfig(configoptions);
GCLLib.GCLClient.initialize(config).then(res => {
client = res;
core = client.core();
console.log("GCLClient: ", res)
}, err => {
console.log("GCL error:", err)
})config = new T1CSdk.T1CConfig(configoptions);
T1CSdk.T1CClient.initialize(config).then(res => {
client = res;
console.log("Client config: ", client.localConfig)
core = client.core();
}, err => {
errorHandler(err);
});Installation Guide
{{ds-url}}/v3/tokens/applicationT1CSdk.T1CClient.initialize(config).then(res => {
client = res;
}, err => {
console.error(error)
});const beid = client.beid(reader_id);beid.allData(filters).then(...).catch(...)// pin and pin_type are needed for luxid
const generic = client.generic(reader_id, pin, pin_type)generic.allData('beid', filters).then(...).catch(...)const generic = client.paymentGeneric(reader_id)generic.readData('emv').then(...).catch(...)export interface AbstractEidGeneric {
allData(module: string, filters?: string[] | Options, callback?: (error: T1CLibException, data: TokenAllDataResponse) => void): Promise<TokenAllDataResponse>;
allCerts(module: string, parseCerts?: boolean, filters?: string[] | Options, callback?: (error: T1CLibException, data: TokenAllCertsResponse) => void): Promise<TokenAllCertsResponse>;
biometric(module: string, callback?: (error: T1CLibException, data: TokenBiometricDataResponse) => void): Promise<TokenBiometricDataResponse>;
tokenData(module: string, callback?: (error: T1CLibException, data: TokenInfoResponse) => void): Promise<TokenInfoResponse>;
address(module: string, callback?: (error: T1CLibException, data: TokenAddressResponse) => void): Promise<TokenAddressResponse>;
picture(module: string, callback?: (error: T1CLibException, data: TokenPictureResponse) => void): Promise<TokenPictureResponse>;
rootCertificate(module: string, parseCerts?: boolean, callback?: (error: T1CLibException, data: TokenCertificateResponse) => void): Promise<TokenCertificateResponse>;
intermediateCertificates(module: string, parseCerts?: boolean, callback?: (error: T1CLibException, data: TokenCertificateResponse) => void): Promise<TokenCertificateResponse>;
authenticationCertificate(module: string, parseCerts?: boolean, callback?: (error: T1CLibException, data: TokenCertificateResponse) => void): Promise<TokenCertificateResponse>;
nonRepudiationCertificate(module: string, parseCerts?: boolean, callback?: (error: T1CLibException, data: TokenCertificateResponse) => void): Promise<TokenCertificateResponse>;
encryptionCertificate(module: string, parseCerts?: boolean, callback?: (error: T1CLibException, data: TokenCertificateResponse) => void): Promise<TokenCertificateResponse>;
issuerCertificate(module: string, parseCerts?: boolean, callback?: (error: T1CLibException, data: TokenCertificateResponse) => void): Promise<TokenCertificateResponse>;
allCertsExtended(module: string, parseCerts?: boolean, filters?: string[] | Options, callback?: (error: T1CLibException, data: TokenAllCertsExtendedResponse) => void): Promise<TokenAllCertsExtendedResponse>;
rootCertificateExtended(module: string, parseCerts?: boolean, callback?: (error: T1CLibException, data: TokenCertificateExtendedResponse) => void): Promise<TokenCertificateExtendedResponse>;
intermediateCertificatesExtended(module: string, parseCerts?: boolean, callback?: (error: T1CLibException, data: TokenCertificateExtendedResponse) => void): Promise<TokenCertificateExtendedResponse>;
authenticationCertificateExtended(module: string, parseCerts?: boolean, callback?: (error: T1CLibException, data: TokenCertificateExtendedResponse) => void): Promise<TokenCertificateExtendedResponse>;
nonRepudiationCertificateExtended(module: string, parseCerts?: boolean, callback?: (error: T1CLibException, data: TokenCertificateExtendedResponse) => void): Promise<TokenCertificateExtendedResponse>;
encryptionCertificateExtended(module: string, parseCerts?: boolean, callback?: (error: T1CLibException, data: TokenCertificateExtendedResponse) => void): Promise<TokenCertificateExtendedResponse>;
issuerCertificateExtended(module: string, parseCerts?: boolean, callback?: (error: T1CLibException, data: TokenCertificateExtendedResponse) => void): Promise<TokenCertificateExtendedResponse>;
verifyPin(module: string, body: TokenVerifyPinData, callback?: (error: T1CLibException, data: TokenVerifyPinResponse) => void): Promise<TokenVerifyPinResponse>;
authenticate(module: string, body: TokenAuthenticateOrSignData, callback?: (error: T1CLibException, data: TokenAuthenticateResponse) => void): Promise<TokenAuthenticateResponse>;
sign(module: string, body: TokenAuthenticateOrSignData, bulk?: boolean, callback?: (error: T1CLibException, data: TokenSignResponse) => void): Promise<TokenSignResponse>;
allAlgoRefs(module: string, callback?: (error: T1CLibException, data: TokenAlgorithmReferencesResponse) => void): Promise<TokenAlgorithmReferencesResponse>
resetBulkPin(module: string, callback?: (error: T1CLibException, data: BoolDataResponse) => void): Promise<BoolDataResponse>;
}export interface AbstractPaymentGeneric {
readApplicationData(module: string, callback?: (error: T1CLibException, data: PaymentReadApplicationDataResponse) => void): Promise<PaymentReadApplicationDataResponse>;
readData(module: string, callback?: (error: T1CLibException, data: PaymentReadDataResponse) => void): Promise<PaymentReadDataResponse>;
allCerts(module: string, aid: string, filters: string[] | Options, callback?: (error: T1CLibException, data: PaymentAllCertsResponse | TokenAllCertsExtendedResponse) => void): Promise<PaymentAllCertsResponse | TokenAllCertsExtendedResponse>;
issuerPublicCertificate(module: string, aid: string, callback?: (error: T1CLibException, data: PaymentCertificateResponse) => void): Promise<PaymentCertificateResponse>;
iccPublicCertificate(module: string, aid: string, callback?: (error: T1CLibException, data: PaymentCertificateResponse) => void): Promise<PaymentCertificateResponse>;
allCertsExtended(module: string, aid: string, filters: string[] | Options, callback?: (error: T1CLibException, data: TokenAllCertsExtendedResponse) => void): Promise<TokenAllCertsExtendedResponse>;
issuerPublicCertificateExtended(module: string, aid: string, callback?: (error: T1CLibException, data: TokenCertificateExtendedResponse) => void): Promise<TokenCertificateExtendedResponse>;
iccPublicCertificateExtended(module: string, aid: string, callback?: (error: T1CLibException, data: TokenCertificateExtendedResponse) => void): Promise<TokenCertificateExtendedResponse>;
verifyPin(module: string, body: PaymentVerifyPinData, callback?: (error: T1CLibException, data: PaymentVerifyPinResponse) => void): Promise<PaymentVerifyPinResponse>;
resetBulkPin(module: string, callback?: (error: T1CLibException, data: BoolDataResponse) => void): Promise<BoolDataResponse>;
sign(module: string, body: PaymentSignData, bulk?: boolean, callback?: (error: T1CLibException, data: PaymentSignResponse) => void): Promise<PaymentSignResponse>;
}public generic = (reader_id: string, pin?: string, pinType?: PinType): AbstractEidGeneric => {
return this.moduleFactory.createEidGeneric(reader_id, pin, pinType)
};
public paymentGeneric = (reader_id: string): AbstractPaymentGeneric => {
return this.moduleFactory.createPaymentGeneric(reader_id)
};
public fileex = (): AbstractFileExchange => {
return this.moduleFactory.createFileExchange()
};
public rawprint = (): AbstractRawPrint => {
return this.moduleFactory.createRawPrint()
};
public beid = (reader_id: string): AbstractEidBE => {
return this.moduleFactory.createEidBE(reader_id)
};
public remoteloading = (reader_id: string): AbstractRemoteLoading => {
return this.moduleFactory.createRemoteLoading(reader_id)
};
public emv = (reader_id: string): AbstractEmv => {
return this.moduleFactory.createEmv(reader_id)
};
public crelan = (reader_id: string): AbstractCrelan => {
return this.moduleFactory.createCrelan(reader_id)
};
// get instance for Aventra
public aventra = (reader_id: string): AbstractAventra => {
return this.moduleFactory.createAventra(reader_id);
}
// get instance for Oberthur
public oberthur = (reader_id: string): AbstractOberthur73 => {
return this.moduleFactory.createOberthur(reader_id);
}
// get instance for Oberthur
public idemia = (reader_id: string): AbstractIdemia => {
return this.moduleFactory.createIdemia(reader_id);
}
public luxeid = (reader_id: string, pin: string, pin_type: PinType): AbstractEidLux => {
return this.moduleFactory.createEidLUX(reader_id, pin, pin_type);
}
public wacom = (): AbstractWacom => {
return this.moduleFactory.createWacom();
}
public diplad = (reader_id: string): AbstractEidDiplad => {
return this.moduleFactory.createEidDiplad(reader_id);
}
public certigna = (reader_id: string): AbstractCertigna => {
return this.moduleFactory.createCertigna(reader_id);
}
public certinomis = (reader_id: string): AbstractCertinomis => {
return this.moduleFactory.createCertinomis(reader_id);
}
public dnie = (reader_id: string): AbstractDNIe => {
return this.moduleFactory.createDNIe(reader_id);
}
public safenet = (reader_id: string): AbstractSafenet => {
return this.moduleFactory.createSafenet(reader_id);
}
public eherkenning = (reader_id: string): AbstractEherkenning => {
return this.moduleFactory.createEherkenning(reader_id);
}
public jcop = (reader_id: string): AbstractJcop => {
return this.moduleFactory.createJcop(reader_id);
}
public airbus = (reader_id: string): AbstractAirbus => {
return this.moduleFactory.createAirbus(reader_id);
}
public luxtrust = (reader_id: string): AbstractLuxTrust => {
return this.moduleFactory.createLuxTrust(reader_id);
}
public camerfirma = (reader_id: string): AbstractCamerfirma => {
return this.moduleFactory.createCamerfirma(reader_id);
}
public chambersign = (reader_id: string): AbstractChambersign => {
return this.moduleFactory.createChambersign(reader_id);
}// Config object definition
export class T1CConfigOptions {
constructor(
public t1cApiUrl?: string,
public t1cApiPort?: string,
public t1cProxyUrl?: string,
public t1cProxyPort?: string,
public jwt?: string
) {}
}
// example
const configoptions = new T1CSdk.T1CConfigOptions(
environment.t1cApiUrl,
environment.t1cApiPort,
environment.t1cProxyUrl,
environment.t1cProxyPort,
environment.jwt
);
config = new T1CSdk.T1CConfig(configoptions);curl --location --request GET 'https://acc-ds.t1t.io/v3_5/tokens/application' \
--header 'apikey: your-api-key'{
"success": true,
"data": "eyJraWQiOiJ0MWNkcyIsImFsZyI6IlJTMjU2In0.eyJpc3MiOiJ0MWNkcy1hcHAiLCJzdWIiOiJkZXZlbG9wbWVudCIsImV4cCI6MTU5OTA1MTExMywiaWF0IjoxNTk5MDQ5OTEzLCJuYmYiOjE1OTkwNDk5MDh9.LE_AdYv9PWxqSRm6-lkV_3TxInCqbf_hTwHFKCFfYwkuzex6AMkeW6FaVCOxu-EBU158S2g70i4VBpeT2TAr0IoOyjK-nalvVG5aB9MwidZMtiPlidcUfsDhsyhbhwqlhI2dzB5J5KsBmvZwpoG-Pg2koUSidruixg3SxRrCMotBRlRNKItnYgfs6_wvd_OOLXs2OlufYOD876MWcJymBK48wf9ESQ50clR3zwPAQsNnXFq2Augk0gOlCgWO1--WgaFeMnBF28b7genZXIkwZCfT82nRYtiOs0zLK2WtyireTHDgjIZif4nX8pggE7t_63Hbv8wCvv8_Mg2PfdhCMQ"
}const configoptions = new T1CSdk.T1CConfigOptions(
environment.t1cApiUrl,
environment.t1cApiPort,
environment.t1cProxyUrl,
environment.t1cProxyPort,
environment.jwt
);
config = new T1CSdk.T1CConfig(configoptions);
T1CSdk.T1CClient.initialize(config).then(res => {
client = res;
console.log("Client config: ", client.localConfig)
core = client.core();
}, err => {});updateJWT(jwt: string, callback?: (error: T1CLibException, data?: T1CClient) => void): Promise<T1CClient>core.updateJWT("jwt").then(client => {}, error => {});
export interface AbstractEidBE {
allData(filters?: string[] | Options, callback?: (error: T1CLibException, data: TokenAllDataResponse) => void): Promise<TokenAllDataResponse>;
biometric(callback?: (error: T1CLibException, data: TokenBiometricDataResponse) => void): Promise<TokenBiometricDataResponse>;
tokenData(callback?: (error: T1CLibException, data: TokenInfoResponse) => void): Promise<TokenInfoResponse>;
tokenVersion(callback?: (error: T1CLibException, data: TokenVersionResponse) => void): Promise<TokenVersionResponse>
address(callback?: (error: T1CLibException, data: TokenAddressResponse) => void): Promise<TokenAddressResponse>;
picture(callback?: (error: T1CLibException, data: TokenPictureResponse) => void): Promise<TokenPictureResponse>;
allCerts(parseCerts?: boolean, filters?: string[] | Options, callback?: (error: T1CLibException, data: TokenAllCertsResponse) => void): Promise<TokenAllCertsResponse>;
rootCertificate(parseCerts?: boolean, callback?: (error: T1CLibException, data: TokenCertificateResponse) => void): Promise<TokenCertificateResponse>;
intermediateCertificates(parseCerts?: boolean, callback?: (error: T1CLibException, data: TokenCertificateResponse) => void): Promise<TokenCertificateResponse>;
authenticationCertificate(parseCerts?: boolean, callback?: (error: T1CLibException, data: TokenCertificateResponse) => void): Promise<TokenCertificateResponse>;
nonRepudiationCertificate(parseCerts?: boolean, callback?: (error: T1CLibException, data: TokenCertificateResponse) => void): Promise<TokenCertificateResponse>;
encryptionCertificate(parseCerts?: boolean, callback?: (error: T1CLibException, data: TokenCertificateResponse) => void): Promise<TokenCertificateResponse>;
allCertsExtended(parseCerts?: boolean, filters?: string[] | Options, callback?: (error: T1CLibException, data: TokenAllCertsExtendedResponse) => void): Promise<TokenAllCertsExtendedResponse>;
rootCertificateExtended(parseCerts?: boolean, callback?: (error: T1CLibException, data: TokenCertificateExtendedResponse) => void): Promise<TokenCertificateExtendedResponse>;
intermediateCertificatesExtended(parseCerts?: boolean, callback?: (error: T1CLibException, data: TokenCertificateExtendedResponse) => void): Promise<TokenCertificateExtendedResponse>;
authenticationCertificateExtended(parseCerts?: boolean, callback?: (error: T1CLibException, data: TokenCertificateExtendedResponse) => void): Promise<TokenCertificateExtendedResponse>;
nonRepudiationCertificateExtended(parseCerts?: boolean, callback?: (error: T1CLibException, data: TokenCertificateExtendedResponse) => void): Promise<TokenCertificateExtendedResponse>;
encryptionCertificateExtended(parseCerts?: boolean, callback?: (error: T1CLibException, data: TokenCertificateExtendedResponse) => void): Promise<TokenCertificateExtendedResponse>;
verifyPin(body: TokenVerifyPinData, callback?: (error: T1CLibException, data: TokenVerifyPinResponse) => void): Promise<TokenVerifyPinResponse>;
authenticate(body: TokenAuthenticateOrSignData, callback?: (error: T1CLibException, data: TokenAuthenticateResponse) => void): Promise<TokenAuthenticateResponse>;
sign(body: TokenAuthenticateOrSignData, bulk?: boolean, callback?: (error: T1CLibException, data: TokenSignResponse) => void): Promise<TokenSignResponse>;
signRaw(body: TokenAuthenticateOrSignData, bulk?: boolean, callback?: (error: T1CLibException, data: TokenSignResponse) => void): Promise<TokenSignResponse>;
allAlgoRefs(callback?: (error: T1CLibException, data: TokenAlgorithmReferencesResponse) => void): Promise<TokenAlgorithmReferencesResponse>
resetBulkPin(callback?: (error: T1CLibException, data: BoolDataResponse) => void): Promise<BoolDataResponse>;
}T1CSdk.T1CClient.initialize(config).then(res => {
client = res;
}, err => {
console.error(error)
});var beid = client.beid(reader_id);function callback(err,data) {
if(err){console.log("Error:",JSON.stringify(err, null, ' '));}
else {console.log(JSON.stringify(data, null, ' '));}
}
beid.biometric(callback);

127.0.0.1, ::1, localhost) are included automatically.GET /v3/certmgr/status[/{domain}], POST /v3/certmgr/install, POST /v3/certmgr/renew, POST /v3/certmgr/hosts, DELETE /v3/certmgr/uninstall.policies.json + user.js) — no NSS certutil or Homebrew needed.ERR_CERT_AUTHORITY_INVALID in Chrome and Edge is resolved automatically on install.t1c-reg): the cron that polls t1c-reg is spawned via tokio::spawn (replacing actix_rt::spawn) and carries a 5 s connect + 10 s request timeout. The HttpServer no longer blocks waiting for the daemon to respond before it begins serving.[4.0.5] across all five MSI projects — prevents a repeat of the Binary:Wix4UtilCA_x64 linker error caused by a silent NuGet auto-update.var core = client.core();
core.readersCardAvailable(callback);{
"data": [
{
"card": {
"atr": "3B9813400AA503010101AD1311",
"description": ["Belgian eID Card"]
},
"id": "57a3e2e71c48cee9",
"name": "Bit4id miniLector",
"pinpad": false
}
],
"success": true
}var beid = client.beid(reader_id);client.beid(reader_id).biometric(callback);function callback(err,data) {
if(err){
console.log("Error:",JSON.stringify(err, null, ' '));
}
else {
console.log(JSON.stringify(data, null, ' '));
}
}{
"birthDate": "15 JUL 1993",
"birthLocation": "Roeselare",
"cardDeliveryMunicipality": "Avelgem",
"cardNumber": "592..8233",
"cardValidityDateBegin": "27.05.2015",
"cardValidityDateEnd": "27.05.2025",
"chipNumber": "U0xHk...EstwAjEpJQQg==",
"documentType": "01",
"firstNames": "Gilles Frans",
"name": "Platteeuw",
"nationalNumber": "930...154",
"nationality": "Belg",
"nobleCondition": "",
"pictureHash": "Fqva9YCp...JKyn8=",
"rawData": "AQw1OTIxMjQwNTgy...TARFBar2vWAqTW+axEIuyskBgFySsp/",
"sex": "M",
"signature": "hKys9WMjUm4ipg...14xUCg/98Y9/gP/vgG7JTRZJoKgDXLLTvLZO4qlfA==",
"specialStatus": "0",
"thirdName": "J",
"version": "0"
}client.beid(reader_id).address(callback);{
"municipality": "Hoeselt",
"rawData": "ARJLZXJrc...AAAAAA==",
"signature": "mhPyeRg25H...w==",
"streetAndNumber": "Kerkstraat X",
"version": "0",
"zipcode": "3730"
}client.beid(reader_id).picture(callback);{
"data": "/9j/4AAQSkZJRgABA...59aVpcklSDzyKUTEDGK//9k=",
"success": true
}{
"info": {
"rawData": "string",
"version": "string",
"serialNumber": "string",
"label": "string",
"prnGeneration": "string",
"eidCompliant": "string",
"graphicalPersoVersion": "string",
"versionRfu": "string",
"electricalPersoVersion": "string",
"electricalPersoInterfaceVersion": "string",
"changeCounter": "number",
"activated": "string",
},
"infoType": "Token"
}client.beid(reader_id).tokenVersion(callback);
{
"success": true,
"data": {
"version": "1.7"
}
}allCertsExtended(parseCerts?: boolean, filters?: string[] | Options, callback?: (error: T1CLibException, data: TokenAllCertsExtendedResponse) => void): Promise<TokenAllCertsExtendedResponse>;
rootCertificateExtended(parseCerts?: boolean, callback?: (error: T1CLibException, data: TokenCertificateExtendedResponse) => void): Promise<TokenCertificateExtendedResponse>;
intermediateCertificatesExtended(parseCerts?: boolean, callback?: (error: T1CLibException, data: TokenCertificateExtendedResponse) => void): Promise<TokenCertificateExtendedResponse>;
authenticationCertificateExtended(parseCerts?: boolean, callback?: (error: T1CLibException, data: TokenCertificateExtendedResponse) => void): Promise<TokenCertificateExtendedResponse>;
nonRepudiationCertificateExtended(parseCerts?: boolean, callback?: (error: T1CLibException, data: TokenCertificateExtendedResponse) => void): Promise<TokenCertificateExtendedResponse>;
encryptionCertificateExtended(parseCerts?: boolean, callback?: (error: T1CLibException, data: TokenCertificateExtendedResponse) => void): Promise<TokenCertificateExtendedResponse>;{
"success" : true
"data" : {
"certificates": [{
"certificate"?: string,
"certificateType"?: string,
"id"?: string,
"subject"?: string,
"issuer"?: string,
"serialNumber"?: string,
"url"?: string,
"hashSubPubKey"?: string,
"hashIssPubKey"?: string,
"exponent"?: string,
"remainder"?: string,
"parsedCertificate"?: Certificate
}]
}
}{
"success" : true
"data" : {
"rootCertificate": {
"certificates": [...]
},
"authenticationCertificate": {
"certificates": [...]
},
"nonRepudiationCertificate": {
"certificates": [...]
},
"intermediateCertificates": {
"certificates": [...]
},
"encryptionCertificate": {
"certificates": [...]
}
}
}client.beid(reader_id).rootCertificate(parseCertsBoolean, callback);{
success: true,
data: {
certificate?: string,
certificates?: Array<string>,
certificateType?: string,
id?: string,
parsedCertificate?: Certificate,
parsedCertificates?: Array<Certificate>
}
}client.beid(reader_id).authenticationCertificate(parseCertsBoolean, callback);{
success: true,
data: {
certificate?: string,
certificates?: Array<string>,
certificateType?: string,
id?: string,
parsedCertificate?: Certificate,
parsedCertificates?: Array<Certificate>
}
}client.beid(reader_id).intermediateCertificates(parseCertsBoolean, callback);{
success: true,
data: {
certificate?: string,
certificates?: Array<string>,
certificateType?: string,
id?: string,
parsedCertificate?: Certificate,
parsedCertificates?: Array<Certificate>
}
}client.beid(reader_id).nonRepudiationCertificate(parseCertsBoolean, callback);{
success: true,
data: {
certificate?: string,
certificates?: Array<string>,
certificateType?: string,
id?: string,
parsedCertificate?: Certificate,
parsedCertificates?: Array<Certificate>
}
}client.beid(reader_id).encryptionCertificate(parseCertsBoolean, callback);{
success: true,
data: {
certificate?: string,
certificates?: Array<string>,
certificateType?: string,
id?: string,
parsedCertificate?: Certificate,
parsedCertificates?: Array<Certificate>
}
}var filter = [];
client.beid(reader_id).allData({ filters: filter}, callback);{
"picture": {
"picture": "/9j/4AAQSkZJRgABAgEBLAEsAAD/.../wAALCADIAIwBAREA/8QA0gAAAQUBAQEBAQEAAAAAAAAAAAECAwQFBgcICQoLEAACAQMDAgQDBQUEBAAAAX0BAgMABBEFEiExQQYTUWEHInEUMoGRoQgjQrHBFVLR8CQzYnKCCQoWFxgZGiUmJygpKjQ1Njc4OTpDREVGR0hJSlNUVVZXWFlaY2RlZmdoaWpzdHV2d3h5eoOEhYaHiImKkpOUlZaXmJmaoqOkpaanqKmqsrO0tba3uLm6wsPExcbHyMnK0tPU1dbX2Nna4eLj5OXm5+jp6vHy8/T19vf4+fr/2gAIAQEAAD8A9JpKKWiikooooopaKSilooooopKr3d9bWaFriVEwM4J5Ncjq3jUxkixQADozjJNcze+L9WndWF20OOCI/lzRb+KtYjhIN67Z7vyf1qT/AIS3Wc5F2OnQgY/lWrovjC7hYLqJ86IkksPvCustPEumXbbUuAjYzh+K1UkWRA6MGU9CDkGn0UUUUUUUhOBk8CuY1zxOls/kWjbnH3pAMgewrz7VtWmu7gvJIzZ65NZk1wSBjOagWbn5lB+vagy7+2KlilUE7eRj1qS3ncSEE4X3qwzNs81Dgg9K19G8VXumTLFv8yDOWjb+len6bqMGp2qz2zZU8Ed1PpVyiiiiio5pkgiaSRgqKMkmuH8ReKXlMlpAAkHRnB5b29q4+e5HzAHjPFZkoLyhevH6014XUcjBqAow5xQEYjFPClDxkCnq20AkZ/xqyl2oUK4xu6n0qwgguZQ28K2Ofc1v6Pqs2lSRGJzsLAOv94d69MtriO6gSaFgyMMg1LS0UUlcn491FbfS/sicyzEH6AGvOCzuApPOakt7CWYk7TjNXE0iUNnyyfpVqPQ53XiNwPepYfDMhb94GAq5/wAIzbhc4IPpVK/8OYjzEMmsWbRZ0XIUnHtVRrR4/vqR9RSwQGXdt4Zav2rbFww6DI5ruvBuqIIjaSuMu2Y8/TpXYUtFFIa8r8W6h9v1d9mCqHYuO4FVdM0t7iZWb8a6y10+KNQCOlXFijQfKop6g9hUmw4pjoRzmopEyvIqrJEjDGKpXGnwzoQ68+1YNxpv2Ry8RPHrVGUqse4MN38Qq7o8o8kOh+dG3AjsRXpejapHqVsDkLMo+dM8/WtOiis/WrxrHTJp1GWAwOeme9eWqqzTln6k5rqNLhWKFcDmtJRk1aSPPWp0i21J5dRSx8VWKVXkQA1WmwvGDzWVegSRsp4zXNT2WwMASSxqa1kNimMBkOB9fWt7QLx4ddgaNCyyLtIHevR6Wiuf8ZsRobAdWcD+dcLYQZlHck/lXWQKEjUVZj69OlXI+manXnvTiADioXPJ4qBhVaQ/NVWbkZ7VlXeDmqRYY27Rn1rOmkDXOwKBgH8av6XOba9guVz8hA2+1epg5GaWiuf8ZqTom4fwyKf5iuS0uFiQcV0MYwgBqxH1FWl6VLGeKcxOOaaRmoZAcVTkBqrOcL61j3B5NVgducVXkeOOXLKMt1p9tIsyjaAMGvVI+I1+gp9FZXiOAT6LcKRnaN35Vy+lhfKJ9Kv+cifeYACpIry3A5kA+tW1uYmXKuD+NSRzDseKl3gjrTS47UhYAGqFxINxqhcSA8ZrPlQmq8kZArNujljkdBUuhAy3cUOOWdRXrY4FLRUN0iSW8iSkBGUg5riLGMrbzxq3IkI3CozpuWZmnkye+6qT6TlmPnkk9M1Smsbq3OUuOOvWtDTrq4j+V5CRn1rpIZy6ZNSbiBz1qneXphFcpqmqzyNiJiBnqKyl+33DDZJL9dxq2i6pDg7mYehNX7a/lx5d5EADwGHUVBeR/MfT2q/4It2n10vtykY3H29K9MpaSsLxKJJo4oI5Ci53NjvWbbweUGAH3sE5qG8DpnqB7CsKNru7umitUKgdXbqay3m1L7cluxlMm/DAqMYrqLfTW5DKAw7joa1LRCnDVNelYo91cXq13NcMfLDbAcA+tVbXTppyzMrNtGSq9RTP7VhgZY44HBP+1k1Zi1LzZNgbOexGCKS8kwQcc1LM4ayeT0Sl8M+IhpDzfuA4kwCe+BXqFldxXtrHcQnKOMjNWKSsfV48zI3qMVVwpIA5xxTpI1bqBVNrRQ25EwfVaja3cybtgz/eK81ahjKrz1pTwR6k1U1aQ/Zm57VhQKDGhAyBWxatHACUXbuHOO9Yt3plol01wkWSTnGazLixaW5EsSbSO4q5HZu6Ey9R0qLUQYNOcdA3FY1vGS4wK9f8NQtBolurdSC2PrWtRWfqoHlI3cHFZUXJJ9TU3U4xxTguKdsyM1FINtQNjcKpauC1uwHORWLYsAAhPStqOPKAjoaHhU8Fc1G0KDouKgmUBTisDXCTBGoxgtk1W02AysoUclgK9it4hDBHGOiKFqWiqWppvtT7EGsgKoGVJB7ip161KoWlY4qrctjGOpqCJd74JqLUlVYic8YrlI22ySSKehzXUWDCa2RxzkVaaMVUnXaDWXdzBVIzziuf1Pc80MS9x1rd8Maa39qxRucqhDtj2r0elopkiCRGRuhGKxJreaFipQlB/EBTA2Dih5tg4ySeAKlUnbufr6VBOpkBA4PassR3NtIZJJ/MB/h24xWDr+rySYihU+/NZULXMkXlrHyepFdfoYaG1RG5IFa7yZTIrNv5gqHmudnn3zgdeazrjL3+7PyggV6J4QgY28ly643YRT64610tFFJTXXcjL6jFc+/BIP8ACcUKoEm888YFI13GuVkbafehZ4uu8UOYpVwGGazp9KtmYs2AfempZQx524pyusRAyKkEuXU9jxWNrUxUsnc1k26F50U9WIFd1F4N08XCzu0rdCUJ4Jro0RY0VEUKqjAA7U+iiikrCvV2Xki9ic1BExDYPOKL6xhvIdrqM9j6VjmwNuNiu6/8CzUiW0uw73bOOCADVO7hulGRIxY9iOKy5RfgnbKB+NLZWWp3EwMtwBHnPU8106xrFGiZzt5JNcpqdyLnVWVOUU81a0GL7TrdsmMgOCfoDmvUaWiiiikrM1aHlJh0HBrNBAcZqcnH0qJ1EnBGaqvGy/dPFU51mfv+tVRaNnLc/Wp0cRLgHmqup35hs2AJ8xxgYrBijKRlm+8eSa6nwLbbryW4b+EYFd5RRRRRRVXURmxlz7fzrmDJ820noavoQ0WCcmlQZpXjBGarMijpzVedBtJNZczbSTmsW6k864BY/Kvaomk3sFB4rtfBO398F6BcV19FFFFFFVr/AJs5fpXLXEJK716imWt5tOxzir6Tqe9JLcAcbhUTTrt4Iqhc3IOQGrA1C/CcZ56VkPOzHr1p0JZ32r07mu/8ELsaYZ5K5rsKKKKSloqtfnFnL9KwkAP41Qv7I53R9ax5ri5tzhg31qm+qzdDzUb6zKBjAqlNqkrZxwTWe8jSOSSSalhiaRgO1a1tAsYA711/hA7bpx6qa7CikpaSio1njZioYZHWs/UdQtmhlgjnjeUYyinJHPes2M5HNPYDbiqr28cvyuoIqjceH7eQ5AI+lZ0vhyME4Z/zqjPoiRZ5aqBslRulXbe3woOKtLGc8itvQJxbXqseh4NdRPqaxpujjMnqAcYHrToNShlAz8h96mkvLeJQ0k8aKe7MBT0uIZF3JNGy+qsCKqajfx2gUFvmJ6ZrB1HxUkSttIGOOtcpfeK5jC8dsxDP1f0+laehxeVp8cjcyTfOxPU1uRmpm6VAchqkEmKjkcYz0rJvGDZrJMe+Tgd6vRwbU6UpTBqS1O2ZT71vRkSJtakaARITyy+3UVyXiXUTvijEqugB+6en1rJi1AqmN7D6Gut8S61a6XKipbieSRSSXPSuBv8AUZbyQlwFXP3VGAKp7q9B0OTzdLtG/wBnH5VtR1Z6ionXnIprDI6VWkjB/i5qnPCMHAqCCAeZyKutGoWqsvBqOM4cH3rcgOQKvRNxisbxB4ettQgaZcRToM7gOv1rgEvzAvl+VE+D1K1//9k="
},
"biometric": {
"birthDate": "15 JUL 1993",
"birthLocation": "Roeselare",
"cardDeliveryMunicipality": "Avelgem",
"cardNumber": "592124058233",
"cardValidityDateBegin": "27.05.2015",
"cardValidityDateEnd": "27.05.2025",
"chipNumber": "...==",
"documentType": "01",
"firstNames": "Gilles Frans",
"name": "Platteeuw",
"nationalNumber": "...",
"nationality": "Belg",
"nobleCondition": "",
"pictureHash": "...=",
"rawData": "...+axEIuyskBgFySsp/",
"sex": "M",
"signature": ".../OlA44h4YCM/h+J14xUCg/98Y9/.../C/RB2dtVbHwFvDuafmr4ZEshTlZTLidHKlISFvFWOtsLAEPCbl5LjfQwcOKe0pDADtHb4IStBnr+aaE8oHsTaKq66Y+zt+AbwdmWOrMA5URKKf7dZkY7jt3h8KZDw36VjcytUgjxVIdqwHsDkmIjK6mJtakIwybS5wn3RiQj33/vgG7JTRZJoKgDXLLTvLZO4qlfA==",
"specialStatus": "0",
"thirdName": "J",
"version": "0"
},
"address": {
"municipality": "Hoeselt",
"rawData": "...==",
"signature": "...+Evety1PnTE4pqXaHgBxIpk+P8kRL5W3zDV+../../..+YoHBC9KqTmSpl5KULxdnKiyCt+2RyJdzE2wyoymjRmysIhJy1wW9PRnx99S1TFqQLuc0tyBmkBPR4aFqmOq4a7zqd0q2Q1g+BbnwJ4d3oa10ia5+0kBXf0THoXv3HYIHlnwhBMfAtWzPnFrYBuAKTwyl7yBF5IFfXFpGWuVZUTJElgNcmNvsHMnAhVwDw==",
"streetAndNumber": "Kerkstraat X",
"version": "0",
"zipcode": "3730"
}
}var filter = ['biometric'];
client.beid().allData({ filters: filter }, callback);{
"biometric": {
"birthDate": "15 JUL 1993",
"birthLocation": "Roeselare",
"cardDeliveryMunicipality": "Avelgem",
"cardNumber": "592124058233",
"cardValidityDateBegin": "27.05.2015",
"cardValidityDateEnd": "27.05.2025",
"chipNumber": "...==",
"documentType": "01",
"firstNames": "Gilles Frans",
"name": "Platteeuw",
"nationalNumber": "...",
"nationality": "Belg",
"nobleCondition": "",
"pictureHash": "...=",
"rawData": "...+axEIuyskBgFySsp/",
"sex": "M",
"signature": ".../OlA44h4YCM/h+J14xUCg/98Y9/.../C/RB2dtVbHwFvDuafmr4ZEshTlZTLidHKlISFvFWOtsLAEPCbl5LjfQwcOKe0pDADtHb4IStBnr+aaE8oHsTaKq66Y+zt+AbwdmWOrMA5URKKf7dZkY7jt3h8KZDw36VjcytUgjxVIdqwHsDkmIjK6mJtakIwybS5wn3RiQj33/vgG7JTRZJoKgDXLLTvLZO4qlfA==",
"specialStatus": "0",
"thirdName": "J",
"version": "0"
}
}var filter = [];
client.beid(reader_id).allCerts(parseCerts, { filters: filter}, callback);{
"rootCertificate": {
...
},
"authenticationCertificate": {
...
},
"nonRepudiationCertificate": {
...
},
"intermediateCertificates": {
...
},
"encryptionCertificate": {
...
}
}var filter = ['rootCertificate'];
client.beid(reader_id).allCerts(parseCerts, { filters: filter}, callback);{
"rootCertificate": {
...
}
}var filter = null;
client.beid(reader_id).allCerts(parseCerts, { filters: filter}, callback);{
"rootCertificate": {
...
},
"authenticationCertificate": {
...
},
"nonRepudiationCertificate": {
...
},
"intermediateCertificates": {
...
},
"encryptionCertificate": {
...
}
}var data = {
"pin":"...",
"algorithm":"sha1",
"data":"I2e+u/sgy7fYgh+DWA0p2jzXQ7E=",
"osDialog": true,
"txId": "1234",
"language": "fr"
}
client.beid(reader_id).sign(data, callback);var data = {
"pin":"...",
"algorithm":"sha1",
"data":"I2e+u/sgy7fYgh+DWA0p2jzXQ7E=",
"osDialog": true
}
client.beid(reader_id).sign(data, callback);{
"success": true,
"data": {
"data" : "W7wqvWA8m9S...="
}
}var data = {
"algorithm":"sha1",
"data":"I2e+u/sgy7fYgh+DWA0p2jzXQ7E=",
"osDialog": false
}
client.beid(reader_id).sign(data, callback);{
"success": true,
"data": {
"data" : "W7wqvWA8m9S...="
}
}var data = {
"algorithm":"sha256",
"data":"vl5He0ulthjX+VWNM46QX7vJ8VvXMq2k/Tq8Xq1bwEw=",
"osDialog": false
}
beid.signRaw(data, callback);const data = {
algorithm: "sha256",
data: "E1uHACbPvhLew0gGmBH83lvtKIAKxU2/RezfBOsT6Vs=",
pin: "1234"
}
const bulk = true;
beid.sign(data, bulk).then(res => {
}, err => {
console.error(err)
})beid.resetBulkPin().then(res => {
}, err => {
console.error(err)
}){
"success": true,
"data": true
}This is sample text to demonstrate siging with Belgian eID135b870026cfbe12dec348069811fcde5bed28800ac54dbf45ecdf04eb13e95bE1uHACbPvhLew0gGmBH83lvtKIAKxU2/RezfBOsT6Vs=var data = {
"pin":"...",
"algorithm":"sha256",
"data":"E1uHACbPvhLew0gGmBH83lvtKIAKxU2/RezfBOsT6Vs="
}
client.beid(reader_id).signData(data, callback);{
"success": true,
"data": {
"data" : "W7wqvWA8m9S...="
}
}E1uHACbPvhLew0gGmBH83lvtKIAKxU2/RezfBOsT6Vs=7B8F4654076B80EB963911F19CFAD1AAF4285ED48E826F6CDE1B01A79AA73FADB5446E667FC4F90417782C91270540F3TbwLx5Vw+RK6ETqvkzJ8JKIkLRX8zR8+KGU7I9of90YxOXkn3GjftmWEBXpFgBit+VWGBmr+Do886sqM0R5L9w==var data = {
"pin":"..."
}
client.beid(reader_id).verifyPin(data, callback);{
"verified": true
}var data = {}
client.beid(reader_id).verifyPin(data, callback);{
"verified": true
} $("#buttonValidate").on('click', function () {
var _body={};
_body.pin = $("#psw").val(); //only when no pin-pad available
var beid = client.beid(reader_id);
beid.verifyPin(_body, validationCallback);
});var data = {
"pin": "...",
"algorithm": "sha1",
"data":"I2e+u/sgy7fYgh+DWA0p2jzXQ7E="
}
client.beid(reader_id).authenticate(data, callback);{
"success": true,
"data": {
"data" : "W7wqvWA8m9S...="
}
}The calculated digest of the hash is prefixed with:
DigestInfo ::= SEQUENCE {
digestAlgorithm AlgorithmIdentifier,
digest OCTET STRING
}
Make sure this has been taken into consideration in order to validate the signature in a backend process.generic.allAlgoRefs(module, callback);{
"success": true,
"data": ["sha1", "sha256"]
}%LocalAppData%\T1CConnector\
t1c-ca.pem ← Root CA certificate (PEM)
t1c-ca-key.pem ← Root CA private key
t1c-tls.pem ← localhost TLS leaf certificate
t1c-tls-key.pem ← localhost TLS private key%LocalAppData%\<ConnectorName>\logs\t1c-api.logexport interface AbstractEidDiplad {
allData(filters: string[] | Options, callback?: (error: T1CLibException, data: TokenAllDataResponse) => void): Promise<TokenAllDataResponse>;
allCerts(parseCerts?: boolean, filters?: string[] | Options, callback?: (error: T1CLibException, data: TokenAllCertsResponse) => void): Promise<TokenAllCertsResponse>;
biometric(callback?: (error: T1CLibException, data: TokenBiometricDataResponse) => void): Promise<TokenBiometricDataResponse>;
tokenData(callback?: (error: T1CLibException, data: TokenInfoResponse) => void): Promise<TokenInfoResponse>;
address(callback?: (error: T1CLibException, data: TokenAddressResponse) => void): Promise<TokenAddressResponse>;
picture(callback?: (error: T1CLibException, data: TokenPictureResponse) => void): Promise<TokenPictureResponse>;
rootCertificate(parseCerts?: boolean, callback?: (error: T1CLibException, data: TokenCertificateResponse) => void): Promise<TokenCertificateResponse>;
intermediateCertificates(parseCerts?: boolean, callback?: (error: T1CLibException, data: TokenCertificateResponse) => void): Promise<TokenCertificateResponse>;
authenticationCertificate(parseCerts?: boolean, callback?: (error: T1CLibException, data: TokenCertificateResponse) => void): Promise<TokenCertificateResponse>;
nonRepudiationCertificate(parseCerts?: boolean, callback?: (error: T1CLibException, data: TokenCertificateResponse) => void): Promise<TokenCertificateResponse>;
encryptionCertificate(parseCerts?: boolean, callback?: (error: T1CLibException, data: TokenCertificateResponse) => void): Promise<TokenCertificateResponse>;
allCertsExtended(parseCerts?: boolean, filters?: string[] | Options, callback?: (error: T1CLibException, data: TokenAllCertsExtendedResponse) => void): Promise<TokenAllCertsExtendedResponse>;
rootCertificateExtended(parseCerts?: boolean, callback?: (error: T1CLibException, data: TokenCertificateExtendedResponse) => void): Promise<TokenCertificateExtendedResponse>;
intermediateCertificatesExtended(parseCerts?: boolean, callback?: (error: T1CLibException, data: TokenCertificateExtendedResponse) => void): Promise<TokenCertificateExtendedResponse>;
authenticationCertificateExtended(parseCerts?: boolean, callback?: (error: T1CLibException, data: TokenCertificateExtendedResponse) => void): Promise<TokenCertificateExtendedResponse>;
nonRepudiationCertificateExtended(parseCerts?: boolean, callback?: (error: T1CLibException, data: TokenCertificateExtendedResponse) => void): Promise<TokenCertificateExtendedResponse>;
encryptionCertificateExtended(parseCerts?: boolean, callback?: (error: T1CLibException, data: TokenCertificateExtendedResponse) => void): Promise<TokenCertificateExtendedResponse>;
verifyPin(body: TokenVerifyPinData, callback?: (error: T1CLibException, data: TokenVerifyPinResponse) => void): Promise<TokenVerifyPinResponse>;
authenticate(body: TokenAuthenticateOrSignData, callback?: (error: T1CLibException, data: TokenAuthenticateResponse) => void): Promise<TokenAuthenticateResponse>;
sign(body: TokenAuthenticateOrSignData, bulk?: boolean, callback?: (error: T1CLibException, data: TokenSignResponse) => void): Promise<TokenSignResponse>;
allAlgoRefs(callback?: (error: T1CLibException, data: TokenAlgorithmReferencesResponse) => void): Promise<TokenAlgorithmReferencesResponse>
resetBulkPin(callback?: (error: T1CLibException, data: BoolDataResponse) => void): Promise<BoolDataResponse>;
}T1cSdk.initialize(config).then(res => {
const diplad = res.client.createEidDiplad(readerId);
}, err => {
console.error(error)
});diplad.allData().then(res => {
}, err => {
console.log(err);
}{
"data": {
"biometric": {
"cardNumber": "cardNumber",
"cardValidityDateEnd": "2021-01-08",
"chipNumber": "c57c0a3f-d034-46c9-831e-a208b2e44fb6",
"firstNames": "Tom",
"name": "Van Cammen",
"nationality": "BE",
"rawData": "BASE64_ENCODED_CARD_DATA",
"version": "1",
"issuer": ""
},
"picture": {
"picture": "BASE64_ENCODED_BYTE_ARRAY"
}
},
"success": true
}diplad.biometric().then(res => {
}, err => {
console.log(err);
}{
"data": {
"cardNumber": "cardNumber",
"cardValidityDateEnd": "2021-01-08",
"chipNumber": "c57c0a3f-d034-46c9-831e-a208b2e44fb6",
"firstNames": "Tom",
"name": "Van Cammen",
"nationality": "BE",
"rawData": "BASE64_ENCODED_CARD_DATA",
"version": "1",
"issuer": ""
},
"success": true
}diplad.picture().then(res => {
}, err => {
console.log(err);
}{
"data": {
"picture": "BASE64_ENCODED_BYTE_ARRAY"
},
"success": true
}const filter = ['rootCertificate', 'authenticationCertificate', 'nonRepudiationCertificate'];
diplad.allCerts(parseCertsBoolean, filter).then(res => {
}, err => {
console.log(err);
}{
success: true,
data: {
authenticationCertificate?: {
certificate?: string,
certificates?: Array<string>,
certificateType?: string,
id?: string,
parsedCertificate?: Certificate,
parsedCertificates?: Array<Certificate>
},
nonRepudiationCertificate?: {
certificate?: string,
certificates?: Array<string>,
certificateType?: string,
id?: string,
parsedCertificate?: Certificate,
parsedCertificates?: Array<Certificate>
},
rootCertificate?: {
certificate?: string,
certificates?: Array<string>,
certificateType?: string,
id?: string,
parsedCertificate?: Certificate,
parsedCertificates?: Array<Certificate>
},
}
}diplad.rootCertificate(parseCertsBoolean).then(res => {
}, err => {
console.log(err);
}{
success: true,
data: {
certificate?: string,
certificates?: Array<string>,
certificateType?: string,
id?: string,
parsedCertificate?: Certificate,
parsedCertificates?: Array<Certificate>
}
}diplad.authenticationCertificate(parseCertsBoolean).then(res => {
}, err => {
console.log(err);
}{
success: true,
data: {
certificate?: string,
certificates?: Array<string>,
certificateType?: string,
id?: string,
parsedCertificate?: Certificate,
parsedCertificates?: Array<Certificate>
}
}diplad.nonRepudiationCertificate(parseCertsBoolean).then(res => {
}, err => {
console.log(err);
}{
success: true,
data: {
certificate?: string,
certificates?: Array<string>,
certificateType?: string,
id?: string,
parsedCertificate?: Certificate,
parsedCertificates?: Array<Certificate>
}
}const data = {
pin: "1234", // optional
osDialog: true // optional
}
diplad.verifyPin(data).then(res => {
}, err => {
console.error(err)
}){
"success": true,
"data": {
"verified": true
}
}const data = {
algorithm: "sha256",
data: "E1uHACbPvhLew0gGmBH83lvtKIAKxU2/RezfBOsT6Vs=",
pin: "1234"
}
const bulk = false;
diplad.sign(data, bulk).then(res => {
}, err => {
console.error(err)
}){
"success": true,
"data": {
"data": "..."
}
}const data = {
algorithm: "sha256",
data: "E1uHACbPvhLew0gGmBH83lvtKIAKxU2/RezfBOsT6Vs=",
pin: "1234"
}
diplad.authenticate(data).then(res => {
}, err => {
console.error(err)
}){
"success": true,
"data": {
"data": "..."
}
}diplad.allAlgoRefs().then(res => {
}, err => {
console.error(err)
}){
"success": true,
"data": {
"ref": ["sha1", "sha256", "sha512"]
}
}diplad.resetBulkPin().then(res => {
}, err => {
console.error(err)
}){
"success": true,
"data": true
}export interface AbstractEherkenning {
allCerts(parseCerts?: boolean, filters?: string[] | Options, callback?: (error: T1CLibException, data: TokenAllCertsResponse) => void): Promise<TokenAllCertsResponse>;
authenticationCertificate(parseCerts?: boolean, callback?: (error: T1CLibException, data: TokenCertificateResponse) => void): Promise<TokenCertificateResponse>;
nonRepudiationCertificate(parseCerts?: boolean, callback?: (error: T1CLibException, data: TokenCertificateResponse) => void): Promise<TokenCertificateResponse>;
allCertsExtended(parseCerts?: boolean, filters?: string[] | Options, callback?: (error: T1CLibException, data: TokenAllCertsExtendedResponse) => void): Promise<TokenAllCertsExtendedResponse>;
authenticationCertificateExtended(parseCerts?: boolean, callback?: (error: T1CLibException, data: TokenCertificateExtendedResponse) => void): Promise<TokenCertificateExtendedResponse>;
nonRepudiationCertificateExtended(parseCerts?: boolean, callback?: (error: T1CLibException, data: TokenCertificateExtendedResponse) => void): Promise<TokenCertificateExtendedResponse>;
validateSignature(body: TokenValidateSignatureRequest, callback?: (error: T1CLibException, data: TokenValidateSignatureResponse) => void): Promise<TokenValidateSignatureResponse>;
verifyPin(body: TokenVerifyPinData, callback?: (error: T1CLibException, data: TokenVerifyPinResponse) => void): Promise<TokenVerifyPinResponse>;
authenticate(body: TokenAuthenticateOrSignData, callback?: (error: T1CLibException, data: TokenAuthenticateResponse) => void): Promise<TokenAuthenticateResponse>;
sign(body: TokenAuthenticateOrSignData, bulk?: boolean, callback?: (error: T1CLibException, data: TokenSignResponse) => void): Promise<TokenSignResponse>;
signRaw(body: TokenAuthenticateOrSignData, bulk?: boolean, callback?: (error: T1CLibException, data: TokenSignResponse) => void): Promise<TokenSignResponse>;
allAlgoRefs(callback?: (error: T1CLibException, data: TokenAlgorithmReferencesResponse) => void): Promise<TokenAlgorithmReferencesResponse>
resetBulkPin(callback?: (error: T1CLibException, data: BoolDataResponse) => void): Promise<BoolDataResponse>;
}module.tokenData().then(res => {
// see response below
}){
"success": true,
"data": {
"info": {
"slot": "string",
"label": "string",
"manufacturerId": "string",
"model": "string",
"serialNumber": "string",
"flags": {
"isRandomNumberGenerator": "boolean",
"isWriteProtected": "boolean",
"isLoginRequired": "boolean",
"isUserPinInitialized": "boolean",
"isRestoreKeyNotNeeded": "boolean",
"isClockOnToken": "boolean",
"isProtectedAuthenticationPath": "boolean",
"isDualCryptoOperations": "boolean",
"isTokenInitialized": "boolean",
"isSecondaryAuthentication": "boolean",
"isUserPinCountLow": "boolean",
"isUserPinFinalTry": "boolean",
"isUserPinLocked": "boolean",
"isUserPinToBeChanged": "boolean",
"isSoPinCountLow": "boolean",
"isSoPinFinalTry": "boolean",
"isSoPinLocked": "boolean",
"isSoPinToBeChanged": "boolean"
},
"mechanisms": [
{
"mechanism": "string",
"flags": {
"isHardware": "boolean",
"isEncrypt": "boolean",
"isDecrypt": "boolean",
"isDigest": "boolean",
"isSign": "boolean",
"isSignRecover": "boolean",
"isVerify": "boolean",
"isVerifyRecover": "boolean",
"isGenerate": "boolean",
"isGenerateKeyPair": "boolean",
"isWrap": "boolean",
"isUnwrap": "boolean",
"isExtension": "boolean",
"isEcFP": "boolean",
"isEcNamedcurve": "boolean",
"isEcUncompress": "boolean",
"isEcCompress": "boolean"
},
"ulMinKeySize": "number",
"ulMaxKeySize": "number"
}
],
"ulMaxSessionCount": "number",
"ulSessionCount": "number",
"ulMaxRwSessionCount": "number",
"ulMaxPinLen": "number",
"ulMinPinLen": "number",
"ulTotalPubLicMemory": "number",
"ulFreePubMemory": "number",
"ulTotalPrivateMemory": "number",
"ulFreePrivateMemory": "number",
"hardwareVersion": "string",
"firmwareVersion": "string"
},
"infoType": "TokenInfoType"
}
}
//ENUM
TokenInfoType {
Token,
PKCS11,
File,
Payment,
HSM,
Vault,
Wallet,
}allCertsExtended(parseCerts?: boolean, filters?: string[] | Options, callback?: (error: T1CLibException, data: TokenAllCertsExtendedResponse) => void): Promise<TokenAllCertsExtendedResponse>;
authenticationCertificateExtended(parseCerts?: boolean, callback?: (error: T1CLibException, data: TokenCertificateExtendedResponse) => void): Promise<TokenCertificateExtendedResponse>;
nonRepudiationCertificateExtended(parseCerts?: boolean, callback?: (error: T1CLibException, data: TokenCertificateExtendedResponse) => void): Promise<TokenCertificateExtendedResponse>;
encryptionCertificateExtended(parseCerts?: boolean, callback?: (error: T1CLibException, data: TokenCertificateExtendedResponse) => void): Promise<TokenCertificateExtendedResponse>;
rootCertificateExtended(parseCerts?: boolean, callback?: (error: T1CLibException, data: TokenCertificateExtendedResponse) => void): Promise<TokenCertificateExtendedResponse>;{
"success" : true
"data" : {
"certificates": [{
"certificate"?: string,
"certificateType"?: string,
"id"?: string,
"subject"?: string,
"issuer"?: string,
"serialNumber"?: string,
"url"?: string,
"hashSubPubKey"?: string,
"hashIssPubKey"?: string,
"exponent"?: string,
"remainder"?: string,
"parsedCertificate"?: Certificate
}]
}
}{
"success" : true
"data" : {
"authenticationCertificate": {
"certificates": [...]
},
"nonRepudiationCertificate": {
"certificates": [...]
},
"encryptionCertificate": {
"certificates": [...]
},
"rootCertificate": {
"certificates": [...]
}
}
}generic.authenticationCertificate(module, parseCertsBoolean, callback);{
success: true,
data: {
certificate?: string,
certificates?: Array<string>,
certificateType?: string,
id?: string,
parsedCertificate?: Certificate,
parsedCertificates?: Array<Certificate>
}
}generic.nonRepudiationCertificate(module, parseCertsBoolean, callback);{
success: true,
data: {
certificate?: string,
certificates?: Array<string>,
certificateType?: string,
id?: string,
parsedCertificate?: Certificate,
parsedCertificates?: Array<Certificate>
}
}generic.nonRepudiationCertificate(module, parseCertsBoolean, callback);{
success: true,
data: {
certificate?: string,
certificates?: Array<string>,
certificateType?: string,
id?: string,
parsedCertificate?: Certificate,
parsedCertificates?: Array<Certificate>
}
}generic.rootCertificate(module, parseCertsBoolean, callback);{
success: true,
data: {
certificate?: string,
certificates?: Array<string>,
certificateType?: string,
id?: string,
parsedCertificate?: Certificate,
parsedCertificates?: Array<Certificate>
}
}var filter = [];
generic.allCerts(module, parseCerts, { filters: filter}, callback);{
"authenticationCertificate": {
...
},
"nonRepudiationCertificate": {
...
},
"encryptionCertificate": {
...
}
}var filter = ['authenticationCertificate'];
generic.allCerts(module, { filters: filter}, callback);{
"authenticationCertificate": {
...
}
}var filter = null;
module.allCerts({ filters: filter}, callback);{
"authenticationCertificate": {
...
},
"nonRepudiationCertificate": {
...
}
}var data = {
"algorithm":"sha256",
"data":"vl5He0ulthjX+VWNM46QX7vJ8VvXMq2k/Tq8Xq1bwEw=",
"osDialog": false
}
module.signRaw(data, callback);var data = {
"pin":"...",
"algorithm":"sha256",
"data":"n4bQgYhMfWWaL+qgxVrQFaO/TxsrC4Is0V1sFbDwCgg="
"osDialog": true
}
module.sign(data, callback);{
"success": true,
"data": {
"data" : "W7wqvWA8m9S...="
}
}var data = {
"algorithm": "sha256",
"data":"n4bQgYhMfWWaL+qgxVrQFaO/TxsrC4Is0V1sFbDwCgg="
"osDialog": false
}
module.sign(data, callback);{
"success": true,
"data": {
"data" : "W7wqvWA8m9S...="
}
}const body = {
"algorithm": 'sha256',
"hash": '...',
"signedHash": '...',
"osDialog": false,
"id": 'cert_id',
"pin": 'pin_code',
"timeout": 120 //timeout in seconds
}
safenet.validateSignature(body).then(response => {
response.valid
).catch(error => {
errorHandler(error)}
){
"success": true,
"data": {
"valid": true
}
}export interface AbstractChambersign {
allCerts(parseCerts?: boolean, filters?: string[] | Options, callback?: (error: T1CLibException, data: TokenAllCertsResponse) => void): Promise<TokenAllCertsResponse>;
authenticationCertificate(parseCerts?: boolean, callback?: (error: T1CLibException, data: TokenCertificateResponse) => void): Promise<TokenCertificateResponse>;
nonRepudiationCertificate(parseCerts?: boolean, callback?: (error: T1CLibException, data: TokenCertificateResponse) => void): Promise<TokenCertificateResponse>;
allCertsExtended(parseCerts?: boolean, filters?: string[] | Options, callback?: (error: T1CLibException, data: TokenAllCertsExtendedResponse) => void): Promise<TokenAllCertsExtendedResponse>;
authenticationCertificateExtended(parseCerts?: boolean, callback?: (error: T1CLibException, data: TokenCertificateExtendedResponse) => void): Promise<TokenCertificateExtendedResponse>;
nonRepudiationCertificateExtended(parseCerts?: boolean, callback?: (error: T1CLibException, data: TokenCertificateExtendedResponse) => void): Promise<TokenCertificateExtendedResponse>;
validateSignature(body: TokenValidateSignatureRequest, callback?: (error: T1CLibException, data: TokenValidateSignatureResponse) => void): Promise<TokenValidateSignatureResponse>;
verifyPin(body: TokenVerifyPinData, callback?: (error: T1CLibException, data: TokenVerifyPinResponse) => void): Promise<TokenVerifyPinResponse>;
authenticate(body: TokenAuthenticateOrSignData, callback?: (error: T1CLibException, data: TokenAuthenticateResponse) => void): Promise<TokenAuthenticateResponse>;
sign(body: TokenAuthenticateOrSignData, bulk?: boolean, callback?: (error: T1CLibException, data: TokenSignResponse) => void): Promise<TokenSignResponse>;
signRaw(body: TokenAuthenticateOrSignData, bulk?: boolean, callback?: (error: T1CLibException, data: TokenSignResponse) => void): Promise<TokenSignResponse>;
allAlgoRefs(callback?: (error: T1CLibException, data: TokenAlgorithmReferencesResponse) => void): Promise<TokenAlgorithmReferencesResponse>
resetBulkPin(callback?: (error: T1CLibException, data: BoolDataResponse) => void): Promise<BoolDataResponse>;
tokenData(callback?: (error: T1CLibException, data: TokenInfoResponse) => void): Promise<TokenInfoResponse>;
}
T1CSdk.T1CClient.initialize(config).then(res => {
client = res;
}, err => {
console.error(error)
});var core = client.core();
core.readersCardAvailable(callback);{
"data": [
// List of reader with cards found
],
"success": true
}const moduleName = "chambersign";
var module = client.generic(selected_reader.id);var module = client.chambersign(selected_reader.id);module.tokenData().then(res => {
// see response below
}){
"success": true,
"data": {
"info": {
"slot": "string",
"label": "string",
"manufacturerId": "string",
"model": "string",
"serialNumber": "string",
"flags": {
"isRandomNumberGenerator": "boolean",
"isWriteProtected": "boolean",
"isLoginRequired": "boolean",
"isUserPinInitialized": "boolean",
"isRestoreKeyNotNeeded": "boolean",
"isClockOnToken": "boolean",
"isProtectedAuthenticationPath": "boolean",
"isDualCryptoOperations": "boolean",
"isTokenInitialized": "boolean",
"isSecondaryAuthentication": "boolean",
"isUserPinCountLow": "boolean",
"isUserPinFinalTry": "boolean",
"isUserPinLocked": "boolean",
"isUserPinToBeChanged": "boolean",
"isSoPinCountLow": "boolean",
"isSoPinFinalTry": "boolean",
"isSoPinLocked": "boolean",
"isSoPinToBeChanged": "boolean"
},
"mechanisms": [
{
"mechanism": "string",
"flags": {
"isHardware": "boolean",
"isEncrypt": "boolean",
"isDecrypt": "boolean",
"isDigest": "boolean",
"isSign": "boolean",
"isSignRecover": "boolean",
"isVerify": "boolean",
"isVerifyRecover": "boolean",
"isGenerate": "boolean",
"isGenerateKeyPair": "boolean",
"isWrap": "boolean",
"isUnwrap": "boolean",
"isExtension": "boolean",
"isEcFP": "boolean",
"isEcNamedcurve": "boolean",
"isEcUncompress": "boolean",
"isEcCompress": "boolean"
},
"ulMinKeySize": "number",
"ulMaxKeySize": "number"
}
],
"ulMaxSessionCount": "number",
"ulSessionCount": "number",
"ulMaxRwSessionCount": "number",
"ulMaxPinLen": "number",
"ulMinPinLen": "number",
"ulTotalPubLicMemory": "number",
"ulFreePubMemory": "number",
"ulTotalPrivateMemory": "number",
"ulFreePrivateMemory": "number",
"hardwareVersion": "string",
"firmwareVersion": "string"
},
"infoType": "TokenInfoType"
}
}
//ENUM
TokenInfoType {
Token,
PKCS11,
File,
Payment,
HSM,
Vault,
Wallet,
}module.authenticationCertificate(module, parseCertsBoolean, callback);{
success: true,
data: {
certificate?: string,
certificates?: Array<string>,
certificateType?: string,
id?: string,
parsedCertificate?: Certificate,
parsedCertificates?: Array<Certificate>
}
}module.nonRepudiationCertificate(module, parseCertsBoolean, callback);{
success: true,
data: {
certificate?: string,
certificates?: Array<string>,
certificateType?: string,
id?: string,
parsedCertificate?: Certificate,
parsedCertificates?: Array<Certificate>
}
}var filter = [];
module.allCerts(module, parseCerts, { filters: filter}, callback);{
"authenticationCertificate": {
...
},
"nonRepudiationCertificate": {
...
}
}var filter = ['authenticationCertificate'];
module.allCerts(module, { filters: filter}, callback);{
"authenticationCertificate": {
...
}
}var filter = null;
module.allCerts(module, { filters: filter}, callback);{
"authenticationCertificate": {
...
},
"nonRepudiationCertificate": {
...
}
}var data = {
"pin":"...",
"algorithm":"sha1",
"data":"I2e+u/sgy7fYgh+DWA0p2jzXQ7E=",
"osDialog": true
}
module.sign(module, data, callback);{
"success": true,
"data": {
"data" : "W7wqvWA8m9S...="
}
}var data = {
"algorithm":"sha1",
"data":"I2e+u/sgy7fYgh+DWA0p2jzXQ7E=",
"osDialog": false
}
module.sign(module, data, callback);{
"success": true,
"data": {
"data" : "W7wqvWA8m9S...="
}
}var data = {
"algorithm":"sha256",
"data":"vl5He0ulthjX+VWNM46QX7vJ8VvXMq2k/Tq8Xq1bwEw=",
"osDialog": false
}
chambersign.signRaw(data, callback);const data = {
algorithm: "sha256",
data: "E1uHACbPvhLew0gGmBH83lvtKIAKxU2/RezfBOsT6Vs=",
pin: "1234"
}
const bulk = true;
module.sign(module, data, bulk).then(res => {
}, err => {
console.error(err)
})module.resetBulkPin(module).then(res => {
}, err => {
console.error(err)
}){
"success": true,
"data": true
}var data = {
"pin":"..."
}
module.verifyPin(module, data, callback);{
"verified": true
}var data = {}
module.verifyPin(module, data, callback);{
"verified": true
}var data = {
"pin": "...",
"algorithm": "sha1",
"data":"I2e+u/sgy7fYgh+DWA0p2jzXQ7E="
}
module.authenticate(module, data, callback);{
"success": true,
"data": {
"data" : "W7wqvWA8m9S...="
}
}module.allAlgoRefs(module, callback);{
"success": true,
"data": ["sha1", "sha256"]
}const body = {
"algorithm": 'sha256',
"hash": '...',
"signedHash": '...',
"osDialog": false,
"id": 'cert_id',
"pin": 'pin_code',
"timeout": 120 //timeout in seconds
}
module.validateSignature(body).then(response => {
response.valid
).catch(error => {
errorHandler(error)}
){
"success": true,
"data": {
"valid": true
}
}XXXXXX201010{
description: "some error description",
code: "some error code"
}
export interface AbstractJcop {
allCerts(parseCerts?: boolean, filters?: string[] | Options, callback?: (error: T1CLibException, data: TokenAllCertsResponse) => void): Promise<TokenAllCertsResponse>;
authenticationCertificate(parseCerts?: boolean, callback?: (error: T1CLibException, data: TokenCertificateResponse) => void): Promise<TokenCertificateResponse>;
nonRepudiationCertificate(parseCerts?: boolean, callback?: (error: T1CLibException, data: TokenCertificateResponse) => void): Promise<TokenCertificateResponse>;
encryptionCertificate(parseCerts?: boolean, callback?: (error: T1CLibException, data: TokenCertificateResponse) => void): Promise<TokenCertificateResponse>;
allCertsExtended(parseCerts?: boolean, filters?: string[] | Options, callback?: (error: T1CLibException, data: TokenAllCertsExtendedResponse) => void): Promise<TokenAllCertsExtendedResponse>;
authenticationCertificateExtended(parseCerts?: boolean, callback?: (error: T1CLibException, data: TokenCertificateExtendedResponse) => void): Promise<TokenCertificateExtendedResponse>;
nonRepudiationCertificateExtended(parseCerts?: boolean, callback?: (error: T1CLibException, data: TokenCertificateExtendedResponse) => void): Promise<TokenCertificateExtendedResponse>;
encryptionCertificateExtended(parseCerts?: boolean, callback?: (error: T1CLibException, data: TokenCertificateExtendedResponse) => void): Promise<TokenCertificateExtendedResponse>;
validateSignature(body: TokenValidateSignatureRequest, callback?: (error: T1CLibException, data: TokenValidateSignatureResponse) => void): Promise<TokenValidateSignatureResponse>;
verifyPin(body: TokenVerifyPinData, callback?: (error: T1CLibException, data: TokenVerifyPinResponse) => void): Promise<TokenVerifyPinResponse>;
authenticate(body: TokenAuthenticateOrSignData, callback?: (error: T1CLibException, data: TokenAuthenticateResponse) => void): Promise<TokenAuthenticateResponse>;
sign(body: TokenAuthenticateOrSignData, bulk?: boolean, callback?: (error: T1CLibException, data: TokenSignResponse) => void): Promise<TokenSignResponse>;
signRaw(body: TokenAuthenticateOrSignData, bulk?: boolean, callback?: (error: T1CLibException, data: TokenSignResponse) => void): Promise<TokenSignResponse>;
allAlgoRefs(callback?: (error: T1CLibException, data: TokenAlgorithmReferencesResponse) => void): Promise<TokenAlgorithmReferencesResponse>
resetBulkPin(callback?: (error: T1CLibException, data: BoolDataResponse) => void): Promise<BoolDataResponse>;
}T1CSdk.T1CClient.initialize(config).then(res => {
client = res;
}, err => {
console.error(error)
});var core = client.core();
core.readersCardAvailable(callback);{
"data": [
// List of reader with cards found
],
"success": true
}const moduleName = "jcop3";
var module = client.generic(selected_reader.id);var module = client.jcop3(selected_reader.id);module.tokenData().then(res => {
// see response below
}){
"success": true,
"data": {
"info": {
"slot": "string",
"label": "string",
"manufacturerId": "string",
"model": "string",
"serialNumber": "string",
"flags": {
"isRandomNumberGenerator": "boolean",
"isWriteProtected": "boolean",
"isLoginRequired": "boolean",
"isUserPinInitialized": "boolean",
"isRestoreKeyNotNeeded": "boolean",
"isClockOnToken": "boolean",
"isProtectedAuthenticationPath": "boolean",
"isDualCryptoOperations": "boolean",
"isTokenInitialized": "boolean",
"isSecondaryAuthentication": "boolean",
"isUserPinCountLow": "boolean",
"isUserPinFinalTry": "boolean",
"isUserPinLocked": "boolean",
"isUserPinToBeChanged": "boolean",
"isSoPinCountLow": "boolean",
"isSoPinFinalTry": "boolean",
"isSoPinLocked": "boolean",
"isSoPinToBeChanged": "boolean"
},
"mechanisms": [
{
"mechanism": "string",
"flags": {
"isHardware": "boolean",
"isEncrypt": "boolean",
"isDecrypt": "boolean",
"isDigest": "boolean",
"isSign": "boolean",
"isSignRecover": "boolean",
"isVerify": "boolean",
"isVerifyRecover": "boolean",
"isGenerate": "boolean",
"isGenerateKeyPair": "boolean",
"isWrap": "boolean",
"isUnwrap": "boolean",
"isExtension": "boolean",
"isEcFP": "boolean",
"isEcNamedcurve": "boolean",
"isEcUncompress": "boolean",
"isEcCompress": "boolean"
},
"ulMinKeySize": "number",
"ulMaxKeySize": "number"
}
],
"ulMaxSessionCount": "number",
"ulSessionCount": "number",
"ulMaxRwSessionCount": "number",
"ulMaxPinLen": "number",
"ulMinPinLen": "number",
"ulTotalPubLicMemory": "number",
"ulFreePubMemory": "number",
"ulTotalPrivateMemory": "number",
"ulFreePrivateMemory": "number",
"hardwareVersion": "string",
"firmwareVersion": "string"
},
"infoType": "TokenInfoType"
}
}
//ENUM
TokenInfoType {
Token,
PKCS11,
File,
Payment,
HSM,
Vault,
Wallet,
}allCertsExtended(parseCerts?: boolean, filters?: string[] | Options, callback?: (error: T1CLibException, data: TokenAllCertsExtendedResponse) => void): Promise<TokenAllCertsExtendedResponse>;
authenticationCertificateExtended(parseCerts?: boolean, callback?: (error: T1CLibException, data: TokenCertificateExtendedResponse) => void): Promise<TokenCertificateExtendedResponse>;
nonRepudiationCertificateExtended(parseCerts?: boolean, callback?: (error: T1CLibException, data: TokenCertificateExtendedResponse) => void): Promise<TokenCertificateExtendedResponse>;
encryptionCertificateExtended(parseCerts?: boolean, callback?: (error: T1CLibException, data: TokenCertificateExtendedResponse) => void): Promise<TokenCertificateExtendedResponse>;{
"success" : true
"data" : {
"certificates": [{
"certificate"?: string,
"certificateType"?: string,
"id"?: string,
"subject"?: string,
"issuer"?: string,
"serialNumber"?: string,
"url"?: string,
"hashSubPubKey"?: string,
"hashIssPubKey"?: string,
"exponent"?: string,
"remainder"?: string,
"parsedCertificate"?: Certificate
}]
}
}{
"success" : true
"data" : {
"authenticationCertificate": {
"certificates": [...]
},
"nonRepudiationCertificate": {
"certificates": [...]
}
"encryptionCertificate": {
"certificates": [...]
}
}
}module.authenticationCertificate(module, parseCertsBoolean, callback);{
success: true,
data: {
certificate?: string,
certificates?: Array<string>,
certificateType?: string,
id?: string,
parsedCertificate?: Certificate,
parsedCertificates?: Array<Certificate>
}
}module.nonRepudiationCertificate(module, parseCertsBoolean, callback);{
success: true,
data: {
certificate?: string,
certificates?: Array<string>,
certificateType?: string,
id?: string,
parsedCertificate?: Certificate,
parsedCertificates?: Array<Certificate>
}
}module.encryptionCertificate(module, parseCertsBoolean, callback);{
success: true,
data: {
certificate?: string,
certificates?: Array<string>,
certificateType?: string,
id?: string,
parsedCertificate?: Certificate,
parsedCertificates?: Array<Certificate>
}
}var filter = [];
module.allCerts(module, parseCerts, { filters: filter}, callback);{
"authenticationCertificate": {
...
},
"nonRepudiationCertificate": {
...
},
"encryptionCertificate": {
...
}
}var filter = ['authenticationCertificate'];
module.allCerts(module, { filters: filter}, callback);{
"authenticationCertificate": {
...
}
}var filter = null;
module.allCerts(module, { filters: filter}, callback);{
"authenticationCertificate": {
...
},
"nonRepudiationCertificate": {
...
}
}var data = {
"pin":"...",
"algorithm":"sha1",
"data":"I2e+u/sgy7fYgh+DWA0p2jzXQ7E=",
"osDialog": true,
"id": "id.."
}
module.sign(module, data, callback);{
"success": true,
"data": {
"data" : "W7wqvWA8m9S...="
}
}var data = {
"algorithm":"sha1",
"data":"I2e+u/sgy7fYgh+DWA0p2jzXQ7E=",
"osDialog": false,
"id": "id.."
}
module.sign(module, data, callback);{
"success": true,
"data": {
"data" : "W7wqvWA8m9S...="
}
}var data = {
"algorithm":"sha256",
"data":"vl5He0ulthjX+VWNM46QX7vJ8VvXMq2k/Tq8Xq1bwEw=",
"osDialog": false
}
module.signRaw(data, callback);const data = {
algorithm: "sha256",
data: "E1uHACbPvhLew0gGmBH83lvtKIAKxU2/RezfBOsT6Vs=",
pin: "1234",
id: "id.."
}
const bulk = true;
module.sign(module, data, bulk).then(res => {
}, err => {
console.error(err)
})module.resetBulkPin(module).then(res => {
}, err => {
console.error(err)
}){
"success": true,
"data": true
}var data = {
"pin":"..."
}
module.verifyPin(module, data, callback);{
"verified": true
}var data = {}
module.verifyPin(module, data, callback);{
"verified": true
}var data = {
"pin": "...",
"algorithm": "sha1",
"data":"I2e+u/sgy7fYgh+DWA0p2jzXQ7E=",
"id": "id.."
}
module.authenticate(module, data, callback);{
"success": true,
"data": {
"data" : "W7wqvWA8m9S...="
}
}module.verifyPin(module, data, callback);module.allAlgoRefs(module, callback);{
"success": true,
"data": ["sha1", "sha256"]
}const body = {
"algorithm": 'sha256',
"hash": '...',
"signedHash": '...',
"osDialog": false,
"id": 'cert_id',
"pin": 'pin_code',
"timeout": 120 //timeout in seconds
}
module.validateSignature(body).then(response => {
response.valid
).catch(error => {
errorHandler(error)}
){
"success": true,
"data": {
"valid": true
}
}cd ~/Library/Application\ Support/Trust1Team/Trust1Connector/./uninstall.shUninstalling Trust1Connector
version: 3.6.0
module: trust1team_launch
May 24 13:16:04.627 INFO Operating system: macos
May 24 13:16:04.627 INFO Installation folder: "/Users/gilles/Library/Application Support/Trust1Team/Trust1Connector"
May 24 13:16:04.627 INFO Starting migration
module: trust1team_launch::commons
May 24 13:16:04.627 INFO Migrate Trust1Connector Common
May 24 13:16:04.627 INFO Stop service Common
May 24 13:16:04.627 INFO Stop service Common
May 24 13:16:04.631 INFO No file exchange configuration found; No such file or directory (os error 2)
module: trust1team_launch
May 24 13:16:04.631 INFO Launcher ended successfully
The application is not part of the firewall
The application is not part of the firewall
The application is not part of the firewall
Uninstall Trust1Connector Completed with status OKcd ~/Library/Application\ Support/Trust1Team/Trust1Connector/
open .export interface AbstractIdemia {
allCerts(parseCerts?: boolean, filters?: string[] | Options, callback?: (error: T1CLibException, data: TokenAllCertsResponse) => void): Promise<TokenAllCertsResponse>;
tokenData(callback?: (error: T1CLibException, data: TokenInfoResponse) => void): Promise<TokenInfoResponse>;
rootCertificate(parseCerts?: boolean, callback?: (error: T1CLibException, data: TokenCertificateResponse) => void): Promise<TokenCertificateResponse>;
authenticationCertificate(parseCerts?: boolean, callback?: (error: T1CLibException, data: TokenCertificateResponse) => void): Promise<TokenCertificateResponse>;
nonRepudiationCertificate(parseCerts?: boolean, callback?: (error: T1CLibException, data: TokenCertificateResponse) => void): Promise<TokenCertificateResponse>;
encryptionCertificate(parseCerts?: boolean, callback?: (error: T1CLibException, data: TokenCertificateResponse) => void): Promise<TokenCertificateResponse>;
issuerCertificate(parseCerts?: boolean, callback?: (error: T1CLibException, data: TokenCertificateResponse) => void): Promise<TokenCertificateResponse>
allCertsExtended(parseCerts?: boolean, filters?: string[] | Options, callback?: (error: T1CLibException, data: TokenAllCertsExtendedResponse) => void): Promise<TokenAllCertsExtendedResponse>;
rootCertificateExtended(parseCerts?: boolean, callback?: (error: T1CLibException, data: TokenCertificateExtendedResponse) => void): Promise<TokenCertificateExtendedResponse>;
authenticationCertificateExtended(parseCerts?: boolean, callback?: (error: T1CLibException, data: TokenCertificateExtendedResponse) => void): Promise<TokenCertificateExtendedResponse>;
nonRepudiationCertificateExtended(parseCerts?: boolean, callback?: (error: T1CLibException, data: TokenCertificateExtendedResponse) => void): Promise<TokenCertificateExtendedResponse>;
encryptionCertificateExtended(parseCerts?: boolean, callback?: (error: T1CLibException, data: TokenCertificateExtendedResponse) => void): Promise<TokenCertificateExtendedResponse>;
issuerCertificateExtended(parseCerts?: boolean, callback?: (error: T1CLibException, data: TokenCertificateExtendedResponse) => void): Promise<TokenCertificateExtendedResponse>;
validateSignature(body: TokenValidateSignatureRequest, callback?: (error: T1CLibException, data: TokenValidateSignatureResponse) => void): Promise<TokenValidateSignatureResponse>;
verifyPin(body: TokenVerifyPinData, callback?: (error: T1CLibException, data: TokenVerifyPinResponse) => void): Promise<TokenVerifyPinResponse>;
authenticate(body: TokenAuthenticateOrSignData, callback?: (error: T1CLibException, data: TokenAuthenticateResponse) => void): Promise<TokenAuthenticateResponse>;
sign(body: TokenAuthenticateOrSignData, bulk?: boolean, callback?: (error: T1CLibException, data: TokenSignResponse) => void): Promise<TokenSignResponse>;
signRaw(body: TokenAuthenticateOrSignData, bulk?: boolean, callback?: (error: T1CLibException, data: TokenSignResponse) => void): Promise<TokenSignResponse>;
allAlgoRefs(callback?: (error: T1CLibException, data: TokenAlgorithmReferencesResponse) => void): Promise<TokenAlgorithmReferencesResponse>
resetBulkPin(callback?: (error: T1CLibException, data: BoolDataResponse) => void): Promise<BoolDataResponse>;
}
T1cSdk.initialize(config).then(res => {
const idemia = res.client.idemia(readerId);
}, err => {
console.error(error)
});export interface AbstractEidGeneric {
allCerts(parseCerts?: boolean, filters?: string[] | Options, callback?: (error: T1CLibException, data: TokenAllCertsResponse) => void): Promise<TokenAllCertsResponse>;
authenticationCertificate(parseCerts?: boolean, callback?: (error: T1CLibException, data: TokenCertificateResponse) => void): Promise<TokenCertificateResponse>;
nonRepudiationCertificate(parseCerts?: boolean, callback?: (error: T1CLibException, data: TokenCertificateResponse) => void): Promise<TokenCertificateResponse>;
rootCertificate(parseCerts?: boolean, callback?: (error: T1CLibException, data: TokenCertificateResponse) => void): Promise<TokenCertificateResponse>;
encryptionCertificate(parseCerts?: boolean, callback?: (error: T1CLibException, data: TokenCertificateResponse) => void): Promise<TokenCertificateResponse>;
issuerCertificate(parseCerts?: boolean, callback?: (error: T1CLibException, data: TokenCertificateResponse) => void): Promise<TokenCertificateResponse>;
allCertsExtended(parseCerts?: boolean, filters?: string[] | Options, callback?: (error: T1CLibException, data: TokenAllCertsExtendedResponse) => void): Promise<TokenAllCertsExtendedResponse>;
rootCertificateExtended(parseCerts?: boolean, callback?: (error: T1CLibException, data: TokenCertificateExtendedResponse) => void): Promise<TokenCertificateExtendedResponse>;
authenticationCertificateExtended(parseCerts?: boolean, callback?: (error: T1CLibException, data: TokenCertificateExtendedResponse) => void): Promise<TokenCertificateExtendedResponse>;
nonRepudiationCertificateExtended(parseCerts?: boolean, callback?: (error: T1CLibException, data: TokenCertificateExtendedResponse) => void): Promise<TokenCertificateExtendedResponse>;
encryptionCertificateExtended(parseCerts?: boolean, callback?: (error: T1CLibException, data: TokenCertificateExtendedResponse) => void): Promise<TokenCertificateExtendedResponse>;
issuerCertificateExtended(parseCerts?: boolean, callback?: (error: T1CLibException, data: TokenCertificateExtendedResponse) => void): Promise<TokenCertificateExtendedResponse>;
validateSignature(body: TokenValidateSignatureRequest, callback?: (error: T1CLibException, data: TokenValidateSignatureResponse) => void): Promise<TokenValidateSignatureResponse>;
verifyPin(body: TokenVerifyPinData, callback?: (error: T1CLibException, data: TokenVerifyPinResponse) => void): Promise<TokenVerifyPinResponse>;
authenticate(body: TokenAuthenticateOrSignData, callback?: (error: T1CLibException, data: TokenAuthenticateResponse) => void): Promise<TokenAuthenticateResponse>;
sign(body: TokenAuthenticateOrSignData, bulk?: boolean, callback?: (error: T1CLibException, data: TokenSignResponse) => void): Promise<TokenSignResponse>;
signRaw(body: TokenAuthenticateOrSignData, bulk?: boolean, callback?: (error: T1CLibException, data: TokenSignResponse) => void): Promise<TokenSignResponse>;
allAlgoRefs(callback?: (error: T1CLibException, data: TokenAlgorithmReferencesResponse) => void): Promise<TokenAlgorithmReferencesResponse>
resetBulkPin(callback?: (error: T1CLibException, data: BoolDataResponse) => void): Promise<BoolDataResponse>;
}T1CSdk.T1CClient.initialize(config).then(res => {
client = res;
}, err => {
console.error(error)
});var core = client.core();
core.readersCardAvailable(callback);{
"data": [
// List of reader with cards found
],
"success": true
}const moduleName = "airbus";
var module = client.generic(selected_reader.id);export interface AbstractCertigna {
allCertFilters(): string[];
allKeyRefs(): string[];
allCerts(parseCerts?: boolean, filters?: string[] | Options, callback?: (error: T1CLibException, data: TokenAllCertsResponse) => void): Promise<TokenAllCertsResponse>;
authenticationCertificate(parseCerts?: boolean, callback?: (error: T1CLibException, data: TokenCertificateResponse) => void): Promise<TokenCertificateResponse>;
nonRepudiationCertificate(parseCerts?: boolean, callback?: (error: T1CLibException, data: TokenCertificateResponse) => void): Promise<TokenCertificateResponse>;
verifyPin(body: TokenVerifyPinData, callback?: (error: T1CLibException, data: TokenVerifyPinResponse) => void): Promise<TokenVerifyPinResponse>;
authenticate(body: TokenAuthenticateOrSignData, callback?: (error: T1CLibException, data: TokenAuthenticateResponse) => void): Promise<TokenAuthenticateResponse>;
sign(body: TokenAuthenticateOrSignData, bulk?: boolean, callback?: (error: T1CLibException, data: TokenSignResponse) => void): Promise<TokenSignResponse>;
signRaw(body: TokenAuthenticateOrSignData, bulk?: boolean, callback?: (error: T1CLibException, data: TokenSignResponse) => void): Promise<TokenSignResponse>;
allAlgoRefs(callback?: (error: T1CLibException, data: TokenAlgorithmReferencesResponse) => void): Promise<TokenAlgorithmReferencesResponse>
resetBulkPin(callback?: (error: T1CLibException, data: BoolDataResponse) => void): Promise<BoolDataResponse>;
}T1CSdk.T1CClient.initialize(config).then(res => {
client = res;
}, err => {
console.error(error)
});var core = client.core();
core.readersCardAvailable(callback);{
"data": [
// List of reader with cards found
],
"success": true
}const moduleName = 'certigna';
var module = client.generic(selected_reader.id);module.tokenData().then(res => {
// see response below
}){
"success": true,
"data": {
"info": {
"slot": "string",
"label": "string",
"manufacturerId": "string",
"model": "string",
"serialNumber": "string",
"flags": {
"isRandomNumberGenerator": "boolean",
"isWriteProtected": "boolean",
"isLoginRequired": "boolean",
"isUserPinInitialized": "boolean",
"isRestoreKeyNotNeeded": "boolean",
"isClockOnToken": "boolean",
"isProtectedAuthenticationPath": "boolean",
"isDualCryptoOperations": "boolean",
"isTokenInitialized": "boolean",
"isSecondaryAuthentication": "boolean",
"isUserPinCountLow": "boolean",
"isUserPinFinalTry": "boolean",
"isUserPinLocked": "boolean",
"isUserPinToBeChanged": "boolean",
"isSoPinCountLow": "boolean",
"isSoPinFinalTry": "boolean",
"isSoPinLocked": "boolean",
"isSoPinToBeChanged": "boolean"
},
"mechanisms": [
{
"mechanism": "string",
"flags": {
"isHardware": "boolean",
"isEncrypt": "boolean",
"isDecrypt": "boolean",
"isDigest": "boolean",
"isSign": "boolean",
"isSignRecover": "boolean",
"isVerify": "boolean",
"isVerifyRecover": "boolean",
"isGenerate": "boolean",
"isGenerateKeyPair": "boolean",
"isWrap": "boolean",
"isUnwrap": "boolean",
"isExtension": "boolean",
"isEcFP": "boolean",
"isEcNamedcurve": "boolean",
"isEcUncompress": "boolean",
"isEcCompress": "boolean"
},
"ulMinKeySize": "number",
"ulMaxKeySize": "number"
}
],
"ulMaxSessionCount": "number",
"ulSessionCount": "number",
"ulMaxRwSessionCount": "number",
"ulMaxPinLen": "number",
"ulMinPinLen": "number",
"ulTotalPubLicMemory": "number",
"ulFreePubMemory": "number",
"ulTotalPrivateMemory": "number",
"ulFreePrivateMemory": "number",
"hardwareVersion": "string",
"firmwareVersion": "string"
},
"infoType": "TokenInfoType"
}
}
//ENUM
TokenInfoType {
Token,
PKCS11,
File,
Payment,
HSM,
Vault,
Wallet,
}allCertsExtended(parseCerts?: boolean, filters?: string[] | Options, callback?: (error: T1CLibException, data: TokenAllCertsExtendedResponse) => void): Promise<TokenAllCertsExtendedResponse>;
rootCertificateExtended(parseCerts?: boolean, callback?: (error: T1CLibException, data: TokenCertificateExtendedResponse) => void): Promise<TokenCertificateExtendedResponse>;
authenticationCertificateExtended(parseCerts?: boolean, callback?: (error: T1CLibException, data: TokenCertificateExtendedResponse) => void): Promise<TokenCertificateExtendedResponse>;
nonRepudiationCertificateExtended(parseCerts?: boolean, callback?: (error: T1CLibException, data: TokenCertificateExtendedResponse) => void): Promise<TokenCertificateExtendedResponse>;
encryptionCertificateExtended(parseCerts?: boolean, callback?: (error: T1CLibException, data: TokenCertificateExtendedResponse) => void): Promise<TokenCertificateExtendedResponse>;
issuerCertificateExtended(parseCerts?: boolean, callback?: (error: T1CLibException, data: TokenCertificateExtendedResponse) => void): Promise<TokenCertificateExtendedResponse>;{
"success" : true
"data" : {
"certificates": [{
"certificate"?: string,
"certificateType"?: string,
"id"?: string,
"subject"?: string,
"issuer"?: string,
"serialNumber"?: string,
"url"?: string,
"hashSubPubKey"?: string,
"hashIssPubKey"?: string,
"exponent"?: string,
"remainder"?: string,
"parsedCertificate"?: Certificate
}]
}
}{
"success" : true
"data" : {
"rootCertificate": {
"certificates": [...]
},
"authenticationCertificate": {
"certificates": [...]
},
"nonRepudiationCertificate": {
"certificates": [...]
},
"encryptionCertificates": {
"certificates": [...]
},
"issuerCertificates": {
"certificates": [...]
}
}
}idemia.allCertFilters().then(res => {
}, err => {
console.error(err)
}){
success: true,
data: ['rootCertificate', 'authenticationCertificate', 'encryptionCertificate', 'nonRepudiationCertificate', 'issuerCertificate']
}idemia.allKeyRefs().then(res => {
}, err => {
console.error(err)
}){
success: true,
data: ['authenticate', 'sign', 'encrypt']
}const filter = ['rootCertificate', 'authenticationCertificate', 'encryptionCertificate'];
idemia.allCerts(filter).then(res => {
res.data
}, err => {
console.error(err)
}){
"rootCertificate": {
...
},
"authenticationCertificate": {
...
},
"nonRepudiationCertificate": {
...
},
"intermediateCertificates": {
...
},
"encryptionCertificate": {
...
}
}idemia.tokenData().then(res => {
}, err => {
console.error(err)
}){
success: true,
data: {
version?: string,
serialNumber?: string,
label?: string,
changeCounter?: number,
}
}idemia.rootCertificate(parseCertsBoolean).then(res => {
}, err => {
console.error(err)
})idemia.authenticationCertificate(parseCertsBoolean).then(res => {
}, err => {
console.error(err)
})idemia.nonRepudiationCertificate(parseCertsBoolean).then(res => {
}, err => {
console.error(err)
})idemia.issuerCertificate(parseCertsBoolean).then(res => {
}, err => {
console.error(err)
})aventra.encryptionCertificate(parseCertsBoolean).then(res => {
}, err => {
console.error(err)
}){
success: true,
data: {
certificate?: string,
certificates?: Array<string>,
certificateType?: string,
id?: string,
parsedCertificate?: Certificate,
parsedCertificates?: Array<Certificate>
}
}const data = {
pin: "1234", // optional
osDialog: true // optional
}
idemia.verifyPin(data).then(res => {
}, err => {
console.error(err)
}){
success: true,
data: {
"verfied": true
}
}const data = {
algorithm: "sha256",
data: "E1uHACbPvhLew0gGmBH83lvtKIAKxU2/RezfBOsT6Vs=",
id: "123"
}
const bulk = false;
idemia.sign(data, bulk).then(res => {
}, err => {
console.error(err)
}){
success: true,
data: {
data: string
}
}var data = {
"algorithm":"sha256",
"data":"vl5He0ulthjX+VWNM46QX7vJ8VvXMq2k/Tq8Xq1bwEw=",
"osDialog": false,
"id" : "fewf5+65"
}
idemia.signRaw(data, callback);idemia.resetBulkPin().then(res => {
}, err => {
console.error(err)
}){
"success": true,
"data": true
}const data = {
algorithm: "sha256",
data: "E1uHACbPvhLew0gGmBH83lvtKIAKxU2/RezfBOsT6Vs=",
id: "123"
}
idemia.authenticate(data).then(res => {
}, err => {
console.error(err)
}){
success: true,
data: {
data: string
}
}idemia.allAlgoRefs(data).then(res => {
}, err => {
console.error(err)
}){
success: true,
data: {
ref: ['sha256', 'md5']
}
}const body = {
"algorithm": 'sha256',
"hash": '...',
"signedHash": '...',
"osDialog": false,
"id": 'cert_id',
"pin": 'pin_code',
"timeout": 120 //timeout in seconds
}
safenet.validateSignature(body).then(response => {
response.valid
).catch(error => {
errorHandler(error)}
){
"success": true,
"data": {
"valid": true
}
}var module = client.airbus(selected_reader.id);module.tokenData().then(res => {
// see response below
}){
"success": true,
"data": {
"info": {
"slot": "string",
"label": "string",
"manufacturerId": "string",
"model": "string",
"serialNumber": "string",
"flags": {
"isRandomNumberGenerator": "boolean",
"isWriteProtected": "boolean",
"isLoginRequired": "boolean",
"isUserPinInitialized": "boolean",
"isRestoreKeyNotNeeded": "boolean",
"isClockOnToken": "boolean",
"isProtectedAuthenticationPath": "boolean",
"isDualCryptoOperations": "boolean",
"isTokenInitialized": "boolean",
"isSecondaryAuthentication": "boolean",
"isUserPinCountLow": "boolean",
"isUserPinFinalTry": "boolean",
"isUserPinLocked": "boolean",
"isUserPinToBeChanged": "boolean",
"isSoPinCountLow": "boolean",
"isSoPinFinalTry": "boolean",
"isSoPinLocked": "boolean",
"isSoPinToBeChanged": "boolean"
},
"mechanisms": [
{
"mechanism": "string",
"flags": {
"isHardware": "boolean",
"isEncrypt": "boolean",
"isDecrypt": "boolean",
"isDigest": "boolean",
"isSign": "boolean",
"isSignRecover": "boolean",
"isVerify": "boolean",
"isVerifyRecover": "boolean",
"isGenerate": "boolean",
"isGenerateKeyPair": "boolean",
"isWrap": "boolean",
"isUnwrap": "boolean",
"isExtension": "boolean",
"isEcFP": "boolean",
"isEcNamedcurve": "boolean",
"isEcUncompress": "boolean",
"isEcCompress": "boolean"
},
"ulMinKeySize": "number",
"ulMaxKeySize": "number"
}
],
"ulMaxSessionCount": "number",
"ulSessionCount": "number",
"ulMaxRwSessionCount": "number",
"ulMaxPinLen": "number",
"ulMinPinLen": "number",
"ulTotalPubLicMemory": "number",
"ulFreePubMemory": "number",
"ulTotalPrivateMemory": "number",
"ulFreePrivateMemory": "number",
"hardwareVersion": "string",
"firmwareVersion": "string"
},
"infoType": "TokenInfoType"
}
}
//ENUM
TokenInfoType {
Token,
PKCS11,
File,
Payment,
HSM,
Vault,
Wallet,
}allCertsExtended(parseCerts?: boolean, filters?: string[] | Options, callback?: (error: T1CLibException, data: TokenAllCertsExtendedResponse) => void): Promise<TokenAllCertsExtendedResponse>;
authenticationCertificateExtended(parseCerts?: boolean, callback?: (error: T1CLibException, data: TokenCertificateExtendedResponse) => void): Promise<TokenCertificateExtendedResponse>;
nonRepudiationCertificateExtended(parseCerts?: boolean, callback?: (error: T1CLibException, data: TokenCertificateExtendedResponse) => void): Promise<TokenCertificateExtendedResponse>;
encryptionCertificateExtended(parseCerts?: boolean, callback?: (error: T1CLibException, data: TokenCertificateExtendedResponse) => void): Promise<TokenCertificateExtendedResponse>;
rootCertificateExtended(parseCerts?: boolean, callback?: (error: T1CLibException, data: TokenCertificateExtendedResponse) => void): Promise<TokenCertificateExtendedResponse>;{
"success" : true
"data" : {
"certificates": [{
"certificate"?: string,
"certificateType"?: string,
"id"?: string,
"subject"?: string,
"issuer"?: string,
"serialNumber"?: string,
"url"?: string,
"hashSubPubKey"?: string,
"hashIssPubKey"?: string,
"exponent"?: string,
"remainder"?: string,
"parsedCertificate"?: Certificate
}]
}
}{
"success" : true
"data" : {
"authenticationCertificate": {
"certificates": [...]
},
"nonRepudiationCertificate": {
"certificates": [...]
},
"encryptionCertificate": {
"certificates": [...]
},
"rootCertificate": {
"certificates": [...]
}
}
}module.authenticationCertificate(module, parseCertsBoolean, callback);{
success: true,
data: {
certificate?: string,
certificates?: Array<string>,
certificateType?: string,
id?: string,
parsedCertificate?: Certificate,
parsedCertificates?: Array<Certificate>
}
}module.nonRepudiationCertificate(module, parseCertsBoolean, callback);{
success: true,
data: {
certificate?: string,
certificates?: Array<string>,
certificateType?: string,
id?: string,
parsedCertificate?: Certificate,
parsedCertificates?: Array<Certificate>
}
}module.nonRepudiationCertificate(module, parseCertsBoolean, callback);{
success: true,
data: {
certificate?: string,
certificates?: Array<string>,
certificateType?: string,
id?: string,
parsedCertificate?: Certificate,
parsedCertificates?: Array<Certificate>
}
}module.rootCertificate(module, parseCertsBoolean, callback);{
success: true,
data: {
certificate?: string,
certificates?: Array<string>,
certificateType?: string,
id?: string,
parsedCertificate?: Certificate,
parsedCertificates?: Array<Certificate>
}
}var filter = [];
module.allCerts(module, parseCerts, { filters: filter}, callback);{
"authenticationCertificate": {
...
},
"nonRepudiationCertificate": {
...
},
"encryptionCertificate": {
...
}
}var filter = ['authenticationCertificate'];
module.allCerts(module, { filters: filter}, callback);{
"authenticationCertificate": {
...
}
}var filter = null;
module.allCerts(module, { filters: filter}, callback);{
"authenticationCertificate": {
...
},
"nonRepudiationCertificate": {
...
}
}var data = {
"pin":"...",
"algorithm":"sha1",
"data":"I2e+u/sgy7fYgh+DWA0p2jzXQ7E=",
"osDialog": true,
"id": "id.."
}
module.sign(module, data, callback);{
"success": true,
"data": {
"data" : "W7wqvWA8m9S...="
}
}var data = {
"algorithm":"sha1",
"data":"I2e+u/sgy7fYgh+DWA0p2jzXQ7E=",
"osDialog": false,
"id": "id.."
}
module.sign(module, data, callback);{
"success": true,
"data": {
"data" : "W7wqvWA8m9S...="
}
}var data = {
"algorithm":"sha256",
"data":"vl5He0ulthjX+VWNM46QX7vJ8VvXMq2k/Tq8Xq1bwEw=",
"osDialog": false
}
module.signRaw(data, callback);const data = {
algorithm: "sha256",
data: "E1uHACbPvhLew0gGmBH83lvtKIAKxU2/RezfBOsT6Vs=",
pin: "1234",
id: "id.."
}
const bulk = true;
module.sign(module, data, bulk).then(res => {
}, err => {
console.error(err)
})module.resetBulkPin(module).then(res => {
}, err => {
console.error(err)
}){
"success": true,
"data": true
}var data = {
"pin":"..."
}
module.verifyPin(module, data, callback);{
"verified": true
}var data = {}
module.verifyPin(module, data, callback);{
"verified": true
}var data = {
"pin": "...",
"algorithm": "sha1",
"data":"I2e+u/sgy7fYgh+DWA0p2jzXQ7E=",
"id": "id.."
}
module.authenticate(module, data, callback);{
"success": true,
"data": {
"data" : "W7wqvWA8m9S...="
}
}module.verifyPin(module, data, callback);module.allAlgoRefs(module, callback);{
"success": true,
"data": ["sha1", "sha256"]
}const body = {
"algorithm": 'sha256',
"hash": '...',
"signedHash": '...',
"osDialog": false,
"id": 'cert_id',
"pin": 'pin_code',
"timeout": 120 //timeout in seconds
}
module.validateSignature(body).then(response => {
response.valid
).catch(error => {
errorHandler(error)}
){
"success": true,
"data": {
"valid": true
}
}var module = client.certigna(selected_reader.id);module.tokenData().then(res => {
// see response below
}){
"success": true,
"data": {
"info": {
"slot": "string",
"label": "string",
"manufacturerId": "string",
"model": "string",
"serialNumber": "string",
"flags": {
"isRandomNumberGenerator": "boolean",
"isWriteProtected": "boolean",
"isLoginRequired": "boolean",
"isUserPinInitialized": "boolean",
"isRestoreKeyNotNeeded": "boolean",
"isClockOnToken": "boolean",
"isProtectedAuthenticationPath": "boolean",
"isDualCryptoOperations": "boolean",
"isTokenInitialized": "boolean",
"isSecondaryAuthentication": "boolean",
"isUserPinCountLow": "boolean",
"isUserPinFinalTry": "boolean",
"isUserPinLocked": "boolean",
"isUserPinToBeChanged": "boolean",
"isSoPinCountLow": "boolean",
"isSoPinFinalTry": "boolean",
"isSoPinLocked": "boolean",
"isSoPinToBeChanged": "boolean"
},
"mechanisms": [
{
"mechanism": "string",
"flags": {
"isHardware": "boolean",
"isEncrypt": "boolean",
"isDecrypt": "boolean",
"isDigest": "boolean",
"isSign": "boolean",
"isSignRecover": "boolean",
"isVerify": "boolean",
"isVerifyRecover": "boolean",
"isGenerate": "boolean",
"isGenerateKeyPair": "boolean",
"isWrap": "boolean",
"isUnwrap": "boolean",
"isExtension": "boolean",
"isEcFP": "boolean",
"isEcNamedcurve": "boolean",
"isEcUncompress": "boolean",
"isEcCompress": "boolean"
},
"ulMinKeySize": "number",
"ulMaxKeySize": "number"
}
],
"ulMaxSessionCount": "number",
"ulSessionCount": "number",
"ulMaxRwSessionCount": "number",
"ulMaxPinLen": "number",
"ulMinPinLen": "number",
"ulTotalPubLicMemory": "number",
"ulFreePubMemory": "number",
"ulTotalPrivateMemory": "number",
"ulFreePrivateMemory": "number",
"hardwareVersion": "string",
"firmwareVersion": "string"
},
"infoType": "TokenInfoType"
}
}
//ENUM
TokenInfoType {
Token,
PKCS11,
File,
Payment,
HSM,
Vault,
Wallet,
}allCertsExtended(parseCerts?: boolean, filters?: string[] | Options, callback?: (error: T1CLibException, data: TokenAllCertsExtendedResponse) => void): Promise<TokenAllCertsExtendedResponse>;
authenticationCertificateExtended(parseCerts?: boolean, callback?: (error: T1CLibException, data: TokenCertificateExtendedResponse) => void): Promise<TokenCertificateExtendedResponse>;
nonRepudiationCertificateExtended(parseCerts?: boolean, callback?: (error: T1CLibException, data: TokenCertificateExtendedResponse) => void): Promise<TokenCertificateExtendedResponse>;{
"success" : true
"data" : {
"certificates": [{
"certificate"?: string,
"certificateType"?: string,
"id"?: string,
"subject"?: string,
"issuer"?: string,
"serialNumber"?: string,
"url"?: string,
"hashSubPubKey"?: string,
"hashIssPubKey"?: string,
"exponent"?: string,
"remainder"?: string,
"parsedCertificate"?: Certificate
}]
}
}{
"success" : true
"data" : {
"authenticationCertificate": {
"certificates": [...]
},
"nonRepudiationCertificate": {
"certificates": [...]
}
}
}module.authenticationCertificate(parseCertsBoolean, callback);{
success: true,
data: {
certificate?: string,
certificates?: Array<string>,
certificateType?: string,
id?: string,
parsedCertificate?: Certificate,
parsedCertificates?: Array<Certificate>
}
}module.nonRepudiationCertificate(parseCertsBoolean, callback);{
success: true,
data: {
certificate?: string,
certificates?: Array<string>,
certificateType?: string,
id?: string,
parsedCertificate?: Certificate,
parsedCertificates?: Array<Certificate>
}
}var filter = [];
module.allCerts(parseCerts, { filters: filter}, callback);{
success: true,
data: {
certificate?: string,
certificates?: Array<string>,
certificateType?: string,
id?: string,
parsedCertificate?: Certificate,
parsedCertificates?: Array<Certificate>
}
}var filter = ['authenticationCertificate'];
module.allCerts({ filters: filter}, callback);{
success: true,
data: {
certificate?: string,
certificates?: Array<string>,
certificateType?: string,
id?: string,
parsedCertificate?: Certificate,
parsedCertificates?: Array<Certificate>
}
}var filter = null;
module.allCerts({ filters: filter}, callback);{
"authenticationCertificate": {
...
},
"nonRepudiationCertificate": {
...
}
}var data = {
"pin":"...",
"algorithm":"sha256",
"data":"n4bQgYhMfWWaL+qgxVrQFaO/TxsrC4Is0V1sFbDwCgg="
"osDialog": true
}
module.sign(data, callback);{
"success": true,
"data": {
"data" : "W7wqvWA8m9S...="
}
}var data = {
"algorithm": "sha256",
"data":"n4bQgYhMfWWaL+qgxVrQFaO/TxsrC4Is0V1sFbDwCgg="
"osDialog": false
}
module.sign(data, callback);{
"success": true,
"data": {
"data" : "W7wqvWA8m9S...="
}
}var data = {
"algorithm":"sha256",
"data":"vl5He0ulthjX+VWNM46QX7vJ8VvXMq2k/Tq8Xq1bwEw=",
"osDialog": false
}
module.signRaw(data, callback);const data = {
algorithm: "sha256",
data: "E1uHACbPvhLew0gGmBH83lvtKIAKxU2/RezfBOsT6Vs=",
pin: "1234"
}
const bulk = true;
module.sign(data, bulk).then(res => {
}, err => {
console.error(err)
})client.resetBulkPin(module).then(res => {
}, err => {
console.error(err)
}){
"success": true,
"data": true
}var data = {
"pin":"..."
}
module.verifyPin(data, callback);{
"verified": true
}var data = {}
module.verifyPin(data, callback);{
"verified": true
}var data = {
"pin": "...",
"algorithm": "sha256",
"data":"n4bQgYhMfWWaL+qgxVrQFaO/TxsrC4Is0V1sFbDwCgg="
}
module.authenticate(data, callback);{
"success": true,
"data": {
"data" : "W7wqvWA8m9S...="
}
}module.allAlgoRefs(callback);{
"success": true,
"data": ["sha256"]
}const body = {
"algorithm": 'sha256',
"hash": '...',
"signedHash": '...',
"osDialog": false,
"id": 'cert_id',
"pin": 'pin_code',
"timeout": 120 //timeout in seconds
}
module.validateSignature(body).then(response => {
response.valid
).catch(error => {
errorHandler(error)}
){
"success": true,
"data": {
"valid": true
}
}export class PaymentModuleDescriptionResponse extends DataObjectResponse {
constructor(public data: PaymentModuleDescription, public success: boolean) {
super(data, success);
}
}
export class PaymentModuleDescription {
constructor(
public desc: string
) {}
}
export class PaymentVerifyPinResponse extends DataObjectResponse {
constructor(public data: PaymentVerifyPinResponseData, public success: boolean) {
super(data, success);
}
}
export class PaymentVerifyPinResponseData {
constructor(
public verified: boolean
) {}
}
export class PaymentReadData {
constructor(
public applications: Array<PaymentApplication>,
) {}
}
export class PaymentApplication {
constructor(
public aid?: string,
public name?: string,
public priority?: number,
) {}
}
export class PaymentReadDataResponse extends DataObjectResponse {
constructor(public data: PaymentReadData, public success: boolean) {
super(data, success);
}
}
export class PaymentReadApplicationData {
constructor(
public country?: string,
public countryCode?: string,
public effectiveDate?: string,
public expirationDate?: string,
public language?: string,
public name?: string,
public pan?: string,
) {}
}
export class PaymentReadApplicationDataResponse extends DataObjectResponse {
constructor(public data: PaymentReadApplicationData, public success: boolean) {
super(data, success);
}
}
export class PaymentSignResponseData {
constructor(public success: boolean, public data?: string, public cardSignature?: string, public readerSignature?: string) {
}
}
export class PaymentSignResponse {
constructor(public data: PaymentSignResponseData, public success: boolean) {}
}var data = {
"pin": "...",
"algorithm": "sha1",
"data":"I2e+u/sgy7fYgh+DWA0p2jzXQ7E="
}
client.safenet(reader_id).authenticate(data, callback);{
"success": true,
"data": {
"data" : "W7wqvWA8m9S...="
}
}export interface AbstractSafenet {
allCerts(parseCerts?: boolean, filters?: string[] | Options, callback?: (error: T1CLibException, data: TokenAllCertsResponse) => void): Promise<TokenAllCertsResponse>;
authenticationCertificate(parseCerts?: boolean, callback?: (error: T1CLibException, data: TokenCertificateResponse) => void): Promise<TokenCertificateResponse>;
nonRepudiationCertificate(parseCerts?: boolean, callback?: (error: T1CLibException, data: TokenCertificateResponse) => void): Promise<TokenCertificateResponse>;
allCertsExtended(parseCerts?: boolean, filters?: string[] | Options, callback?: (error: T1CLibException, data: TokenAllCertsExtendedResponse) => void): Promise<TokenAllCertsExtendedResponse>;
authenticationCertificateExtended(parseCerts?: boolean, callback?: (error: T1CLibException, data: TokenCertificateExtendedResponse) => void): Promise<TokenCertificateExtendedResponse>;
nonRepudiationCertificateExtended(parseCerts?: boolean, callback?: (error: T1CLibException, data: TokenCertificateExtendedResponse) => void): Promise<TokenCertificateExtendedResponse>;
validateSignature(body: TokenValidateSignatureRequest, callback?: (error: T1CLibException, data: TokenValidateSignatureResponse) => void): Promise<TokenValidateSignatureResponse>;
verifyPin(body: TokenVerifyPinData, callback?: (error: T1CLibException, data: TokenVerifyPinResponse) => void): Promise<TokenVerifyPinResponse>;
authenticate(body: TokenAuthenticateOrSignData, callback?: (error: T1CLibException, data: TokenAuthenticateResponse) => void): Promise<TokenAuthenticateResponse>;
sign(body: TokenAuthenticateOrSignData, bulk?: boolean, callback?: (error: T1CLibException, data: TokenSignResponse) => void): Promise<TokenSignResponse>;
signRaw(body: TokenAuthenticateOrSignData, bulk?: boolean, callback?: (error: T1CLibException, data: TokenSignResponse) => void): Promise<TokenSignResponse>;
allAlgoRefs(callback?: (error: T1CLibException, data: TokenAlgorithmReferencesResponse) => void): Promise<TokenAlgorithmReferencesResponse>
resetBulkPin(callback?: (error: T1CLibException, data: BoolDataResponse) => void): Promise<BoolDataResponse>;
tokenData(callback?: (error: T1CLibException, data: TokenInfoResponse) => void): Promise<TokenInfoResponse>;
}T1CSdk.T1CClient.initialize(config).then(res => {
client = res;
}, err => {
console.error(error)
});var client = client.safenet(reader_id);function callback(err,data) {
if(err){console.log("Error:",JSON.stringify(err, null, ' '));}
else {console.log(JSON.stringify(data, null, ' '));}
}
beid.biometric(callback);var core = client.core();
core.readersCardAvailable(callback);{
"data": [
{
"card": {
"atr": "3B9813400AA503010101AD1311",
"description": [""]
},
"id": "57a3e2e71c48cee9",
"name": "JC Token",
"pinpad": false
}
],
"success": true
}client.tokenData().then(res => {
// see response below
}){
"success": true,
"data": {
"info": {
"slot": "string",
"label": "string",
"manufacturerId": "string",
"model": "string",
"serialNumber": "string",
"flags": {
"isRandomNumberGenerator": "boolean",
"isWriteProtected": "boolean",
"isLoginRequired": "boolean",
"isUserPinInitialized": "boolean",
"isRestoreKeyNotNeeded": "boolean",
"isClockOnToken": "boolean",
"isProtectedAuthenticationPath": "boolean",
"isDualCryptoOperations": "boolean",
"isTokenInitialized": "boolean",
"isSecondaryAuthentication": "boolean",
"isUserPinCountLow": "boolean",
"isUserPinFinalTry": "boolean",
"isUserPinLocked": "boolean",
"isUserPinToBeChanged": "boolean",
"isSoPinCountLow": "boolean",
"isSoPinFinalTry": "boolean",
"isSoPinLocked": "boolean",
"isSoPinToBeChanged": "boolean"
},
"mechanisms": [
{
"mechanism": "string",
"flags": {
"isHardware": "boolean",
"isEncrypt": "boolean",
"isDecrypt": "boolean",
"isDigest": "boolean",
"isSign": "boolean",
"isSignRecover": "boolean",
"isVerify": "boolean",
"isVerifyRecover": "boolean",
"isGenerate": "boolean",
"isGenerateKeyPair": "boolean",
"isWrap": "boolean",
"isUnwrap": "boolean",
"isExtension": "boolean",
"isEcFP": "boolean",
"isEcNamedcurve": "boolean",
"isEcUncompress": "boolean",
"isEcCompress": "boolean"
},
"ulMinKeySize": "number",
"ulMaxKeySize": "number"
}
],
"ulMaxSessionCount": "number",
"ulSessionCount": "number",
"ulMaxRwSessionCount": "number",
"ulMaxPinLen": "number",
"ulMinPinLen": "number",
"ulTotalPubLicMemory": "number",
"ulFreePubMemory": "number",
"ulTotalPrivateMemory": "number",
"ulFreePrivateMemory": "number",
"hardwareVersion": "string",
"firmwareVersion": "string"
},
"infoType": "TokenInfoType"
}
}
//ENUM
TokenInfoType {
Token,
PKCS11,
File,
Payment,
HSM,
Vault,
Wallet,
}allCertsExtended(parseCerts?: boolean, filters?: string[] | Options, callback?: (error: T1CLibException, data: TokenAllCertsExtendedResponse) => void): Promise<TokenAllCertsExtendedResponse>;
authenticationCertificateExtended(parseCerts?: boolean, callback?: (error: T1CLibException, data: TokenCertificateExtendedResponse) => void): Promise<TokenCertificateExtendedResponse>;
nonRepudiationCertificateExtended(parseCerts?: boolean, callback?: (error: T1CLibException, data: TokenCertificateExtendedResponse) => void): Promise<TokenCertificateExtendedResponse>;{
"success" : true
"data" : {
"certificates": [{
"certificate"?: string,
"certificateType"?: string,
"id"?: string,
"subject"?: string,
"issuer"?: string,
"serialNumber"?: string,
"url"?: string,
"hashSubPubKey"?: string,
"hashIssPubKey"?: string,
"exponent"?: string,
"remainder"?: string,
"parsedCertificate"?: Certificate
}]
}
}{
"success" : true
"data" : {
"authenticationCertificate": {
"certificates": [...]
},
"nonRepudiationCertificate": {
"certificates": [...]
},
}
}client.beid(reader_id).rootCertificate(parseCertsBoolean, callback);{
success: true,
data: {
certificate?: string,
certificates?: Array<string>,
certificateType?: string,
id?: string,
parsedCertificate?: Certificate,
parsedCertificates?: Array<Certificate>
}
}client.beid(reader_id).authenticationCertificate(parseCertsBoolean, callback);{
success: true,
data: {
certificate?: string,
certificates?: Array<string>,
certificateType?: string,
id?: string,
parsedCertificate?: Certificate,
parsedCertificates?: Array<Certificate>
}
}client.beid(reader_id).intermediateCertificates(parseCertsBoolean, callback);{
success: true,
data: {
certificate?: string,
certificates?: Array<string>,
certificateType?: string,
id?: string,
parsedCertificate?: Certificate,
parsedCertificates?: Array<Certificate>
}
}client.beid(reader_id).nonRepudiationCertificate(parseCertsBoolean, callback);{
success: true,
data: {
certificate?: string,
certificates?: Array<string>,
certificateType?: string,
id?: string,
parsedCertificate?: Certificate,
parsedCertificates?: Array<Certificate>
}
}client.beid(reader_id).encryptionCertificate(parseCertsBoolean, callback);{
success: true,
data: {
certificate?: string,
certificates?: Array<string>,
certificateType?: string,
id?: string,
parsedCertificate?: Certificate,
parsedCertificates?: Array<Certificate>
}
}var filter = [];
client.beid(reader_id).allCerts(parseCerts, { filters: filter}, callback);{
"rootCertificate": {
...
},
"authenticationCertificate": {
...
},
"nonRepudiationCertificate": {
...
},
"intermediateCertificates": {
...
},
"encryptionCertificate": {
...
}
}var filter = ['rootCertificate'];
client.safenet(reader_id).allCerts(parseCerts, { filters: filter}, callback);{
"rootCertificate": {
...
}
}var filter = null;
client.safenet(reader_id).allCerts(parseCerts, { filters: filter}, callback);{
"rootCertificate": {
...
},
"authenticationCertificate": {
...
},
"nonRepudiationCertificate": {
...
},
"intermediateCertificates": {
...
},
"encryptionCertificate": {
...
}
}var data = {
"pin":"...",
"algorithm":"sha1",
"data":"I2e+u/sgy7fYgh+DWA0p2jzXQ7E=",
"osDialog": true
}
client.safenet(reader_id).sign(data, callback);{
"success": true,
"data": {
"data" : "W7wqvWA8m9S...="
}
}var data = {
"algorithm":"sha1",
"data":"I2e+u/sgy7fYgh+DWA0p2jzXQ7E=",
"osDialog": false
}
client.safenet(reader_id).sign(data, callback);{
"success": true,
"data": {
"data" : "W7wqvWA8m9S...="
}
}var data = {
"algorithm":"sha256",
"data":"vl5He0ulthjX+VWNM46QX7vJ8VvXMq2k/Tq8Xq1bwEw=",
"osDialog": false
}
client.signRaw(data, callback);var data = {
"pin":"..."
}
client.safenet(reader_id).verifyPin(data, callback);{
"verified": true
}var data = {}
client.safenet(reader_id).verifyPin(data, callback);{
"verified": true
}The calculated digest of the hash is prefixed with:
DigestInfo ::= SEQUENCE {
digestAlgorithm AlgorithmIdentifier,
digest OCTET STRING
}
Make sure this has been taken into consideration in order to validate the signature in a backend process.client.allAlgoRefs(module, callback);{
"success": true,
"data": ["sha1", "sha256"]
}const body = {
"algorithm": 'sha256',
"hash": '...',
"signedHash": '...',
"osDialog": false,
"id": 'cert_id',
"pin": 'pin_code',
"timeout": 120 //timeout in seconds
}
client.validateSignature(body).then(response => {
response.valid
).catch(error => {
errorHandler(error)}
){
"success": true,
"data": {
"valid": true
}
}pinpinTypevar data = {
"pin": "...",
"algorithm": "sha1",
"data":"I2e+u/sgy7fYgh+DWA0p2jzXQ7E="
}
client.luxeid(reader_id, pin).authenticate(data, callback);{
"success": true,
"data": "W7wqvWA8m9SBALZPxN0qUCZfB1O/WLaM/silenLzSXXmeR+0nzB7hXC/Lc/fMru82m/AAqCuGTYMPKcIpQG6MtZ/SGVpZUA/71jv3D9CatmGYGZc52cpcb7cqOVT7EmhrMtwo/jyUbi/Dy5c8G05owkbgx6QxnLEuTLkfoqsW9Q="
}export interface AbstractEidLux {
allData(filters: string[] | Options, callback?: (error: T1CLibException, data: TokenAllDataResponse) => void): Promise<TokenAllDataResponse>;
allCerts(parseCerts?: boolean, filters?: string[] | Options, callback?: (error: T1CLibException, data: TokenAllCertsResponse) => void): Promise<TokenAllCertsResponse>;
biometric(callback?: (error: T1CLibException, data: TokenBiometricDataResponse) => void): Promise<TokenBiometricDataResponse>;
tokenData(callback?: (error: T1CLibException, data: TokenInfoResponse) => void): Promise<TokenInfoResponse>;
address(callback?: (error: T1CLibException, data: TokenAddressResponse) => void): Promise<TokenAddressResponse>;
picture(callback?: (error: T1CLibException, data: TokenPictureResponse) => void): Promise<TokenPictureResponse>;
rootCertificate(parseCerts?: boolean, callback?: (error: T1CLibException, data: TokenCertificateResponse) => void): Promise<TokenCertificateResponse>;
authenticationCertificate(parseCerts?: boolean, callback?: (error: T1CLibException, data: TokenCertificateResponse) => void): Promise<TokenCertificateResponse>;
nonRepudiationCertificate(parseCerts?: boolean, callback?: (error: T1CLibException, data: TokenCertificateResponse) => void): Promise<TokenCertificateResponse>;
allCertsExtended(parseCerts?: boolean, filters?: string[] | Options, callback?: (error: T1CLibException, data: TokenAllCertsExtendedResponse) => void): Promise<TokenAllCertsExtendedResponse>;
rootCertificateExtended(parseCerts?: boolean, callback?: (error: T1CLibException, data: TokenCertificateExtendedResponse) => void): Promise<TokenCertificateExtendedResponse>;
authenticationCertificateExtended(parseCerts?: boolean, callback?: (error: T1CLibException, data: TokenCertificateExtendedResponse) => void): Promise<TokenCertificateExtendedResponse>;
nonRepudiationCertificateExtended(parseCerts?: boolean, callback?: (error: T1CLibException, data: TokenCertificateExtendedResponse) => void): Promise<TokenCertificateExtendedResponse>;
verifyPin(body: TokenVerifyPinData, callback?: (error: T1CLibException, data: TokenVerifyPinResponse) => void): Promise<TokenVerifyPinResponse>;
authenticate(body: TokenAuthenticateOrSignData, callback?: (error: T1CLibException, data: TokenAuthenticateResponse) => void): Promise<TokenAuthenticateResponse>;
sign(body: TokenAuthenticateOrSignData, bulk?: boolean, callback?: (error: T1CLibException, data: TokenSignResponse) => void): Promise<TokenSignResponse>;
signRaw(body: TokenAuthenticateOrSignData, bulk?: boolean, callback?: (error: T1CLibException, data: TokenSignResponse) => void): Promise<TokenSignResponse>;
allAlgoRefs(callback?: (error: T1CLibException, data: TokenAlgorithmReferencesResponse) => void): Promise<TokenAlgorithmReferencesResponse>
resetBulkPin(callback?: (error: T1CLibException, data: BoolDataResponse) => void): Promise<BoolDataResponse>;}
export class PinType {
static PIN = 'Pin';
static CAN = 'Can';
}
T1CSdk.T1CClient.initialize(config).then(res => {
client = res;
}, err => {
console.error(error)
});var module = client.luxeid(reader_id, pin, pinType);function callback(err,data) {
if(err){console.log("Error:",JSON.stringify(err, null, ' '));}
else {console.log(JSON.stringify(data, null, ' '));}
}
module.biometric(callback);var core = client.core();
core.readersCardAvailable(callback);{
"data": [
{
"card": {
"atr": "3B8F800180318065B0850300EF120FFF82900073",
"description":["Grand Duchy of Luxembourg / Identity card with LuxTrust certificate (eID)"
},
"id": "57a3e2e71c48cee9",
"name": "iDentiv CL",
"pinpad": false
}
],
"success": true
}var module = client.luxeid(reader_id, pin, pinType);client.luxeid(reader_id, pin, pinType).biometric(callback);function callback(err,data) {
if(err){
console.log("Error:",JSON.stringify(err, null, ' '));
}
else {
console.log(JSON.stringify(data, null, ' '));
}
}{
"data": {
"birthDate": "830819",
"documentNumber": "SPEC04168",
"documentType": "ID",
"firstName": "SPECIMEN",
"gender": "F",
"issuingState": "LUX",
"lastName": "SPECIMEN",
"nationality": "LUX",
"validityEndDate": "251116",
"validityStartDate": "151116"
},
"success": true
}client.luxeid(reader_id, pin, pinType).address(callback);{
"data": {
//TBD
},
"success": true
}client.luxeid(reader_id, pin, pinType).picture(callback);{
"data": {
"height": 320,
"image": "/0//UQAvAAAAAADwAAABQAAAAAAAAAAAAAAA8AAA....uq9eK159DRO61Ufrf9ICA/9k=",
"width": 240
},
"success": true
}client.luxeid(reader_id, pin, pinType).signatureImage(callback);{
"data": {
"image": "/0//UQAvAAAAAADwAAABQAAAAAAAAAAAAAAA8AAA....uq9eK159DRO61Ufrf9ICA/9k=",
"raw_data": "/0//UQAAAAAADwAAARLKEQDAAAAAAAAAAAAAA8AAA....dl42fgr367PCSA321/9k="
},
"success": true
}allCertsExtended(parseCerts?: boolean, filters?: string[] | Options, callback?: (error: T1CLibException, data: TokenAllCertsExtendedResponse) => void): Promise<TokenAllCertsExtendedResponse>;
authenticationCertificateExtended(parseCerts?: boolean, callback?: (error: T1CLibException, data: TokenCertificateExtendedResponse) => void): Promise<TokenCertificateExtendedResponse>;
nonRepudiationCertificateExtended(parseCerts?: boolean, callback?: (error: T1CLibException, data: TokenCertificateExtendedResponse) => void): Promise<TokenCertificateExtendedResponse>;
encryptionCertificateExtended(parseCerts?: boolean, callback?: (error: T1CLibException, data: TokenCertificateExtendedResponse) => void): Promise<TokenCertificateExtendedResponse>;{
"success" : true
"data" : {
"certificates": [{
"certificate"?: string,
"certificateType"?: string,
"id"?: string,
"subject"?: string,
"issuer"?: string,
"serialNumber"?: string,
"url"?: string,
"hashSubPubKey"?: string,
"hashIssPubKey"?: string,
"exponent"?: string,
"remainder"?: string,
"parsedCertificate"?: Certificate
}]
}
}{
"success" : true
"data" : {
"authenticationCertificate": {
"certificates": [...]
},
"nonRepudiationCertificate": {
"certificates": [...]
},
"rootCertificate": {
"certificates": [...]
}
}
}client.luxeid(reader_id, pin, pinType).rootCertificate({ parseCerts: true }, callback);{
success: true,
data: {
certificate?: string,
certificates?: Array<string>,
certificateType?: string,
id?: string,
parsedCertificate?: Certificate,
parsedCertificates?: Array<Certificate>
}
}client.luxeid(reader_id, pin, pinType).authenticationCertificate({ parseCerts: true }, callback);{
success: true,
data: {
certificate?: string,
certificates?: Array<string>,
certificateType?: string,
id?: string,
parsedCertificate?: Certificate,
parsedCertificates?: Array<Certificate>
}
}client.luxeid(reader_id, pin, pinType).nonRepudiationCertificate({ parseCerts: true }, callback);{
success: true,
data: {
certificate?: string,
certificates?: Array<string>,
certificateType?: string,
id?: string,
parsedCertificate?: Certificate,
parsedCertificates?: Array<Certificate>
}
}var filter = [];
client.luxeid(reader_id, pin, pinType).allData({ filters: filter, parseCerts: true }, callback);{
"data": {
"authentication_certificate": {
"base64": "MIIFjjCCA3agAwI...rTBDdrlEWVaLrY+M+xeIctrC0WnP7u4xg==",
"parsed": { // parsed certificate object }
},
"biometric": {
"birthDate": "830819",
"documentNumber": "SPEC04168",
"documentType": "ID",
"firstName": "SPECIMEN",
"gender": "F",
"issuingState": "LUX",
"lastName": "SPECIMEN",
"nationality": "LUX",
"validityEndDate": "251116",
"validityStartDate": "151116"
},
"non_repudiation_certificate": {
"base64": "MIIFjjCCA3agAwI...rTBDdrlEWVaLrY+M+xeIctrC0WnP7u4xg==",
"parsed": { // parsed certificate object }
},
"picture": {
"height": 320,
"image": "/0//UQAvAAAAAADwAAABQAAAAAAAAAA...f9ICA/9k=",
"width": 240
},
"root_certificates": [
{
"base64": "MIIFjjCCA3agAwI...rTBDdrlEWVaLrY+M+xeIctrC0WnP7u4xg==",
"parsed": { // parsed certificate object }
},
{
"base64": "MIIFjjCCA3agAwI...rTBDdrlEWVaLrY+M+xeIctrC0WnP7u4xg==",
"parsed": { // parsed certificate object }
}
]
},
"success": true
}// filter entries := ["authentication-certificate","biometric","non-repudiation-certificate","picture","root-certificates"]
var filter = ["biometric","authentication-certificate"];
client.luxeid(reader_id, pin, pinType).allData({ filters: filter, parseCerts: true }, callback);{
"data": {
"biometric": {
"birthDate": "830819",
"documentNumber": "SPEC04168",
"documentType": "ID",
"firstName": "SPECIMEN",
"gender": "F",
"issuingState": "LUX",
"lastName": "SPECIMEN",
"nationality": "LUX",
"validityEndDate": "251116",
"validityStartDate": "151116"
},
"authentication_certificate": {
"base64": "MIIFjjCCA3agAwI...rTBDdrlEWVaLrY+M+xeIctrC0WnP7u4xg==",
"parsed": { // parsed certificate object }
}
},
"success": true
}var filter = [];
client.luxeid(reader_id, pin, pinType).allCerts({ filters: filter, parseCerts: true }, callback);{
"rootCertificate": {
...
},
"authenticationCertificate": {
...
},
"nonRepudiationCertificate": {
...
},
"intermediateCertificates": {
...
},
"encryptionCertificate": {
...
}
}// filter entries := ["authentication-certificate","non-repudiation-certificate","root-certificates"];
var filter = ['authentication-certificate'];
client.luxeid(reader_id, pin, pinType).allCerts({ filters: filter, parseCerts: true }, callback);{
"authenticationCertificate": {
...
},
}var filter = ['root-certificates','authentication-certificate','non-repudiaton-certificate'];
client.luxeid(reader_id, pin, pinType).allCertificates({ filters: filter, parseCerts: false }, callback);{
"rootCertificate": {
...
},
"authenticationCertificate": {
...
},
"nonRepudiationCertificate": {
...
}
}var data = {
"pin":"...",
"algorithm":"sha1",
"data":"I2e+u/sgy7fYgh+DWA0p2jzXQ7E="
}
client.luxeid(reader_id, pin, pinType).sign(data, callback);{
"success": true,
"data": "W7wqvWA8m9SBALZPxN0qUCZfB1O/WLaM/silenLzSXXmeR+0nzB7hXC/Lc/fMru82m/AAqCuGTYMPKcIpQG6MtZ/SGVpZUA/71jv3D9CatmGYGZc52cpcb7cqOVT7EmhrMtwo/jyUbi/Dy5c8G05owkbgx6QxnLEuTLkfoqsW9Q="
}This is sample text to demonstrate siging with Luxembourg eID135b870026cfbe12dec348069811fcde5bed28800ac54dbf45ecdf04eb13e95bE1uHACbPvhLew0gGmBH83lvtKIAKxU2/RezfBOsT6Vs=var data = {
"pin":"...",
"algorithm":"sha256",
"data":"E1uHACbPvhLew0gGmBH83lvtKIAKxU2/RezfBOsT6Vs="
}
client.luxeid(reader_id, pin, pinType).sign(data, callback);{
"data": "C7SG5eix1+lzMcZXgL0bCL+rLxKhd8ngrSj6mvlgooWH7CloEU13Rj8QiQHdhHnZgAi4Q0fCMIqAc4dn9uW9OP+MRitimRpYZcaDsGrUehPi/JpOD1e+ko7xKZ67ijUU4KTmG4HXc114oJ7xxx3CGL7TNFfvuEphLbbZa+9IZSSnYDOOENJqhggqqu7paSbLJrxC2zaeMxODKb5WSexHnZH6NnLPl2OmvPTYtxiTUMrLbFRsDRAziF6/VQkgM8/xOm+1/9Expv5DSLRY8RQ+wha6/nMlJjx50JszYIj2aBQKp4AOxPVdPewVGEWF4NF9ffrPLrOA2v2d7t5M4q7yxA==",
"success": true
}var data = {
"algorithm":"sha256",
"data":"vl5He0ulthjX+VWNM46QX7vJ8VvXMq2k/Tq8Xq1bwEw=",
"osDialog": false
}
luxidClient.signRaw(data, callback);var data = {
"pin":"..."
}
client.luxeid(reader_id, pin, pinType).verifyPin(data, callback);{
"success": true
} $("#buttonValidate").on('click', function () {
var _body={};
_body.pin = $("#psw").val(); //only when no pin-pad available
var luxeid = client.luxeid(reader_id, pin, pinType));
luxeid.verifyPin(_body, validationCallback);
});The calculated digest of the hash is prefixed with:
DigestInfo ::= SEQUENCE {
digestAlgorithm AlgorithmIdentifier,
digest OCTET STRING
}
Make sure this has been taken into consideration in order to validate the signature in a backend process.function callback(err,data) {
if(err){
console.log("Error:",JSON.stringify(err, null, ' '));
}
else {
console.log(JSON.stringify(data, null, ' '));
}
}{
success: false,
description: "some error description",
code: "some error code"
}export interface AbstractTruststore {
allCerts(filters?: string[] | Options): Promise<GenericT1CResponse<TruststoreAllCertificatesResponse>>;
rootCertificates(): Promise<GenericT1CResponse<CertificatesResponse>>;
intermediateCertificates(): Promise<GenericT1CResponse<CertificatesResponse>>;
authenticationCertificates(): Promise<GenericT1CResponse<CertificatesResponse>>;
nonRepudiationCertificates(): Promise<GenericT1CResponse<CertificatesResponse>>;
encryptionCertificates(): Promise<GenericT1CResponse<CertificatesResponse>>;
getCertificate(id: string): Promise<GenericT1CResponse<TruststoreCertificate>>;
verifyPin(body: TruststoreVerifyPinRequest): Promise<GenericT1CResponse<boolean>>;
authenticate(body: TruststoreAuthenticateOrSignRequest): Promise<GenericT1CResponse<TruststoreAuthenticateOrSignResponse>>;
sign(body: TruststoreAuthenticateOrSignRequest, bulk?: boolean): Promise<GenericT1CResponse<TruststoreAuthenticateOrSignResponse>>;
allAlgoRefs(): Promise<GenericT1CResponse<string>>;
resetBulkPin(): Promise<GenericT1CResponse<boolean>>;
}T1CSdk.T1CClient.initialize(config).then(res => {
client = res;
}, err => {
console.error(error)
});var ts = client.truststore();ts.allCerts();export interface AbstractLuxTrust {
allCerts(parseCerts?: boolean, filters?: string[] | Options, callback?: (error: T1CLibException, data: TokenAllCertsResponse) => void): Promise<TokenAllCertsResponse>;
rootCertificate(parseCerts?: boolean, callback?: (error: T1CLibException, data: TokenCertificateResponse) => void): Promise<TokenCertificateResponse>;
authenticationCertificate(parseCerts?: boolean, callback?: (error: T1CLibException, data: TokenCertificateResponse) => void): Promise<TokenCertificateResponse>;
nonRepudiationCertificate(parseCerts?: boolean, callback?: (error: T1CLibException, data: TokenCertificateResponse) => void): Promise<TokenCertificateResponse>;
allCertsExtended(parseCerts?: boolean, filters?: string[] | Options, callback?: (error: T1CLibException, data: TokenAllCertsExtendedResponse) => void): Promise<TokenAllCertsExtendedResponse>;
rootCertificateExtended(parseCerts?: boolean, callback?: (error: T1CLibException, data: TokenCertificateExtendedResponse) => void): Promise<TokenCertificateExtendedResponse>;
authenticationCertificateExtended(parseCerts?: boolean, callback?: (error: T1CLibException, data: TokenCertificateExtendedResponse) => void): Promise<TokenCertificateExtendedResponse>;
nonRepudiationCertificateExtended(parseCerts?: boolean, callback?: (error: T1CLibException, data: TokenCertificateExtendedResponse) => void): Promise<TokenCertificateExtendedResponse>;
verifyPin(body: TokenVerifyPinData, callback?: (error: T1CLibException, data: TokenVerifyPinResponse) => void): Promise<TokenVerifyPinResponse>;
authenticate(body: TokenAuthenticateOrSignData, callback?: (error: T1CLibException, data: TokenAuthenticateResponse) => void): Promise<TokenAuthenticateResponse>;
sign(body: TokenAuthenticateOrSignData, bulk?: boolean, callback?: (error: T1CLibException, data: TokenSignResponse) => void): Promise<TokenSignResponse>;
signRaw(body: TokenAuthenticateOrSignData, bulk?: boolean, callback?: (error: T1CLibException, data: TokenSignResponse) => void): Promise<TokenSignResponse>;
allAlgoRefs(callback?: (error: T1CLibException, data: TokenAlgorithmReferencesResponse) => void): Promise<TokenAlgorithmReferencesResponse>
resetBulkPin(callback?: (error: T1CLibException, data: BoolDataResponse) => void): Promise<BoolDataResponse>;
}(prerequisite: Camerfirma driver needed)
export interface AbstractCamerfirma {
allCerts(parseCerts?: boolean, filters?: string[] | Options, callback?: (error: T1CLibException, data: TokenAllCertsResponse) => void): Promise<TokenAllCertsResponse>;
authenticationCertificate(parseCerts?: boolean, callback?: (error: T1CLibException, data: TokenCertificateResponse) => void): Promise<TokenCertificateResponse>;
nonRepudiationCertificate(parseCerts?: boolean, callback?: (error: T1CLibException, data: TokenCertificateResponse) => void): Promise<TokenCertificateResponse>;
allCertsExtended(parseCerts?: boolean, filters?: string[] | Options, callback?: (error: T1CLibException, data: TokenAllCertsExtendedResponse) => void): Promise<TokenAllCertsExtendedResponse>;
authenticationCertificateExtended(parseCerts?: boolean, callback?: (error: T1CLibException, data: TokenCertificateExtendedResponse) => void): Promise<TokenCertificateExtendedResponse>;
nonRepudiationCertificateExtended(parseCerts?: boolean, callback?: (error: T1CLibException, data: TokenCertificateExtendedResponse) => void): Promise<TokenCertificateExtendedResponse>;
validateSignature(body: TokenValidateSignatureRequest, callback?: (error: T1CLibException, data: TokenValidateSignatureResponse) => void): Promise<TokenValidateSignatureResponse>;
verifyPin(body: TokenVerifyPinData, callback?: (error: T1CLibException, data: TokenVerifyPinResponse) => void): Promise<TokenVerifyPinResponse>;
authenticate(body: TokenAuthenticateOrSignData, callback?: (error: T1CLibException, data: TokenAuthenticateResponse) => void): Promise<TokenAuthenticateResponse>;
sign(body: TokenAuthenticateOrSignData, bulk?: boolean, callback?: (error: T1CLibException, data: TokenSignResponse) => void): Promise<TokenSignResponse>;
signRaw(body: TokenAuthenticateOrSignData, bulk?: boolean, callback?: (error: T1CLibException, data: TokenSignResponse) => void): Promise<TokenSignResponse>;
allAlgoRefs(callback?: (error: T1CLibException, data: TokenAlgorithmReferencesResponse) => void): Promise<TokenAlgorithmReferencesResponse>
resetBulkPin(callback?: (error: T1CLibException, data: BoolDataResponse) => void): Promise<BoolDataResponse>;
tokenData(callback?: (error: T1CLibException, data: TokenInfoResponse) => void): Promise<TokenInfoResponse>;
}T1CSdk.T1CClient.initialize(config).then(res => {
client = res;
}, err => {
console.error(error)
});var core = client.core();
core.readersCardAvailable(callback);{
"data": [
// List of reader with cards found
],
"success": true
}(prerequisite: driver installation neeeded)


ts.authenticationCertificates().then().catch();
ts.rootCertificates().then().catch();
ts.intermediateCertificates().then().catch();
ts.encryptionCertificates().then().catch();
ts.nonRepudiationCertificates().then().catch();{
success: true,
data: {
certificates: [{
"certificate": "MIIEd..jRTii/DF8nHZiNmm5w==",
"id": "4d4eebf..43ddf00042e",
"subject": "C=B...ication)",
"serialNumber": "10:00:00:00...2:e8:26:6e"
}],
}
}let filter = new Options(['authenticationCertificate']) //filter out only AuthenticationCertificates
// The filter parameter is optional
ts.allCerts(filter).then().catch(){
"success": true,
"data": {
"authenticationCertificate": {
"certificates": [
{
"certificate": "MIAKBggqhkjOPQQDAwNnADBkAj5w==",
"id": "4d4eebf5f4df00042e",
"subject": "C=BEtication)",
"serialNumber": "10:00:e8:26:6e"
}
]
}
}
}var filter = null;
ts.allCerts({ filters: filter});var data = {
"pin":"...",
"certId:"...",
"data":"n4bQgYhMfWWaL+qgxVrQFaO/TxsrC4Is0V1sFbDwCgg="
"osDialog": true
}
ts.sign(data);{
"success": true,
"data": {
"data" : "W7wqvWA8m9S...="
}
}var filter = null;
ts.allCerts({ filters: filter});var data = {
"pin":"...",
"certId:"...",
"data":"n4bQgYhMfWWaL+qgxVrQFaO/TxsrC4Is0V1sFbDwCgg="
"osDialog": true
}
ts.authenticate(data);{
"success": true,
"data": {
"data" : "W7wqvWA8m9S...="
}
}const data = {
"pin":"...",
"certId:"...",
"data":"n4bQgYhMfWWaL+qgxVrQFaO/TxsrC4Is0V1sFbDwCgg="
"osDialog": true
}
const bulk = true;
ts.sign(data, bulk).then(res => {
}, err => {
console.error(err)
})ts.resetBulkPin().then(res => {
}, err => {
console.error(err)
}){
"success": true,
"data": true
}var data = {
pin?: string;
osDialog?: boolean;
timeout?: Number;
certId?: string;
}
ts.verifyPin(data);{
"success": true,
"data": true
}let getquery: [String: Any] = [kSecClass as String: kSecClassKey,
kSecAttrTokenID as String: "com.example.piv:0123456789",
kSecReturnRef as String: true]let watcher = TKTokenWatcher()
print("The following token IDs are present in the system:")
for tokenID in watcher.tokenIDs {
print(tokenID)
}const moduleName = "camerfirma";
var module = client.generic(selected_reader.id);var module = client.camerfirma(selected_reader.id);module.tokenData().then(res => {
// see response below
}){
"success": true,
"data": {
"info": {
"slot": "string",
"label": "string",
"manufacturerId": "string",
"model": "string",
"serialNumber": "string",
"flags": {
"isRandomNumberGenerator": "boolean",
"isWriteProtected": "boolean",
"isLoginRequired": "boolean",
"isUserPinInitialized": "boolean",
"isRestoreKeyNotNeeded": "boolean",
"isClockOnToken": "boolean",
"isProtectedAuthenticationPath": "boolean",
"isDualCryptoOperations": "boolean",
"isTokenInitialized": "boolean",
"isSecondaryAuthentication": "boolean",
"isUserPinCountLow": "boolean",
"isUserPinFinalTry": "boolean",
"isUserPinLocked": "boolean",
"isUserPinToBeChanged": "boolean",
"isSoPinCountLow": "boolean",
"isSoPinFinalTry": "boolean",
"isSoPinLocked": "boolean",
"isSoPinToBeChanged": "boolean"
},
"mechanisms": [
{
"mechanism": "string",
"flags": {
"isHardware": "boolean",
"isEncrypt": "boolean",
"isDecrypt": "boolean",
"isDigest": "boolean",
"isSign": "boolean",
"isSignRecover": "boolean",
"isVerify": "boolean",
"isVerifyRecover": "boolean",
"isGenerate": "boolean",
"isGenerateKeyPair": "boolean",
"isWrap": "boolean",
"isUnwrap": "boolean",
"isExtension": "boolean",
"isEcFP": "boolean",
"isEcNamedcurve": "boolean",
"isEcUncompress": "boolean",
"isEcCompress": "boolean"
},
"ulMinKeySize": "number",
"ulMaxKeySize": "number"
}
],
"ulMaxSessionCount": "number",
"ulSessionCount": "number",
"ulMaxRwSessionCount": "number",
"ulMaxPinLen": "number",
"ulMinPinLen": "number",
"ulTotalPubLicMemory": "number",
"ulFreePubMemory": "number",
"ulTotalPrivateMemory": "number",
"ulFreePrivateMemory": "number",
"hardwareVersion": "string",
"firmwareVersion": "string"
},
"infoType": "TokenInfoType"
}
}
//ENUM
TokenInfoType {
Token,
PKCS11,
File,
Payment,
HSM,
Vault,
Wallet,
}module.authenticationCertificate(module, parseCertsBoolean, callback);{
success: true,
data: {
certificate?: string,
certificates?: Array<string>,
certificateType?: string,
id?: string,
parsedCertificate?: Certificate,
parsedCertificates?: Array<Certificate>
}
}module.nonRepudiationCertificate(module, parseCertsBoolean, callback);{
success: true,
data: {
certificate?: string,
certificates?: Array<string>,
certificateType?: string,
id?: string,
parsedCertificate?: Certificate,
parsedCertificates?: Array<Certificate>
}
}var filter = [];
module.allCerts(module, parseCerts, { filters: filter}, callback);{
"authenticationCertificate": {
...
},
"nonRepudiationCertificate": {
...
}
}var filter = ['authenticationCertificate'];
module.allCerts(module, { filters: filter}, callback);{
"authenticationCertificate": {
...
}
}var filter = null;
module.allCerts(module, { filters: filter}, callback);{
"authenticationCertificate": {
...
},
"nonRepudiationCertificate": {
...
}
}var data = {
"pin":"...",
"algorithm":"sha1",
"data":"I2e+u/sgy7fYgh+DWA0p2jzXQ7E=",
"osDialog": true
}
module.sign(module, data, callback);{
"success": true,
"data": {
"data" : "W7wqvWA8m9S...="
}
}var data = {
"algorithm":"sha1",
"data":"I2e+u/sgy7fYgh+DWA0p2jzXQ7E=",
"osDialog": false
}
module.sign(module, data, callback);{
"success": true,
"data": {
"data" : "W7wqvWA8m9S...="
}
}var data = {
"algorithm":"sha256",
"data":"vl5He0ulthjX+VWNM46QX7vJ8VvXMq2k/Tq8Xq1bwEw=",
"osDialog": false
}
module.signRaw(data, callback);const data = {
algorithm: "sha256",
data: "E1uHACbPvhLew0gGmBH83lvtKIAKxU2/RezfBOsT6Vs=",
pin: "1234"
}
const bulk = true;
module.sign(module, data, bulk).then(res => {
}, err => {
console.error(err)
})module.resetBulkPin(module).then(res => {
}, err => {
console.error(err)
}){
"success": true,
"data": true
}var data = {
"pin":"..."
}
module.verifyPin(module, data, callback);{
"verified": true
}var data = {}
module.verifyPin(module, data, callback);{
"verified": true
}var data = {
"pin": "...",
"algorithm": "sha1",
"data":"I2e+u/sgy7fYgh+DWA0p2jzXQ7E="
}
module.authenticate(module, data, callback);{
"success": true,
"data": {
"data" : "W7wqvWA8m9S...="
}
}module.allAlgoRefs(module, callback);{
"success": true,
"data": ["sha1", "sha256"]
}const body = {
"algorithm": 'sha256',
"hash": '...',
"signedHash": '...',
"osDialog": false,
"id": 'cert_id',
"pin": 'pin_code',
"timeout": 120 //timeout in seconds
}
module.validateSignature(body).then(response => {
response.valid
).catch(error => {
errorHandler(error)}
){
"success": true,
"data": {
"valid": true
}
}function callback(err,data) {
if(err){console.log("Error:",JSON.stringify(err, null, ' '));}
else {console.log(JSON.stringify(data, null, ' '));}T1CSdk.T1CClient.initialize(config).then(res => {
client = res;
client.core().readers(callback);
}, err => {
console.error(error)
});{
"data": [
{
"card": {
"atr": "3B7D94000080318065B0831100C883009000",
"description": [
"personal identity card (ID card)",
"LuxTrust card"
]
},
"id": "c8d31f8fed44d952",
"name": "Identiv uTrust 4701 F Dual Interface Reader(1)",
"pinpad": false
},
{
"id": "ec3109c84ee9eeb5",
"name": "Identiv uTrust 4701 F Dual Interface Reader(2)",
"pinpad": false
}
],
"success": true
}allCertsExtended(parseCerts?: boolean, filters?: string[] | Options, callback?: (error: T1CLibException, data: TokenAllCertsExtendedResponse) => void): Promise<TokenAllCertsExtendedResponse>;
authenticationCertificateExtended(parseCerts?: boolean, callback?: (error: T1CLibException, data: TokenCertificateExtendedResponse) => void): Promise<TokenCertificateExtendedResponse>;
nonRepudiationCertificateExtended(parseCerts?: boolean, callback?: (error: T1CLibException, data: TokenCertificateExtendedResponse) => void): Promise<TokenCertificateExtendedResponse>;
rootCertificateExtended(parseCerts?: boolean, callback?: (error: T1CLibException, data: TokenCertificateExtendedResponse) => void): Promise<TokenCertificateExtendedResponse>;{
"success" : true
"data" : {
"certificates": [{
"certificate"?: string,
"certificateType"?: string,
"id"?: string,
"subject"?: string,
"issuer"?: string,
"serialNumber"?: string,
"url"?: string,
"hashSubPubKey"?: string,
"hashIssPubKey"?: string,
"exponent"?: string,
"remainder"?: string,
"parsedCertificate"?: Certificate
}]
}
}{
"success" : true
"data" : {
"authenticationCertificate": {
"certificates": [...]
},
"nonRepudiationCertificate": {
"certificates": [...]
},
"rootCertificate": {
"certificates": [...]
}
}
}client.luxtrust(reader_id).rootCertificate({ parseCerts: true }, callback);{
success: true,
data: {
certificate?: string,
certificates?: Array<string>,
certificateType?: string,
id?: string,
parsedCertificate?: Certificate,
parsedCertificates?: Array<Certificate>
}
}client.luxtrust(reader_id).authenticationCertificate({ parseCerts: true }, callback);{
success: true,
data: {
certificate?: string,
certificates?: Array<string>,
certificateType?: string,
id?: string,
parsedCertificate?: Certificate,
parsedCertificates?: Array<Certificate>
}
}client.luxtrust(reader_id).signingCertificate({ parseCerts: true }, callback);{
success: true,
data: {
certificate?: string,
certificates?: Array<string>,
certificateType?: string,
id?: string,
parsedCertificate?: Certificate,
parsedCertificates?: Array<Certificate>
}
}var filter = [];
client.luxtrust(reader_id).allCerts({ filters: filter, parseCerts: true }, callback);{
"rootCertificate": {
...
},
"authenticationCertificate": {
...
},
"nonRepudiationCertificate": {
...
}
}var filter = ['authentication-certificate'];
client.luxtrust(reader_id).allCerts({ filters: filter, parseCerts: true }, callback);{
"rootCertificate": {
...
}
}var filter = ['root-certificates','authentication-certificate','signing-certificate'];
client.luxtrust(reader_id).allCertificates({ filters: filter, parseCerts: false }, callback);{
"rootCertificate": {
...
},
"authenticationCertificate": {
...
},
"nonRepudiationCertificate": {
...
}
}var data = {
"pin":"...",
"algorithm":"sha1",
"data":"I2e+u/sgy7fYgh+DWA0p2jzXQ7E="
}
client.luxtrust(reader_id).sign(data, callback);var data = {
"algorithm":"sha1",
"data":"I2e+u/sgy7fYgh+DWA0p2jzXQ7E="
}
client.luxtrust(reader_id).sign(data, callback);{
"success": true,
"data": "W7wqvWA8m9SBALZPxN0qUCZfB1O/WLaM/silenLzSXXmeR+0nzB7hXC/Lc/fMru82m/AAqCuGTYMPKcIpQG6MtZ/SGVpZUA/71jv3D9CatmGYGZc52cpcb7cqOVT7EmhrMtwo/jyUbi/Dy5c8G05owkbgx6QxnLEuTLkfoqsW9Q="
}This is sample text to demonstrate siging with LuxTrust smartcard or signing stick135b870026cfbe12dec348069811fcde5bed28800ac54dbf45ecdf04eb13e95bE1uHACbPvhLew0gGmBH83lvtKIAKxU2/RezfBOsT6Vs=var data = {
"pin":"...",
"algorithm":"sha256",
"data":"E1uHACbPvhLew0gGmBH83lvtKIAKxU2/RezfBOsT6Vs="
}
client.luxtrust(reader_id).sign(data, callback);{
"data": "C7SG5eix1+lzMcZXgL0bCL+rLxKhd8ngrSj6mvlgooWH7CloEU13Rj8QiQHdhHnZgAi4Q0fCMIqAc4dn9uW9OP+MRitimRpYZcaDsGrUehPi/JpOD1e+ko7xKZ67ijUU4KTmG4HXc114oJ7xxx3CGL7TNFfvuEphLbbZa+9IZSSnYDOOENJqhggqqu7paSbLJrxC2zaeMxODKb5WSexHnZH6NnLPl2OmvPTYtxiTUMrLbFRsDRAziF6/VQkgM8/xOm+1/9Expv5DSLRY8RQ+wha6/nMlJjx50JszYIj2aBQKp4AOxPVdPewVGEWF4NF9ffrPLrOA2v2d7t5M4q7yxA==",
"success": true
}var data = {
"algorithm":"sha256",
"data":"vl5He0ulthjX+VWNM46QX7vJ8VvXMq2k/Tq8Xq1bwEw=",
"osDialog": false
}
luxtrustClient.signRaw(data, callback);var data = {
"pin":"..."
}
client.luxtrust(reader_id).verifyPin(data, callback);var data = {}
client.luxtrust(reader_id).verifyPin(data, callback);{
"success": true
}var data = {
"pin": "...",
"algorithm_reference": "sha1",
"data":"I2e+u/sgy7fYgh+DWA0p2jzXQ7E="
}
client.luxtrust(reader_id).authenticate(data, callback);var data = {
"algorithm_reference": "sha1",
"data":"I2e+u/sgy7fYgh+DWA0p2jzXQ7E="
}
client.luxtrust(reader_id).authenticate(data, callback);{
"success": true,
"data": "W7wqvWA8m9SBALZPxN0qUCZfB1O/WLaM/silenLzSXXmeR+0nzB7hXC/Lc/fMru82m/AAqCuGTYMPKcIpQG6MtZ/SGVpZUA/71jv3D9CatmGYGZc52cpcb7cqOVT7EmhrMtwo/jyUbi/Dy5c8G05owkbgx6QxnLEuTLkfoqsW9Q="
}The calculated digest of the hash is prefixed with:
DigestInfo ::= SEQUENCE {
digestAlgorithm AlgorithmIdentifier,
digest OCTET STRING
}
Make sure this has been taken into consideration in order to validate the signature in a backend process.function callback(err,data) {
if(err){
console.log("Error:",JSON.stringify(err, null, ' '));
}
else {
console.log(JSON.stringify(data, null, ' '));
}
}{
success: false,
description: "some error description",
code: "some error code"
}export interface AbstractEmv {
readApplicationData(callback?: (error: T1CLibException, data: PaymentReadApplicationDataResponse) => void): Promise<PaymentReadApplicationDataResponse>;
readData(callback?: (error: T1CLibException, data: PaymentReadDataResponse) => void): Promise<PaymentReadDataResponse>;
allCerts(aid: string, filters: string[] | Options, callback?: (error: T1CLibException, data: PaymentAllCertsResponse | TokenAllCertsExtendedResponse) => void): Promise<PaymentAllCertsResponse | TokenAllCertsExtendedResponse>;
issuerPublicCertificate(aid: string, callback?: (error: T1CLibException, data: PaymentCertificateResponse) => void): Promise<PaymentCertificateResponse>;
iccPublicCertificate(aid: string, callback?: (error: T1CLibException, data: PaymentCertificateResponse) => void): Promise<PaymentCertificateResponse>;
allCertsExtended(aid: string, filters: string[] | Options, callback?: (error: T1CLibException, data: TokenAllCertsExtendedResponse) => void): Promise<TokenAllCertsExtendedResponse>;
issuerPublicCertificateExtended(aid: string, callback?: (error: T1CLibException, data: TokenCertificateExtendedResponse) => void): Promise<TokenCertificateExtendedResponse>;
iccPublicCertificateExtended(aid: string, callback?: (error: T1CLibException, data: TokenCertificateExtendedResponse) => void): Promise<TokenCertificateExtendedResponse>;
verifyPin(body: PaymentVerifyPinData, callback?: (error: T1CLibException, data: PaymentVerifyPinResponse) => void): Promise<PaymentVerifyPinResponse>;
}T1CSdk.initialize(config).then(res => {
}, err => {
console.error(error)
});var emv = client.emv(reader_id);function callback(err,data) {
if(err){console.log("Error:",JSON.stringify(err, null, ' '));}
else {console.log(JSON.stringify(data, null, ' '));}
}
emv.readData(callback)var coreService = client.core();
core.readersCardAvailable(callback);var emv = client.emv(reader_id);client.emv(reader_id).readData(callback);function callback(err,data) {
if(err){
console.log("Error:",JSON.stringify(err, null, ' '));
}
else {
console.log(JSON.stringify(data, null, ' '));
}
}{
"data": [
{
"aid": "A0000000048002",
"name": "MAESTRO",
"priority": 1
},{
"aid": "A0000000048008",
"name": "MASTERCARD",
"priority": 1
}
],
"success": true
}client.emv(reader_id).readApplicationData(callback);function callback(err,data) {
if(err){
console.log("Error:",JSON.stringify(err, null, ' '));
}
else {
console.log(JSON.stringify(data, null, ' '));
}
}{
"country": "BE",
"countryCode": "0056",
"effectiveDate": "190201",
"expirationDate": "241231",
"language": "nlen",
"name": "",
"pan": "670...001"
}allCertsExtended(parseCerts?: boolean, filters?: string[] | Options, callback?: (error: T1CLibException, data: TokenAllCertsExtendedResponse) => void): Promise<TokenAllCertsExtendedResponse>;
iccPublicCertificateExtended(parseCerts?: boolean, callback?: (error: T1CLibException, data: TokenCertificateExtendedResponse) => void): Promise<TokenCertificateExtendedResponse>;
issuerPublicCertificateExtended(parseCerts?: boolean, callback?: (error: T1CLibException, data: TokenCertificateExtendedResponse) => void): Promise<TokenCertificateExtendedResponse>;{
"success" : true
"data" : {
"certificates": [{
"certificate"?: string,
"exponent"?: string,
"remainder"?: string,
"parsedCertificate"?: Certificate
}]
}
}{
"success" : true
"data" : {
"issuerPublicCertificate": {
"certificates": [...]
},
"iccPublicCertificate": {
"certificates": [...]
}
}
}// Application ID can be retrieved with the Applications endpoint
var aid = "..."
client.emv(reader_id).issuerPublicCertificate(aid, callback);function callback(err,data) {
if(err){
console.log("Error:",JSON.stringify(err, null, ' '));
}
else {
console.log(JSON.stringify(data, null, ' '));
}
}{
"data": {
"data": "base64 encoded data",
"exponent": "base64 encoded data",
"remainder": "base64 encoded data"
},
"success": true
}// Application ID can be retrieved with the Applications endpoint
var aid = "..."
client.emv(reader_id).iccPublicCertificate(aid, callback);function callback(err,data) {
if(err){
console.log("Error:",JSON.stringify(err, null, ' '));
}
else {
console.log(JSON.stringify(data, null, ' '));
}
}{
"certificate": "dxL8JnkxHneX36tdQCzz...HC3Wpt/qppk008q9OMDgVp0F7NJjCC2mXg3b/qD7c09WFXUwZ+XdkmIefhoZT/kme4QEoD49+ppQiqSeCaRjn6N0OetcjleWkPej8vE0QG4mLlG/edWTVbfMGbED9Kbjf4ooauNnq+iAVwgHedsDpdDWJLhV8sDSLQgZ1B3fMQuyZIaD79+X+H9fbhmJg+j7Lr638srglWM9VlthaWjRbFH2HzNEiQ9sOE20lmj6WM6zdYas9+Z4hcwZqWbeiTeIJDwDc6w==",
"exponent": "AQAB",
"remainder": ""
}var data = {
"pin": "...."
}
client.emv().verifyPin(data, callback);{
"verified": true
}var data = {}
client.emv().verifyPin(data, callback);{
"verified": true
} $("#buttonValidate").on('click', function () {
var _body={};
_body.pin = $("#psw").val(); //only when no pin-pad available
var emv = connector.emv(reader_id);
emv.verifyPin(_body, validationCallback);
});{
"code": 301,
"description": "Wrong pin, 2 tries remaining",
"success": false
}{
"code": 301,
"description": "Wrong pin, 1 try remaining",
"success": false
}function callback(err,data) {
if(err){
console.log("Error:",JSON.stringify(err, null, ' '));
}
else {
console.log(JSON.stringify(data, null, ' '));
}
}{
success: false,
description: "some error description",
code: "some error code"
}VASCO DIGIPASS 870, has pin-pad capabilities, and there is a card detected with given ATR and some descriptions.
An ATR (Answer To Reset) identifies the type of a smart-card.
The reader, has a unique ID, reader_id; this reader_id must be used in order to request functionalities for the Crelan card.
This must be done upon instantiation of the Crelan container:export interface AbstractCrelan {
readApplicationData(callback?: (error: T1CLibException, data: PaymentReadApplicationDataResponse) => void): Promise<PaymentReadApplicationDataResponse>;
readData(callback?: (error: T1CLibException, data: PaymentReadDataResponse) => void): Promise<PaymentReadDataResponse>;
allCerts(aid: string, filters: string[] | Options, callback?: (error: T1CLibException, data: PaymentAllCertsResponse | TokenAllCertsExtendedResponse) => void): Promise<PaymentAllCertsResponse | TokenAllCertsExtendedResponse>;
issuerPublicCertificate(aid: string, callback?: (error: T1CLibException, data: PaymentCertificateResponse) => void): Promise<PaymentCertificateResponse>;
iccPublicCertificate(aid: string, callback?: (error: T1CLibException, data: PaymentCertificateResponse) => void): Promise<PaymentCertificateResponse>;
allCertsExtended(aid: string, filters: string[] | Options, callback?: (error: T1CLibException, data: TokenAllCertsExtendedResponse) => void): Promise<TokenAllCertsExtendedResponse>;
issuerPublicCertificateExtended(aid: string, callback?: (error: T1CLibException, data: TokenCertificateExtendedResponse) => void): Promise<TokenCertificateExtendedResponse>;
iccPublicCertificateExtended(aid: string, callback?: (error: T1CLibException, data: TokenCertificateExtendedResponse) => void): Promise<TokenCertificateExtendedResponse>;
verifyPin(body: PaymentVerifyPinData, callback?: (error: T1CLibException, data: PaymentVerifyPinResponse) => void): Promise<PaymentVerifyPinResponse>;
sign(body: PaymentSignData, bulk?: boolean, callback?: (error: T1CLibException, data: PaymentSignResponse) => void): Promise<PaymentSignResponse>;
resetBulkPin(callback?: (error: T1CLibException, data: BoolDataResponse) => void): Promise<BoolDataResponse>;
}T1CSdk.T1CClient.initialize(config).then(res => {
client = res;
}, err => {
console.error(error)
});var crelan = client.crelan(reader_id);function callback(err,data) {
if(err){console.log("Error:",JSON.stringify(err, null, ' '));}
else {console.log(JSON.stringify(data, null, ' '));}
}
crelan.readData(callback)var coreService = client.core();
core.readersCardAvailable(callback);var crelan = client.crelan(reader_id);client.crelan(reader_id).readData(callback);function callback(err,data) {
if(err){
console.log("Error:",JSON.stringify(err, null, ' '));
}
else {
console.log(JSON.stringify(data, null, ' '));
}
}{
"data": [
{
"aid": "A0000000048002",
"name": "MAESTRO",
"priority": 1
},{
"aid": "A0000000048008",
"name": "MASTERCARD",
"priority": 1
}
],
"success": true
}client.crelan(reader_id).readApplicationData(callback);function callback(err,data) {
if(err){
console.log("Error:",JSON.stringify(err, null, ' '));
}
else {
console.log(JSON.stringify(data, null, ' '));
}
}{
"country": "BE",
"countryCode": "0056",
"effectiveDate": "190201",
"expirationDate": "241231",
"language": "nlen",
"name": "",
"pan": "670...001"
}allCertsExtended(parseCerts?: boolean, filters?: string[] | Options, callback?: (error: T1CLibException, data: TokenAllCertsExtendedResponse) => void): Promise<TokenAllCertsExtendedResponse>;
iccPublicCertificateExtended(parseCerts?: boolean, callback?: (error: T1CLibException, data: TokenCertificateExtendedResponse) => void): Promise<TokenCertificateExtendedResponse>;
issuerPublicCertificateExtended(parseCerts?: boolean, callback?: (error: T1CLibException, data: TokenCertificateExtendedResponse) => void): Promise<TokenCertificateExtendedResponse>;{
"success" : true
"data" : {
"certificates": [{
"certificate"?: string,
"exponent"?: string,
"remainder"?: string,
"parsedCertificate"?: Certificate
}]
}
}{
"success" : true
"data" : {
"issuerPublicCertificate": {
"certificates": [...]
},
"iccPublicCertificate": {
"certificates": [...]
}
}
}// Application ID can be retrieved with the Applications endpoint
var aid = "..."
client.crelan(reader_id).issuerPublicCertificate(aid, callback);function callback(err,data) {
if(err){
console.log("Error:",JSON.stringify(err, null, ' '));
}
else {
console.log(JSON.stringify(data, null, ' '));
}
}{
"data": {
"data": "base64 encoded data",
"exponent": "base64 encoded data",
"remainder": "base64 encoded data"
},
"success": true
}// Application ID can be retrieved with the Applications endpoint
var aid = "..."
client.c(reader_id).iccPublicCertificate(aid, callback);function callback(err,data) {
if(err){
console.log("Error:",JSON.stringify(err, null, ' '));
}
else {
console.log(JSON.stringify(data, null, ' '));
}
}{
"certificate": "dxL8JnkxHneX36tdQCzz...HC3Wpt/qppk008q9OMDgVp0F7NJjCC2mXg3b/qD7c09WFXUwZ+XdkmIefhoZT/kme4QEoD49+ppQiqSeCaRjn6N0OetcjleWkPej8vE0QG4mLlG/edWTVbfMGbED9Kbjf4ooauNnq+iAVwgHedsDpdDWJLhV8sDSLQgZ1B3fMQuyZIaD79+X+H9fbhmJg+j7Lr638srglWM9VlthaWjRbFH2HzNEiQ9sOE20lmj6WM6zdYas9+Z4hcwZqWbeiTeIJDwDc6w==",
"exponent": "AQAB",
"remainder": ""
}var data = {
"pin": "...."
}
client.crelan(reader_id).verifyPin(data, callback);{
"verified": true
}var data = {}
client.crelan(reader_id).verifyPin(data, callback);{
"verified": true
} $("#buttonValidate").on('click', function () {
var _body={};
_body.pin = $("#psw").val(); //only when no pin-pad available
var crelan = connector.crelan(reader_id);
crelan.verifyPin(_body, validationCallback);
});{
"code": 301,
"description": "Wrong pin, 2 tries remaining",
"success": false
}{
"code": 301,
"description": "Wrong pin, 1 try remaining",
"success": false
}const data = {
txId: "Tx1",
data: "E1uHACbPvhLew0gGmBH83lvtKIAKxU2/RezfBOsT6Vs=",
language: "fr"
}
const bulk = false;
crelan.sign(data, bulk).then(res => {
}, err => {
console.error(err)
}){
"success": true,
"data": {
"data": "..."
"cardSignature": "...",
"readerSignature": "...",
}
}function callback(err,data) {
if(err){
console.log("Error:",JSON.stringify(err, null, ' '));
}
else {
console.log(JSON.stringify(data, null, ' '));
}
}{
success: false,
description: "some error description",
code: "some error code"
}Issues related to device time not in sync
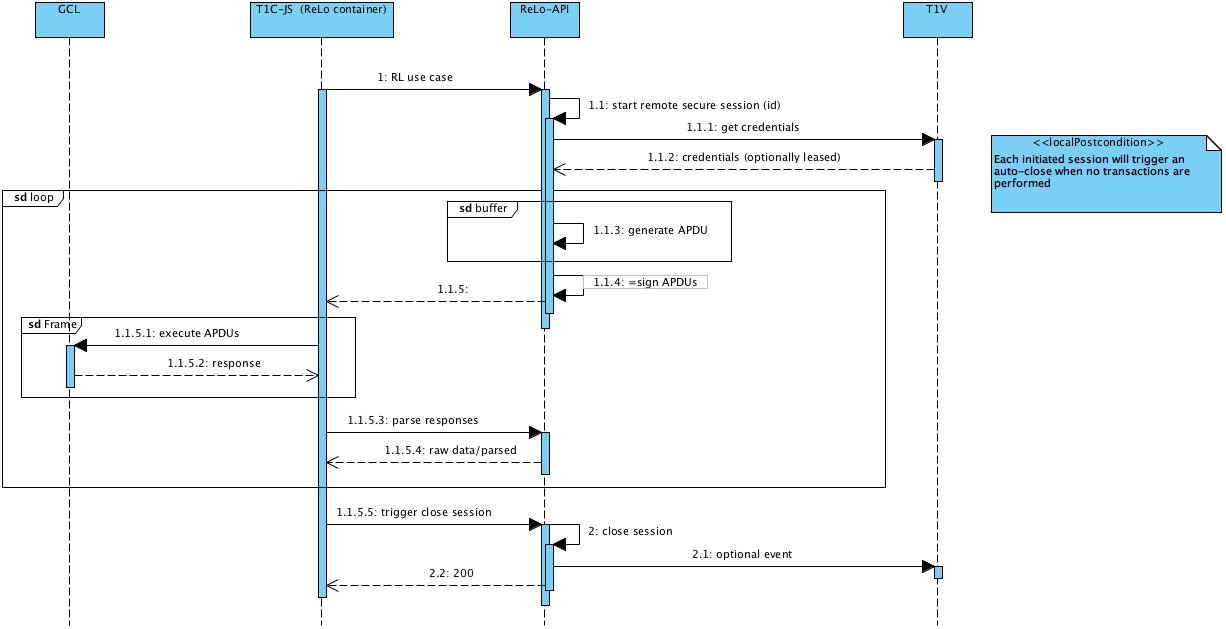
initabspath and the modal set to true.%localappdata%\Trust1Connector\file-exchange.json[Windows]
"C:\Users\userA\t1t\coda"
[OSX]
"/Users/userA/t1t/coda"application_id: mywebapp.com //domain
entity: Trust1Team //root context
type: Codainterface AbstractFileExchange {
download(entity: string, type: string, file: Blob, fileName: string, relPath?: [string], implicitCreationType?: boolean, notifyOnCompletion?: boolean, callback?: (error: T1CLibException, data: FileListResponse) => void): Promise<DataResponse>;
upload(entity: string, type: string, fileName: string, rel_path?: [string], notifyOnCompletion?: boolean, callback?: (error: T1CLibException, data: FileListResponse) => void): Promise<Blob>;
listTypes(entity?: string, page?: Page, callback?: (error: T1CLibException, data: TypeListResponse) => void): Promise<TypeListResponse>;
listType(entity: string, type: string, callback?: (error: T1CLibException, data: TypeResponse) => void): Promise<TypeResponse>;
listTypeContent(entity: string, type: string, relPath?: [string], page?: Page, callback?: (error: T1CLibException, data: FileListResponse) => void): Promise<FileListResponse>;
listContent(entity: string, page?: Page, callback?: (error: T1CLibException, data: FileListResponse) => void): Promise<FileListResponse>;
existsType(entity: string, type: string, callback?: (error: T1CLibException, data: BoolDataResponse) => void): Promise<BoolDataResponse>;
existsFile(entity: string, type: string, relPath: [string], callback?: (error: T1CLibException, data: BoolDataResponse) => void): Promise<BoolDataResponse>;
getAccessMode(entity: string, type: string, relPath?: [string], callback?: (error: T1CLibException, data: DataResponse) => void): Promise<DataResponse>;
createDir(entity: string, type: string, relPath: [string], recursive?: boolean, callback?: (error: T1CLibException, data: FileResponse) => void): Promise<FileResponse>;
copyFile(entity: string, fromType: string, toType: string, fileName: string, newfileName: string, fromrelPath?: [string], toRelPath?: [string], callback?: (error: T1CLibException, data: FileResponse) => void): Promise<FileResponse>;
moveFile(entity: string, fromType: string, toType: string, fileName: string, fromrelPath?: [string], toRelPath?: [string], callback?: (error: T1CLibException, data: FileResponse) => void): Promise<FileResponse>;
renameFile(entity: string, type: string, fileName: string, newfileName: string, relPath?: [string], callback?: (error: T1CLibException, data: FileResponse) => void): Promise<FileResponse>;
getFileInfo(entity: string, type: string, fileName: string, relPath?: [string], callback?: (error: T1CLibException, data: FileResponse) => void): Promise<FileResponse>;
createType(entity: string, type: string, initPath?: [string], modal?: boolean, timeout?: number, callback?: (error: T1CLibException, data: TypeResponse) => void): Promise<TypeResponse>;
createTypeDirs(entity: string, type: string, rel_path: [string], modal?: boolean, timeout?: number, callback?: (error: T1CLibException, data: FileListResponse) => void): Promise<FileListResponse>;
updateType(entity: string, type: string, timeout?: number, callback?: (error: T1CLibException, data: TypeResponse) => void): Promise<TypeResponse>;
deleteType(entity: string, type: string, callback?: (error: T1CLibException, data: boolean) => void): Promise<boolean>;
}enum FileSort {ASC, DESC}
enum TypeStatus {MAPPED,UNMAPPED}class T1CResponse {
constructor(public success: boolean, public data?: any) {}
}
class ListFilesRequest {
constructor(public path: string, public extensions: string[]) {}
}
export class File {
constructor(public extension: string,
public name: string,
public path: string,
public relPath: string[],
public type: string,
public entity: string,
public size: number,
public lastModificationTime: string,
public isDir: boolean,
public access: string) {}
}
class FileListResponse extends T1CResponse {
constructor(public data: FileList, public success: boolean) {
super(success, data);
}
}
class FileList {
constructor(public files: File[], public total: number) {}
}
class FileResponse extends T1CResponse {
constructor(public data: File, public success: boolean) {
super(success, data);
}
}
class TypeListResponse extends T1CResponse {
constructor(public data: TypeList, public success: boolean) {
super(success, data);
}
}
class TypeResponse extends T1CResponse {
constructor(public data: Type, public success: boolean){
super(success, data);
}
}
class Type {
constructor(public entity: string, public type: string, public path: string, access: string, status: TypeStatus, public files: number, public appid?: string) {}
}
class TypeList{
constructor(public types: Type[], public total: number) {}
}
class Page {
constructor (public start: number, public size: number, public sort: FileSort) {}
}
class DataArrayResponse extends T1CResponse {
constructor(public data: string[], public success: boolean) {
super(success, data);
}
}
class DataResponse extends T1CResponse {
constructor(public data: string, public success: boolean) {
super(success, data);
}
}
class RestException {
constructor(public status: number, public code: string, public description: string, public client?: GCLClient) {
ObjectUtil.removeNullAndUndefinedFields(this);
}
}
�download(entity: string, type: string, file: Blob, fileName: string, relPath?: [string], implicitCreationType?: boolean, notifyOnCompletion?: boolean, callback?: (error: T1CLibException, data: FileListResponse) => void): Promise<DataResponse>;{
data: string
success: boolean
}upload(entity: string, type: string, fileName: string, relPath?: [string], notifyOnCompletion?: boolean, callback?: (error: T1CLibException, data: Blob) => void): Promise<Blob>;listTypes(entity?: string, page?: Page, callback?: (error: T1CLibException, data: TypeListResponse) => void): Promise<TypeListResponse>;{
data: TypeList
success: boolean
}listType(entity: string, type: string, callback?: (error: T1CLibException, data: TypeResponse) => void): Promise<TypeResponse>;{
data: Type
success: boolean
}listTypeContent(entity: string, type: string, relPath?: [string], page?: Page, callback?: (error: T1CLibException, data: FileListResponse) => void): Promise<FileListResponse>;{
data: FileList
success: boolean
}listContent(entity: string, page?: Page, callback?: (error: T1CLibException, data: FileListResponse) => void): Promise<FileListResponse>;{
data: FileList
success: boolean
}existsType(entity: string, type: string, callback?: (error: T1CLibException, data: BoolDataResponse) => void): Promise<BoolDataResponse>;{
data: boolean
success: boolean
}existsFile(entity: string, type: string, relPath: [string], callback?: (error: T1CLibException, data: BoolDataResponse) => void): Promise<BoolDataResponse>;{
data: boolean
success: boolean
}getAccessMode(entity: string, type: string, fileName: string, relPath?: [string], callback?: (error: T1CLibException, data: DataResponse) => void): Promise<DataResponse>;{
data: string ("rwx")
success: boolean
}createDir(entity: string, type: string, relPath: [string], recursive?: boolean, callback?: (error: T1CLibException, data: FileResponse) => void): Promise<FileResponse>;{
data: File
success: boolean
}copyFile(entity: string, fromType: string, toType: string, fileName: string, newfileName: string, fromrelPath?: [string], toRelPath?: [string], callback?: (error: T1CLibException, data: FileResponse) => void): Promise<FileResponse>;{
data: File
success: boolean
}moveFile(entity: string, fromType: string, toType: string, fileName: string, fromrelPath?: [string], toRelPath?: [string], callback?: (error: T1CLibException, data: FileResponse) => void): Promise<FileResponse>;{
data: File
success: boolean
}renameFile(entity: string, type: string, fileName: string, newfileName: string, relPath?: [string], callback?: (error: T1CLibException, data: FileResponse) => void): Promise<FileResponse>;{
data: File
success: boolean
}getFileInfo(entity: string, type: string, fileName: string, relPath?: [string], callback?: (error: T1CLibException, data: FileResponse) => void): Promise<FileResponse>;{
data: File
success: boolean
}inittabspath = [ "C:\", "Users", "user1", "Desktop", "folder1" ];
inittabspath = [ "C:\Users", "user1", "Desktop", "folder1" ];
inittabspath = [ "C:\Users\user1\Desktop\folder1" ];initPath = [ "Users", "user1", "Desktop", "folder1" ];
initPath = [ "/Users/user1/Desktop/folder1" ];initPath = [ "home", "user1", "Desktop", "folder1" ];
initPath = [ "/home/user1/Desktop/folder1" ];createType(entity: string, type: string, initPath: [string], modal?: boolean, timeout?: number, callback?: (error: T1CLibException, data: TypeResponse) => void): Promise<TypeResponse>;{
data: Type
success: boolean
}createTypeDirs(entity: string, type: string, relPath: [string], modal?: boolean, timeout?: number, callback?: (error: T1CLibException, data: FileListResponse) => void): Promise<FileListResponse>;{
data: FileList
success: boolean
}updateType(entity: string, type: string, timeout?: number, callback?: (error: T1CLibException, data: TypeResponse) => void): Promise<TypeResponse>;{
data: Type
success: boolean
}deleteType(entity: string, type: string, callback?: (error: T1CLibException, data: boolean) => void): Promise<boolean>;{
data: boolean
success: boolean
}

launchctl load com.t1t.t1c.api.plistsudo defaults write /Library/Preferences/com.apple.security.smartcard useIFDCCID -bool yesdefaults read /Library/Preferences/com.apple.security.smartcard.plist useIFDCCIDhe domain/default pair of (/Library/Preferences/com.apple.security.smartcard.plist, useIFDCCID) does not existsudo defaults write /Library/Preferences/com.apple.security.smartcard useIFDCCID -bool nonetsh int ipv4 show dynamicport tcpProtocol tcp Dynamic Port Range
---------------------------------
Start Port : 49152
Number of Ports : 16384netsh interface ipv4 show excludedportrange protocol=tcpProtocol tcp Port Exclusion Ranges
Start Port End Port
---------- --------
53180 53189 *
* - Administered port exclusions.netsh int ipv4 delete excludedportrange protocol=tcp startport=51980 numberofports=10netsh int ipv4 set dynamic tcp start=54000 num=10511core.readersExcludeByName("Bit4id", callback);{
"data": [
],
"success": true
}
C:\Windows\SysWOW64\vcruntime140.dllComputer\HKEY_LOCAL_MACHINE\SOFTWARE\Microsoft\VisualStudio\14.0\VC\Runtimes\X64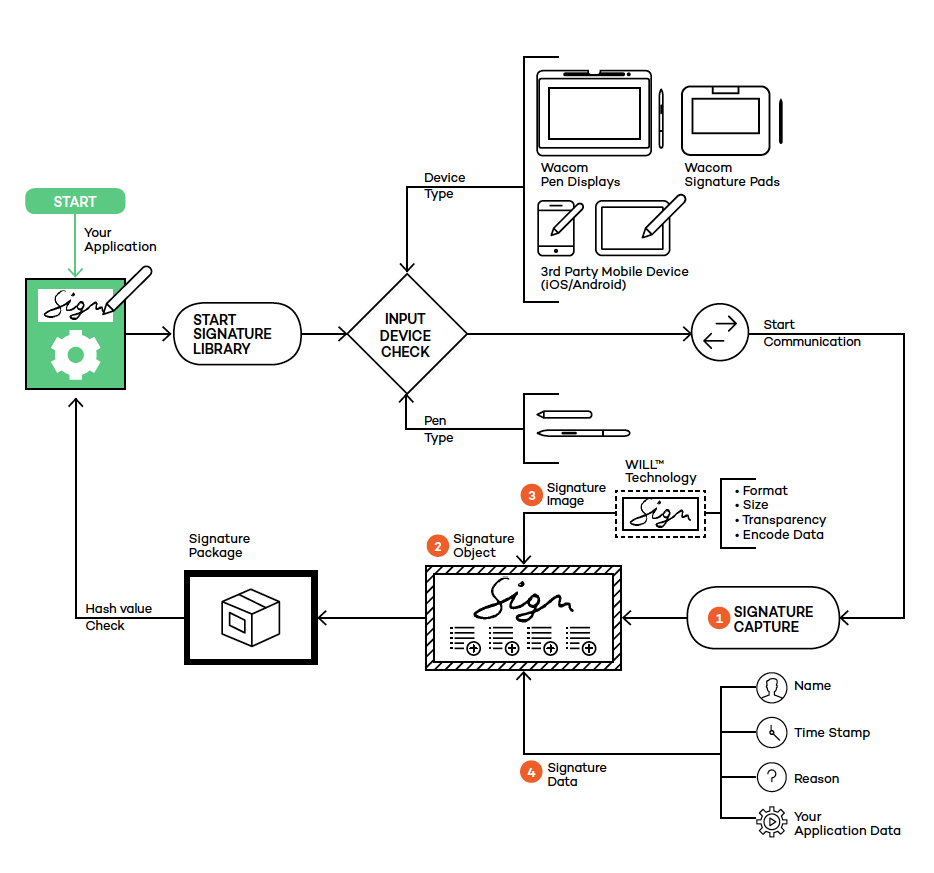
net stop winnat // stop
net start winnat // start<?xml version="1.0" encoding="UTF-8"?>
<!DOCTYPE plist PUBLIC "-//Apple//DTD PLIST 1.0//EN" "http://www.apple.com/DTDs/PropertyList-1.0.dtd">
<plist version="1.0">
<dict>
<key>Label</key>
<string>com.t1t.t1c.acc.api</string>
<key>Program</key>
<string>/Users/michallispashidis/Library/Application Support/Trust1Team/Trust1Connector-Acceptance/t1c-acc-api</string>
<key>ProgramArguments</key>
<array>
<string>/Users/michallispashidis/Library/Application Support/Trust1Team/Trust1Connector-Acceptance</string>
<string>-f</string>
...
<string>-x</string>
<string>51883</string>
<string>--log</string>
<string>none,t1c_rust_api=info</string>
<string>--env</string>
<string>prod</string>
</array>
<key>RunAtLoad</key>
<true/>
</dict>
</plist>
<string>none,t1c_rust_api=info</string><string>none,t1c_rust_api=debug</string>sudo defaults write /Library/Preferences/com.apple.security.smartcard useIFDCCID -bool yesdefaults read /Library/Preferences/com.apple.security.smartcard.plist useIFDCCIDhe domain/default pair of (/Library/Preferences/com.apple.security.smartcard.plist, useIFDCCID) does not existsudo defaults write /Library/Preferences/com.apple.security.smartcard useIFDCCID -bool no