Loading...
Loading...
Loading...
Loading...
Loading...
Loading...
Loading...
Loading...
Loading...
With the latest systems of Apple they have switched over from Intel to Arm processors. Apple has provided a translation layer between application that are compatible with Intel but not with Arm.
In the Trust1Connector we have 1 component which relies on this translation layer for some functionality.
During installation on these systems it can show as a "successfull installation" but the installation folder is still missing.
in the console
logs it will show an error that an installation of Rosetta 2 is necessary.
The solution is to enable rosetta 2 and then re-install the Trust1Connector application.
you can enable Rosetta 2 with the following command (administrative password is required)
This page summarized 'know' solution for connector connection troubleshooting
The issues described in this document will specifically tackle the following topics;
DNS rebind
DNS resolving
Use of proxy and or firewall
DNS rebinding is a method of manipulating resolution of domain names. In the case of the Trust1Connector we use a domain to resolve to localhost
or 127.0.0.1
. We do this because Self signed certificates are not allowed by browsers and using an insecure protocol from a secured website is not allowed either.
Some routers prevent DNS rebind, the name for this is DNS rebind protection. They will prevent domains that resolve to private network ip's, such as 127.0.0.1
.
For the Trust1Connector to work this settings must be disabled or the domain t1c.t1t.io
must be whitelisted. How to do this should be provided in documentation from your ISP or Router vendor.
In some cases customers will have their own custom DNS server for various reasons. When this DNS server does not have the domain t1c.t1t.io
which should resolve to 127.0.0.1
it can cause the customer to prevent using the software.
The issue will typically show up as "Could not find the installation".
To resolve this the domain should be either resolved by the DNS server or the hosts file should be updated.
Modifying your hosts file enables you to add a fallback to the domain name system (DNS) for a domain on a specific machine.
Modifying your hosts file causes your local machine to fall back to the Internet Protocol (IP) address that you specify.
Modifying the hosts file involves adding an entries to it. The entry contains the IP address to which you want the DNS to resolve and a version of the Internet address.
When the connector is not reacting, but the installation has succeeded, a DNS Rebind policy can forbid the communication form a web application to the connector's domain name. The default domain name used is: t1c.t1t.io
Other than DNS rebind, a DNS server not containing the necessary resolutions for localhost
or t1c.t1t.io
can cause the same issues as a DNS rebind problem.
There are 2 approaches to fix DNS rebind issues:
update the 'host' file of the device (needs admin rights)
update the local router which enforces the DNS Rebind
And 2 for when the configured DNS server does not contain the name resolutions;
update the 'host' file of the device (needs admin rights)
Ask the network administrator to update the DNS server to include name resolutions for localhost
and t1c.t1t.io
to 127.0.0.1
The admin password will be asked in the command line. If you open the file with another editor, a pop-up will ask you for the administrator password.
The file will be shown (the example can be different from what is configured on your device)
We need to add an additional line to this file:
Open Notepad or an editor of choice and run as administrator the following file:
The contents will look like this
We need to add an additional line to this file:
Select File > Save to save your changes. Restart your browser
In some cases there is need for a proxy service by the organization or network. Here this setting can be enforce on a System level and on a browser level. On the system level this can be applied via the settings of the Operating system but can also be applied by policies (GPO) from the infrastructure/network.
There is a protocol that can do domain resolution based on a Proxy PAC file, which is used by browsers specifically, this is a Javascript file which is hosted on the network infrastructure for browsers to download and execute to determine domain name resolution.
Another typical case we see is where a firewall is defined which can have certain rules preventing the Trust1Connector to function. For this we ask the administrator to make sure that the following points are tackled;
The domain(s) should be reachable (t1c.t1t.io and ds.t1t.eu)
The program is running on 3 TCP ports, 51983 and 2 dynamically allocated ones, we ask to have the default port (51983) to be allowed by the firewall
An anti-virus has functionalities to protect you from malicious software components. When an anti-virus is present on your device, please allow the connector processes to be trusted and allowed to connect to the web.
More information on 'known' solution for anti-virus services can be found: Troubleshooting
When your windows machine has Windows hello for business available it will show up as an available card reader. This device shows up as an available card but cannot be interacted with like other card readers.
You can exclude this from returning on the reader endpoints by using the readersExcludeByName
function
This exclude readers will search for the term in the reader names and exclude those that match with the term
Starting from v3.8.8 the VCRuntime is statically linked and will not require additional installation from the user.
Open Explorer, and go to %localappdata% or (C:\Users\xyz\AppData\Local\Trust1Connector)
Double click (launch) the .exe file: 't1c-launch'.
If you see the following:
Then you need to make sure that VCRuntime is installed for Windows. You can find the latest versions here:
Checking whether the VC runtime is installed can be done via the file explorer or via regedit.
For the file explorer you need to check if the following file is present
Via regedit you need to check for the following key
See the dedicated section on how to sovle DNS Rebing:
The Smartcard service is a Windows service that manages the connection to the eID and card reader. Therefore, this service must be running for you to be able to access the eID. You can check this as follows:
Open "Windows Services".
Search for "Smartcard service" as shown in the following screenshot:
Check the following Smartcard service settings (based on the screenshot above):
The status column for the Smartcard service shows 'Running'.
The 'Log On As' column shows 'Local Service'.
Are the Smartcard service settings NOT as they should be? Then do whichever of the following two options applies:
1. The Smartcard service is not running.
Start the Smartcard service, as follows:
Double-click the Smartcard service.
Click 'Start' and then 'OK'.
2. The Smartcard service is not logged on as a 'Local Service'.
Double-click the Smartcard service.
Select the second tab, 'Log On'.
Select 'This account'.
Click 'Browse'.
In the white text box, type: loc.
Then click 'Check names'.
The name 'Local service' now appears in the text box.
Then click 'OK'.
Leave the password boxes empty.
Click 'Apply'.
Click 'OK'.
Go back to the first tab, 'General', and restart the service.
Click 'Start'.
Click 'Stop'.
When installing the T1C the possibility of the errors 2502 or 2503 originate from the fact that permissions in the temp folder (C:\Windows\Temp) are not correct, and since the MSI installer relies on this they need to be correct. You need to have permissions next to the administrator rights.
You need to have permissions as <My User> next to the administrator rights.
The Trust1Connector and some installation files are digitally signed. On some machines however the Trust1Connector is flagged/blocked by an antivirus. Disabling the antivirus temporary can allow the user to install the Trust1Connector for some antivirus tools. Below we provide procedures for some antivirus softwares to be able to install the Trust1Connector.
If the user receives an notification that a script from the Trust1Connector is blocked as shown below:
When using the Kaspersky and kaspersky web protection you can add an exclusion rule to the belfiusweb page. After you added this rule, restart the computer to make sure all settings are applied.
If the connector is not starting with the error message: "Can not contact the DS service"
Go to the user folder in %LocalAppData%
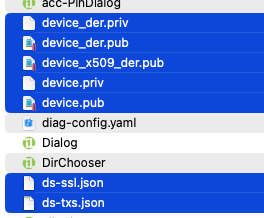
Go to connector folder and remove the selected files below:
Restart your pc or mac, and the restart will re-initialise the device keys.
The problem should be solved after executing this step.
In some cases the Support Desk will ask for a HAR file. This means an export of the functions that a web-page is executing. This is to see that all the functions that call the Trust1Connector are executed correctly.
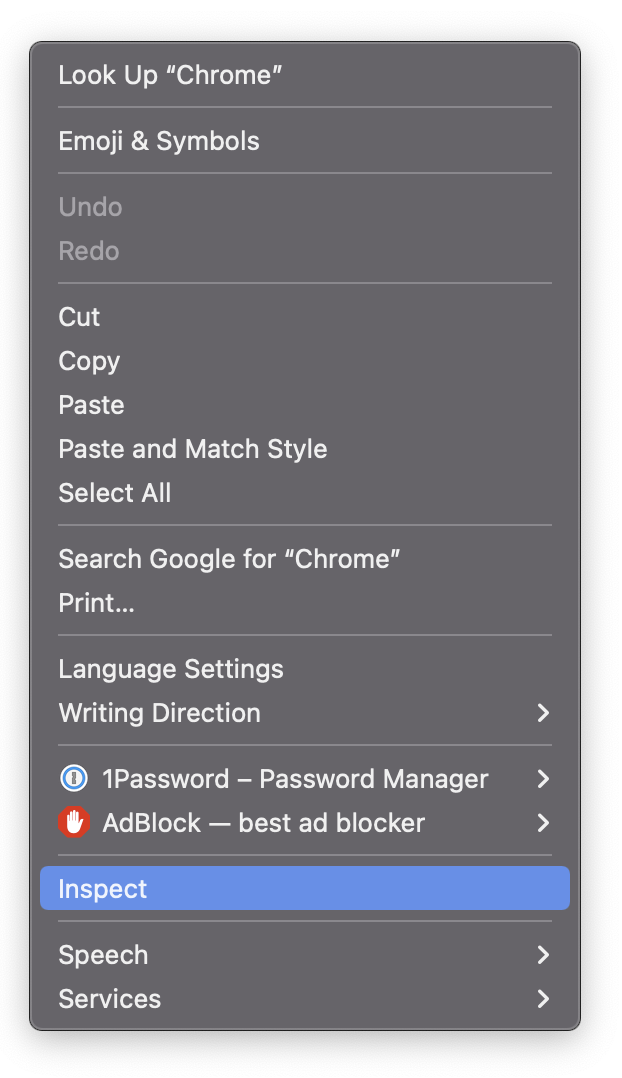
Before you use the web application open the developer tools. This can be done by right clicking and click on inspect
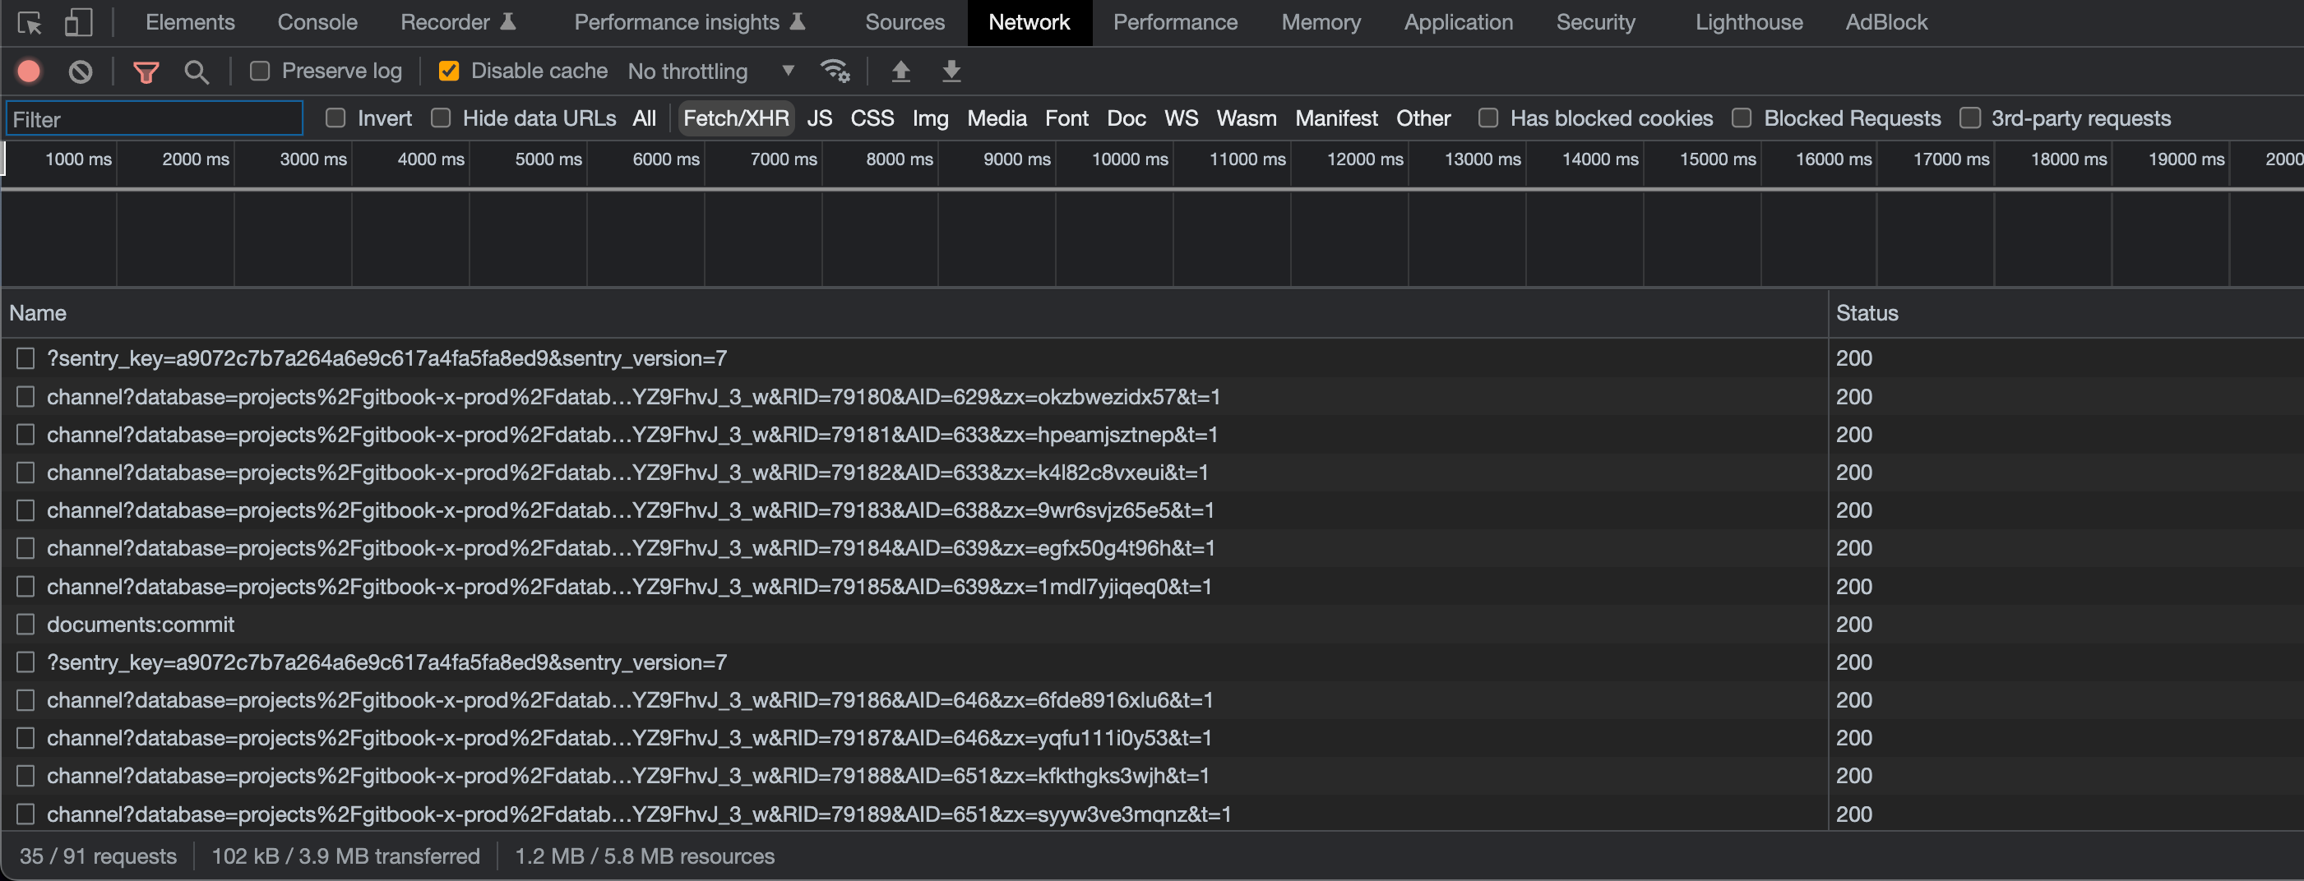
This will open a window like this
Next navigate to the network tab in the inspect
window
When this is done, use the web application's functionality and when you are finished or come to an issue you can use the download button to get a HAR file, save the file to your system and send this to the Support Desk
The Smartcard service is a Windows service that manages the connection to the eID and card reader. Therefore, this service must be running for you to be able to access the eID. You can check this as follows:
Open "Windows Services".
Search for "Smartcard service" as shown in the following screenshot:
Check the following Smartcard service settings (based on the screenshot above):
The status column for the Smartcard service shows 'Running'.
The 'Log On As' column shows 'Local Service'.
Are the Smartcard service settings NOT as they should be? Then do whichever of the following two options applies:
1. The Smartcard service is not running.
Start the Smartcard service, as follows:
Double-click the Smartcard service.
Click 'Start' and then 'OK'.
2. The Smartcard service is not logged on as a 'Local Service'.
Double-click the Smartcard service.
Select the second tab, 'Log On'.
Select 'This account'.
Click 'Browse'.
In the white text box, type: loc.
Then click 'Check names'.
The name 'Local service' now appears in the text box.
Then click 'OK'.
Leave the password boxes empty.
Click 'Apply'.
Click 'OK'.
Go back to the first tab, 'General', and restart the service.
Click 'Start'.
Click 'Stop'.
When installing the T1C the possibility of the errors 2502 or 2503 originate from the fact that permissions in the temp folder (C:\Windows\Temp) are not correct, and since the MSI installer relies on this they need to be correct. You need to have permissions next to the administrator rights.
You need to have permissions as <My User> next to the administrator rights.
The Trust1Connector and some installation files are digitally signed. On some machines however the Trust1Connector is flagged/blocked by an antivirus. Disabling the antivirus temporary can allow the user to install the Trust1Connector for some antivirus tools. Below we provide procedures for some antivirus softwares to be able to install the Trust1Connector.
If the user receives an notification that a script from the Trust1Connector is blocked as shown below:
When using the Kaspersky and kaspersky web protection you can add an exclusion rule to the belfiusweb page. After you added this rule, restart the computer to make sure all settings are applied.
If the connector is not starting with the error message: "Can not contact the DS service"
Go to the user folder in %LocalAppData%
Go to BelfiusConnector folder and remove the selected files below:
Restart your pc or mac, and the restart will re-initialise the device keys.
The problem should be solved after executing this step.
In some cases there is a possibility that the system is not able to retrieve the domain information, in this case the T1C is not usable. To solve this problem you can follow these steps described here;
More information can be found here;
The procedure at can be used to solved the issue.
In some cases there is a possibility that the system is not able to retrieve the domain information, in this case the T1C is not usable. To solve this problem you can follow these steps described here;
More information can be found here;
The procedure at can be used to solved the issue.
The Trust1Connector is using 3 different network ports for communication, For the Trust1Connector by Trust1Team these are ;
Registry, fixed 51983
(51883
for the acceptance version)
API, dynamically assigned
Sandbox, dynamically assigned
In some rare cases the windows system prevents a range of TCP ports to be used by applications, this is called an exclusion range.
You can see the dynamic port range by executing the following command in a terminal
The output will look like the following
For the exclusion range you can use the following command
This can look like the following, this can differ from your system
To remove the listed port ranges from the exclusion range you can use the following command.
This will make sure that starting of 51980 there are 10 ports allowed to be used by other applications.
In some cases you will need to stop winnat
before having access to the exclusion range
After updating the exclusion range you need to restart winnat
If the steps above did not solve your issue you can also update the dynamic port range with the following command. This will move the port range to start from 54000 and have 10511 available ports to be used.
Smart Card Reader Issues Tracker for Sonoma
On MacOS we make use of the launcd service to automatically start the Trust1Connector upon startup of the machine. In some cases where users have installed certain antivirus or antimalware software it will prevent launchd services to startup immediately. The reason here being that the antimalware or antivirus software should be the first that start up so it can controll the launchd services.
In this case the Trust1Connector will not be started and will receive an error on the launchd.
This can be solved to add a KeepAlive
flag in the launchd service.
Go to the LaunchAgents folder and unload the Trust1Connector service
Then open this plist
file in a text editor and add the keepalive flag under the RunAtLoad flag.
Then save this and reload the service
after this you should restart your computer.
A short fix for Mac Sonoma, more details below in the section 'Overview'.
Execute the following steps:
Open a Mac Terminal
Execute command: sudo defaults write /Library/Preferences/com.apple.security.smartcard useIFDCCID -bool yes
Unplug smart card reader from USB port
Restart Mac
Plug smart card reader back in USB port
The fix has been applied and you should be able to sign a document or authenticate
Starting from OSX Sonoma, smart card readers for Mac can fail for the following use cases:
detect card reader
execute transaction (digital signature or authentication)
The general end-user experience is that the smart card communication fails (card reader disseappears or the transaction fails).
A very great shout-out to Ludovic Rousseau who initially did a follow-up on impact of smart card readers in Sonoma:
The initial solution prior to 11/2023 was very elaborate, but was made easy by applying a single command in a MAC OSX terminal:
The command switches the MAC OSX implementation of the CCID drivers to the legacy version (the version working prior to Sonoma).
As MAC OSX defaults using a custom CCID implementation, which still have some issues, switching to the old version is a temporary stolution.
Form a specific moment (not at the time of writing), switching back to the default CCID implementation can be done using the following commands (in a terminal):
Check if the built-in Apple CCID driver is active
If the former command results in:
This means that the built-in Apple driver is active.
The result is 1 so the "external" (non-Apple) CCID driver is enabled.
Returning back to default, execute:
After executing a driver switch, we have noticed that a restart is mandatory!
You need to unplug your smart card reader from the USB port, and plug it back in after restarting
Issues related to device time not in sync
The connector can only work when the device date/time is correctly set. This is due to the security applied on exchanged tokens and keys.
When a connector has been installed on a device, at a moment which is in the past (other day/time), this results in the connector not working, even though the date/time has been set correctly on the system (post-installation).
To solve this problem the followin steps need to be executed:
remove all device related keys
restart the connector
Go to the installation folder of the connector:
%localappdata%/Trust1Connector
Delete all security relate files (selected below):
Those files are:
device.priv
device.pub
device_der.priv
device_der.pub
device_x509_der.pub
ds-ssl.json
ds-txs.bck
Those files will be automatically generated by the connector after the next step
Restart the connector by executing the 't1c-launch'
The process will be stopped, and restarted. The 't1c-launch' process must stop running, and the new processes will trigger the re-generation of the new keys.
Due to this action, the device performs a new registration to the Distribution service, this can be verified in the api.log file (in the /Logs folder)
Go to the installation folder of the connector:
cd ~/Library/Application\ Support/Trust1Team/Trust1Connector/
Open the folder in finder:
open .
Delete all security relate files (selected below):
Those files are:
device.priv
device.pub
device_der.priv
device_der.pub
device_x509_der.pub
ds-ssl.json
ds-txs.bck
Those files will be automatically generated by the connector after the next step
Use the terminal to open the connector installation folder:
cd ~/Library/Application\ Support/Trust1Team/Trust1Connector
Execute the t1c-launch to restart
./t1c-launch --restart
The process will be stopped, and restarted. The 't1c-launch' process must stop running, and the new processes will trigger the re-generation of the new keys.
Due to this action, the device performs a new registration to the Distribution service, this can be verified in the api.log file (in the /Logs folder)
Instructions on how to enable 'debug' logging on a production device
By default, the connector has tracing set to 'info', which limits logging output to it's bare minimum.
For unexpected issues in production, the debug flags have been compiled in the connector, but they are not activeated by default.
This page describes how to enable debug logs for OSX and Windows.
The debug level can be modified throught the launchagent on OSX.
The possible values are: info|warn|debug
Go to the directory of the launch-agents:
cd ~/Library/LaunchAgents/
A connector .plist file can be found (depending on the partner, the naming is different):
Default Trust1Connector launch-agent:
com.t1t.t1c.api.plist
The file has a parameter declaring the log level:
The following line can be modified for example to 'debug' log level:
for example:
update to 'debug' level
After modifying the launch-agent, the service must be restarted. To do so, you need to use launchctl:
Stop the service:
launchctl unload com.t1t.t1c.api.plist
Start the service:
launchctl load com.t1t.t1c.api.plist
The activity monitor can be used to verify if the processes are started correctly:
Go to the logs-folder where the connector is installed (depends on the partner configuration), by default:
cd ~/Library/Application\ Support/Trust1Team/Trust1Connector/logs
Open the log file and notice the debug logging appears :-).
The connector, upon installation, creates a Windows registry entry to start when a device reboots/restarts. The entry declaration can be found when using the 'registry editor' on Windows with the following path:
[HKEY_CURRENT_USER\Software\Microsoft\Windows\CurrentVersion\Run]
What happens is that the t1c-launch
executable is called to bootstrap/initialize the connector processes. After a succesfull bootstrap, the t1c-launch process is killed, and the following 3 processes are running:
In some cases, the t1c-reg.exe will not be running. When that's the case, the connector installed on the device is running in standalone mode. Standalone mode is the mode used when the device is NEVER part of a shared environment (VDI, Citrix, Remote desktop, ...). By default, the connector is installed with a registry process running along the api and sandbox process.
On Windows, the process to enable a different log level is easier than with Mac OSX.
You just need to call the t1c-launch process with additional command line parameters.
To find the t1c-launch binary, you typically can find it in the 'LocalAppData' folder of the logged-in user:
In Windows Explorer type the following path:
%localappdata%
Select the folder from the partner who's connector has been installed:
Open a terminal command, you can do this by starting a n ew command terminal form the Menu Search, or by typing: 'cmd' as a path in the Windows Explorer (opens a terminal window directly in the present folder).
Execute the launcher with new parameters:
t1c-launch --restart --log "none,t1c_rust_api=debug"
Go to the logs-folder where the connector is installed (depends on the partner configuration), by default:
%localappdata%/Trust1Connector/Logs
Open the log file and notice the debug logging appears :-).
The Trust1Connector by default will check and see if a DNS rebind issue has been detected or not.
If this is the case it will try to add a line to the host
file. This file requires administrative rights to update so a pop-up will appear.
This will look like the following in windows.
If you want to prevent this from happening you can update the Registry key to disable this
The following table indicates which key must be updated with which value
Default
Computer\HKEY_CURRENT_USER\Software\Microsoft\Windows\CurrentVersion\Run
Trust1Connector API
C:\Users\{YOUR_USERNAME}\AppData\Local\Trust1Connector\t1c-launch.exe --env prod --silent --fix.dns.rebind false
Standalone
Computer\HKEY_CURRENT_USER\SOFTWARE\Microsoft\Windows\CurrentVersion\Run
Trust1Connector API
C:\Users\{YOUR_USERNAME}\AppData\Local\Trust1Connector\t1c-launch.exe --env prod --silent --fix.dns.rebind false
Admin
Computer\HKEY_LOCAL_MACHINE\Software\Microsoft\Windows\CurrentVersion\Run
Trust1Connector API
C:\Program Files\Trust1Connector\t1c-launch.exe --env prod --silent --fix.dns.rebind false
A reboot is required for this to take into account